


How to use Radiant Photo Smart Presets
Saving time by using shortcuts in photo editing is a key skill to learn, and Radiant Photo's Smart Presets help you do exactly that. Here's how to use them.
As a photographer, post-processing is essential for me to bring my photographic vision to life.
However, there are times when I need to edit photos quickly and in bulk without sacrificing edit quality.

Download the latest version of Radiant Photo to follow along with this simple tutorial.
Start a free 14-day trial today
That’s where Radiant Photo’s Smart Filters come in as a lifesaver.
These advanced filters use AI to detect the scene and simplify the editing process.
With Radiant Photo Smart Filters, I can achieve professional-looking results in just a few minutes.
Understanding Radiant Photo Smart Filters
Presets are a set of predefined adjustments that can be readily applied to a photo.
Radiant Photo Editor takes it to the next level with its automatic Smart Presets.
i) What makes Radiant Photo Smart Presets different?
Unlike normal presets, Smart Presets are powered by AI and equipped with automatic detection, which means they analyze the lighting, subject and scene to recommend the right adjustments.
ii) Smart Presets available in Radiant Photo
There are 13 different categories of scenes in Radiant Photo, which would cover almost all photo scenarios for most photographers.
When you load a photo into Radiant, it quickly reads its content and matches it with the most accurate category based on the scene.
There are three groups of Smart Presets in Radiant:
Radiant Photo-Pro: The presets in this group work best for photos that didn’t go through any kind of post-processing or had just basic adjustments made.
Presets in this group produce a strong effect.
Radiant Photo—Subtle: The Smart Presets in this group have a moderate effect on the photo.
This group is recommended for photos that have already gone through some kind of editing, either in-camera or post-production.
In my experience, it’s also the best group to choose in most cases.
My Smart Presets: This category contains the custom smart presets you’ve created. I’ll cover this in detail in the next section.

Smart Preset categories in Radiant Photos:
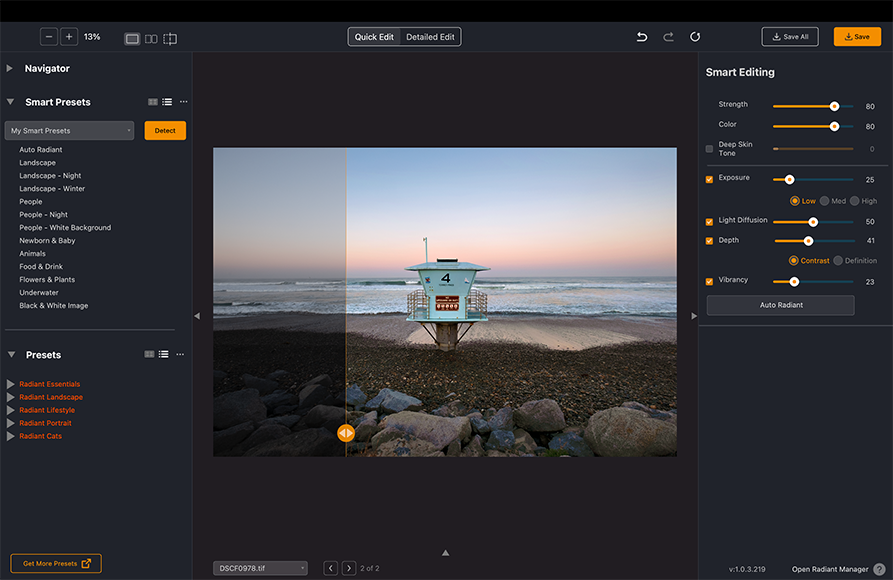
1) Auto Radiant: When this setting is used, the photo is automatically fixed if the scene doesn’t fit into any of the other categories.
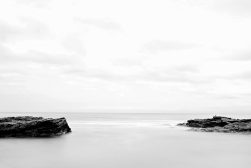
2) Landscape: This covers all photos that fall under the Landscape genre, be it a seascape, waterfall, architecture , or a mountain photo.
It also works for photos with people surrounded by the landscape. (See how to enhance landscape photos with Radiant Photo.)
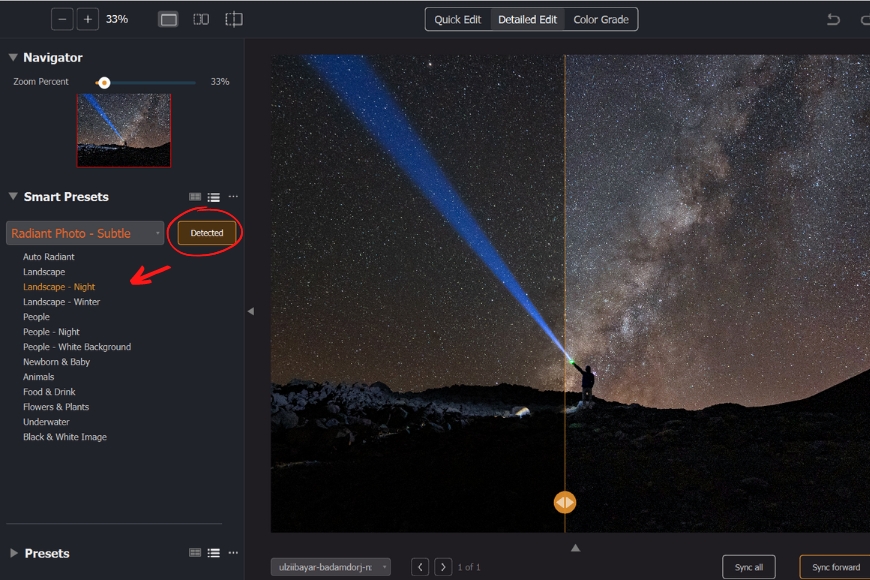
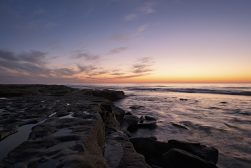
3) Landscape-Night: This is the best preset for night landscape and Astro-landscape shots.
Check the before and after in the example below.
4) Landscape-Winter: Getting accurate colors in the snowy conditions is still a challenge with most cameras.
This preset intelligently corrects color and tint in winter landscape photos.
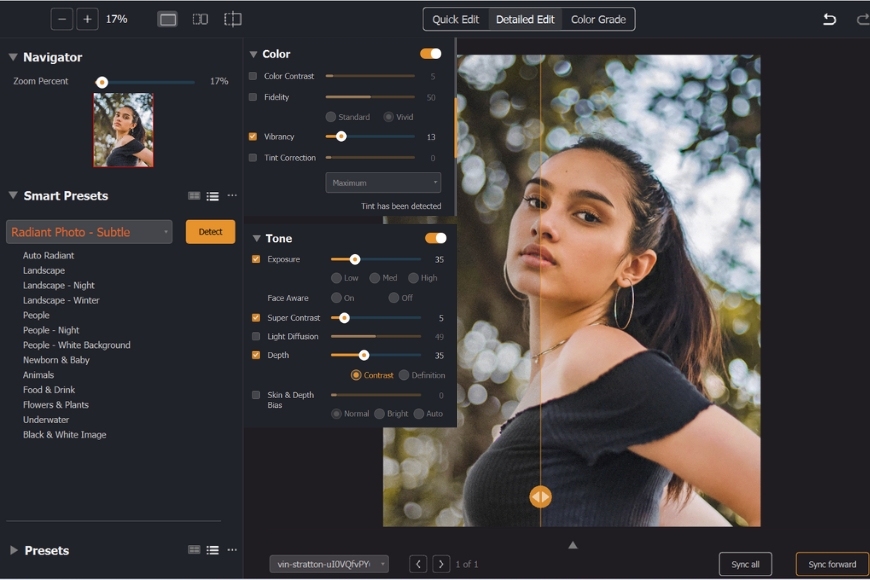
5) People: This Smart Preset corrects the skin tone, add depth to the portraits, and also relight if required.
It automatically analyzes the face and makes appropriate adjustments to exposure and contrast.
(See how to optimize faces with Radiant Photo.)

6) People- Night: Save your nighttime portraits with this preset. It makes necessary adjustments to your photo while maintaining the feel of the night.
This preset reduces graininess while preserving fine details.
7) People – White Background: Use this preset to get a squeaky clean white background in portraits.
It gives you accurate white balance and color while keeping the white background properly exposed.
8) Newborn & Baby: With this preset, you get accurate skin tones in photos of babies.
It applies soft and subtle corrections that are perfect for the skin of the little ones.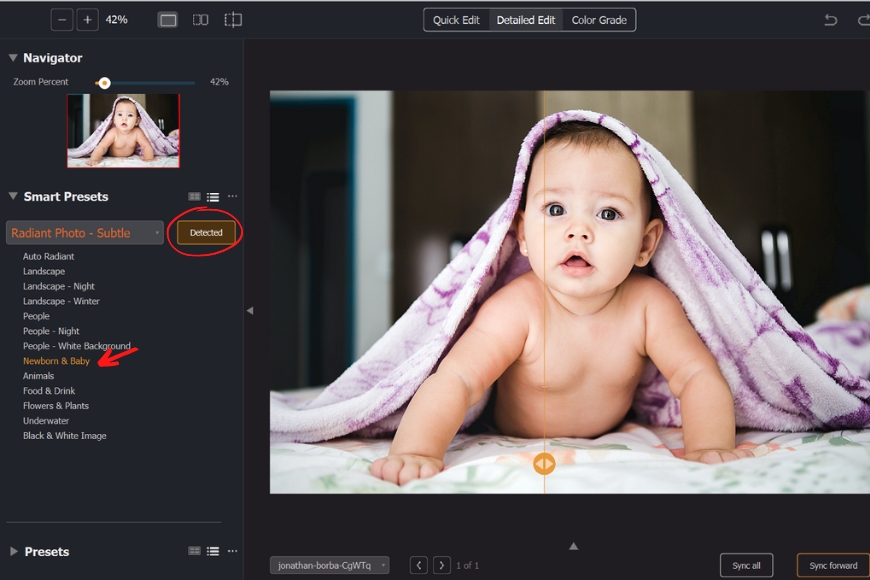
9) Animals: Make corrections to photos of your pets or other animals with this smart preset.
It automatically analyzes the body of the animal in the picture and adds selective exposure, color and contrast adjustments.
10) Food &Drink: Ever shot dull photos of otherwise delicious-looking food?
This smart preset adds depth and makes your food pop out in the photo. It also adds sharpening and corrects tint.
11) Flowers & Plants: Cameras sometimes struggle to capture accurate colors in flowers and plants.
This preset solves the problem by restoring the colors and adding sharpening to the details.

12) Underwater: Photos shot underwater may look flat and discolored without correction.
You can add depth, lift shadows, and restore highlights in your underwater photos with this preset.
It also intelligently detects people and marine life and make necessary corrections.
13) Black & White Image: Bring out the details in black and white pictures with this preset.

In many cases, a photo can be matched with more than one category, which gives you the option to choose the desired scene.
Using Radiant Photo Smart Presets
Radiant Photo makes it super easy to use smart presets. It’s an automated process and doesn’t involve many steps.
However, you can fine-tune a few settings to create your own look.
Selecting and Applying Smart Presets in Radiant Photo
i) Importing images into Radiant Photo: Click on File> Open and navigate to your desired location, then import the photos.
Alternatively, you can also drag the images to the working area or use the shortcut Ctrl+O on Windows or Cmd+O on Mac.
ii) Selecting the Smart Preset Group: There are three groups of presets with different intensities of adjustment.
Radiant Photo-Pro applies a stronger effect and is best for raw, unedited images.
Radiant Photo-Subtle is better suited for photos that went through processing in camera or in the post-production stage.
In this example, I’ve used Radiant Photo-Subtle.
As you can see, the photo is already looking better. However, I’ll change a few settings to make it closer to my vision.
iii) Fine-tuning the category selection and adjustments:
Radiant Photo analyzes the scene and matches it with one of the categories. However, you can also choose a category that you like.
I’ve chosen People-Night for this example. You can see how it drastically reduced the noise.
Also, I’ve increased the exposure quite a bit and slightly raised the vibrancy.
Creating Custom Smart Presets
With custom Smart Presets, you can have both automatic adjustments and control over the final effect.
This feature allows you to predefine a smart preset as per your liking.
That is, even though it analyzes the scene in the photos and selects a matching category, it still applies your custom settings to that scene.
Creating your own Smart Preset in Radiant Photo:
Step 1: Open an image that represents the category for which you want to create a Custom Smart Preset. Check if Radiant Photo is detecting the scene correctly.
Radiant detected Landscape as expected in this example.
Step 2: Select My Smart Preset from the group selection dropdown.
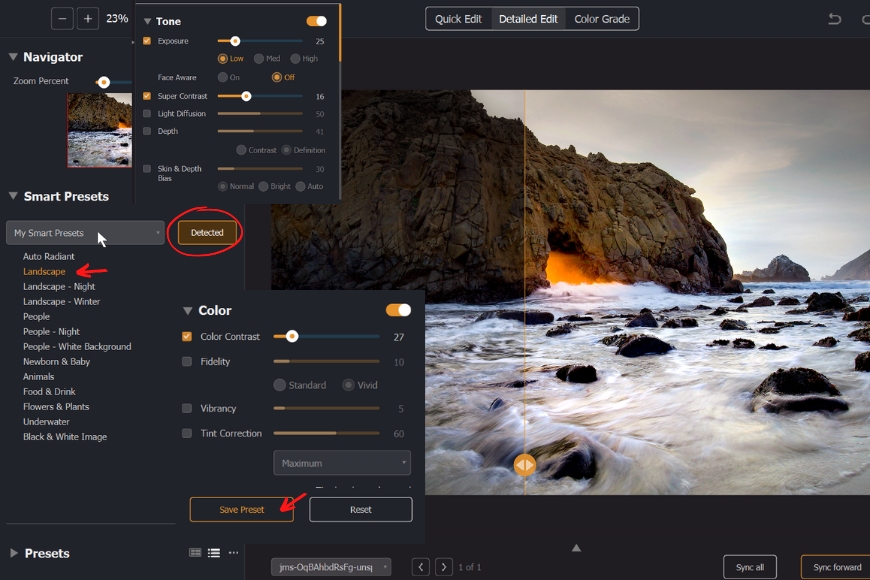
Step 3: Make tone, color, and detail adjustments as per your liking.
Step 4: Click Save Preset, add a description if you wish, and choose the My Smart Presets group.
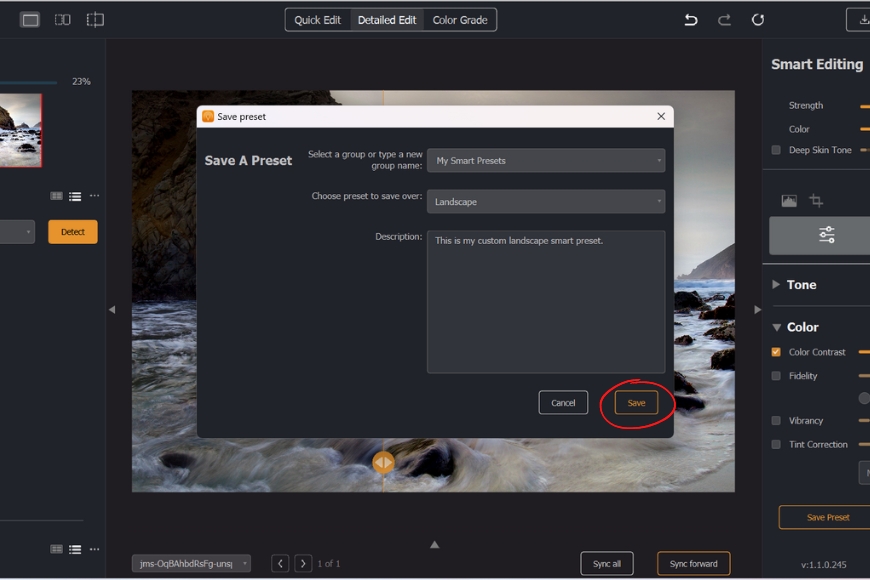
Step 5: Click Save again
Saving Your Photo
Click the “Save All” or “Save” button on the top right corner to save your work.

You can also click File > Save As or use the keyboard shortcut Ctrl+Shift+S.
In the next window, pick the desired location, name, and quality settings you want, then click Save.
Final Thoughts
Radiant Photo helps photographers work faster and better.
It’s a game-changer for those looking to make their post-processing workflow more efficient.
Smart Presets, in particular, is a quick and effective way to achieve professional-level results with just a few clicks.
With its fast AI editing, Radiant Photo would allow you to spend less time editing and more time capturing beautiful photos.
You'll Also Like These:
 Radiant Photo Review: Fast & Fully Customisable AI Photo Editor
 How to Get Started with Radiant Photo (A Beginners Guide)
 How to Create Fine Art Black & White Photos with Radiant Photo
 How to enhance Landscape Photography with Radiant Photo

Yatharth Gupta is a seasoned travel and street photographer with eight years of experience. He is also a blogger and loves to explore new places.

WELCOME TO SHOTKIT
Enter your email to be sent
today's Welcome Gift:
19 Photography Tools
🔥 Popular NOW:


Shotkit may earn a commission on affiliate links. Learn more.