


How to Use iPhone Camera Filters Effectively in 2023
Experimenting with filters on your iPhone is a great way to find a unique 'look' and style for your photos. In this guide, you'll learn how to use filters well.
Whether you’re a savvy photo editor or just learning to edit photos, it’s hard to deny the effectiveness of using iPhone camera filters for amazing photos.
Filters can add style, character, and mood to your iPhone photos. And understanding how they work allows you to control the look of your shots without manually manipulating each setting.

The fastest, simplest and most fun way to improve your smartphone photography skills this year.
Use link to save 80%
I had always avoided using filters in favor of manually adjusting my images. But even setting aside the inefficiency of that approach, I’m finding that taking advantage of photo filters can significantly elevate the quality of my iPhone photography with minimal effort.
This guide will help you capture high-quality photos using iPhone camera filters and teach you to take advantage of these valuable camera features.
- Related: 27 best iPhone camera accessories
What are iPhone Camera Filters?
iPhone filters are style presets in the native Camera app, Photos app, and many third-party apps that edit photos.
Filters allow you to take or create stylized photos without the need to adjust various settings manually.
Traditionally, a camera filter refers to an attachment that affixes to a lens to alter the light exposed to the film or sensor. Digital filters alter the image by applying effects and adjustments over the initial exposure.
What are the Built-In Filters in the iPhone Camera App?
The native iPhone camera app, as well as the native photos app, come equipped with nine filters. You can apply these while you take a picture or during the editing process.
In the Camera app:
- Open the app.
- Tap the arrow icon at the top center of the screen.
- A menu will appear above the shutter button with some adjustment options.
- Tap the icon that looks like a 3-circle Venn diagram
 .
. - You will be presented with ten options; nine photo filters and original. Select your desired filter.
- Your screen will display the camera image with the filter applied.
In the photos app:
- Open photos
- Tap edit in the top right of the screen
- At the bottom, you will see the same 3-circle Venn diagram you did in the camera app. Tap this.
- Again, the photo filter menu will appear below the photo with ten options; nine filters and original.
- Choose your desired filter. Underneath the filter, you will see a slider that allows you to adjust the intensity of the effects.
- Your picture will save to your camera roll automatically.
Let’s look at each of Apple’s photo filter presets.
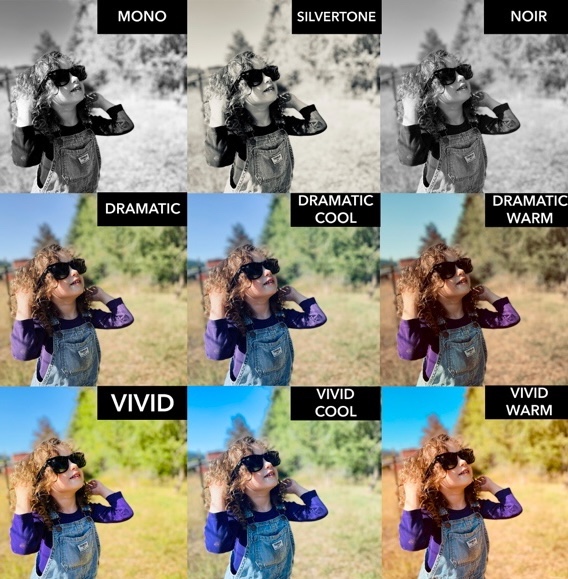
Vivid. The vivid filter bumps up the saturation and color contrast of the picture.
Vivid Warm. This applies the same settings as Vivid but with a warmer color temperature (i.e., more pronounced yellow hues)
Vivid cool. This applies the same settings as Vivid but with a cooler color temperature (a bluish tone).
Dramatic. The dramatic filter crushes blacks and dulls highlights creating a high contrast, slightly less saturated image.
Dramatic Warm. This applies the same settings as Dramatic but with a warmer color temperature.
Dramatic Cool. This applies the same settings as Dramatic but with a cooler color temperature.
Mono. Mono simply desaturates the image. In other words, classic black and white.
Silvertone. Silvertone is a black-and-white exposure with crushed shadows and slightly blown-out highlights for a shiny glowing look. As the name suggests, it gives the photo a silver look reminiscent of old or aged film (after all, silver is the photosensitive ingredient in analog film stock).
Noir. This is a moody, high-contrast black-and-white filter. Great if you’re going for that 1950s detective movie kind of look.
The intensity of filter effects can be adjusted when in edit mode in the Photos app. The default appearance is the maximum intensity, so you can turn it down for more subtle changes.
What are some popular filter apps for the iPhone?
Some third-party photo editing apps offer amazing filter presets beyond what the native iPhone apps provide.
Let’s look at a few of the most popular apps out there.
Adobe Lightroom

Adobe Lightroom is the industry standard program for photo editing. And for good reasons. Lightroom is probably the most robust photo enhancement app out there.
Lightroom is geared toward photographers who want to edit with maximum precision. With features like masking, healing, compositing, the ability to create collages and text overlays, and raw file processing, Lightroom gives you complete control of how your images are processed.
That said, it takes virtually no expertise to utilize any of the dozens of beautiful filter presets Lightroom has to offer. You can even create your own filters from customized settings you may have created manually.
The iOS version is free to download but offers only limited features. You will need a subscription to unlock Lightroom’s full range of capabilities.
It’s worth mentioning Photoshop for iOS has similar capabilities and is also free to download with limited access to features without a subscription. However, photoshop is most appropriate for complex image manipulation and graphic design.
Snapseed
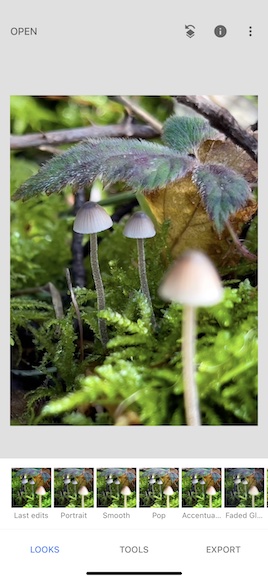
Until I started my shift to Lightroom for my photo enhancement needs, Snapseed was my go-to. It has an impressive range of tools considering that it is entirely free to use.
Developed by Google, Snapseed has 29 editing tools, and 13 filter presets.
It lacks some of the capabilities of Lightroom but is a little more accessible with an intuitive UI. And Like Lightroom, Snapseed can work with raw file formats.
So if you’re capturing with Apple ProRAW, you can fully take advantage of your iPhone camera’s photo-taking abilities.
VSCO

VSCO is a hugely popular app for adding filters to your photos. It boasts more than 200 filter presets and several advanced editing tools.
Another exciting feature of VSCO is its video editing capabilities. It allows you to apply the same filters and enhancements available for photo editing. And with an in-app camera feature, it is a self-contained photography environment.
One drawback is that VSCO does not support Apple ProRAW file format. So while you can still import and edit raw files with VSCO, it can only export your photos as JPGs.
Tips For Using Third-Party Apps Effectively
Third-party photo apps can significantly augment your editing abilities. Here are a few tips for effectively integrating these apps into your workflow.
Ensure the app you use can process the photo file type you use. I’m referring, in particular, to Raw files which, as mentioned, are not compatible with all photo editors.
Unedited raw files may not be especially attractive as they rely on the editing process to achieve complete creative control made possible by working with raw files.
Most photo editing apps are non-destructive, meaning you can apply filters without affecting the original photo. In other words, your photo filters are not necessarily permanent, and you have the freedom to tap cancel and revert pictures you’ve edited in native or third-party apps.
How to Choose the Right Filter for Your Photo
Choosing the best filter for your photo is largely a matter of preference. Filters help create mood, emotion, and character.
Some filters are intended for specific settings and subjects. For instance, a filter might be optimized for portrait mode, perhaps with particular skin tones or shot under natural light vs. artificial.
You’ll see filters that recreate familiar themes and styles, such as old, grainy film. Other filters may target some aspects of an image, like the sky or the subject.
Honestly, the best way to choose the right one is to experiment with a different filter until you find the one that speaks to you.
How To Add Photo Filters To The iPhone Camera
As I mentioned, the native photos app has nine filters presets. So if you want to add filters, the best way is to find a third-party photo filter app with Photos extensions.
An extension allows you to use all of the features of a third-party app directly within the native photos app. You can search the app store for programs that offer Photos extensions.
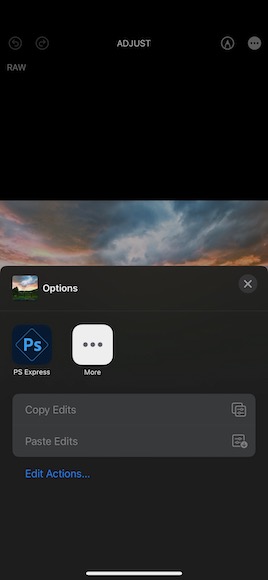
Open Photos, tap edit, then the more button (…) to bring up an options menu.
Any installed apps that come with extensions are listed. Select the app you want to edit in, and without leaving the app, the third-party editor’s interface will open up and allow you to manipulate as desired and save your edits to the camera roll.
FAQ’s
Can You Save Photo Filters on an iPhone?
You can set your phone to preserve the last used camera settings so that your camera doesn’t revert to its default settings each time you open the app. The best way to access additional and custom filters on your iPhone is to use a third-party editor with a Photos extension.
Can you use filters on videos shot on the iPhone Camera?
You can add filter effects to your videos, live photos, photos shot in portrait mode, and timelapse videos when in edit mode in the Photos app.
Does the iPhone camera have a beauty filter?
The native camera app does not have a filter specifically designed to enhance a person’s attractiveness. However, such filters are available on third-party photo editing apps.
Check out these 8 essential tools to help you succeed as a professional photographer.
Includes limited-time discounts.
You'll Also Like These:
 Essential Camera Lens Filters in 2023 (How to Choose & Use Them)
 Best UV Camera Lens Protection Filters in 2023 to Prevent Damages
 27 Best iPhone Camera Accessories to Use in 2023
 Best Camera App for iPhone in 2023
 iPhone Photo Academy Review (March 2023 Update)

WELCOME TO SHOTKIT
Enter your email to be sent
today's Welcome Gift:
19 Photography Tools
🔥 Popular NOW:


Shotkit may earn a commission on affiliate links. Learn more.