


Use These iPhone Camera Settings for BEST Results
Grab your iPhone and dial in these camera settings to ensure every photo you take will look its best. Includes FAQs about the iPhone camera too.
If you’re trying to up your game as a mobile photographer, you’re probably wondering what iPhone camera settings will give you the best results.
Letting the auto mode on your iPhone camera do all the work for you will still yield impressive shots. But to capture beautiful, dynamic photos, you want as much control as possible.

The fastest, simplest and most fun way to improve your smartphone photography skills this year.
Use link to save 80%
Most of my best photography happens when I’m traveling, often enough at times when I’ve left my DSLR at home. So typical.
But when I take complete creative control of my camera mode, I don’t miss my DSLR so much.
Once you master these iPhone camera tricks, you will be surprised by how much a little customization can elevate the quality of your pictures.
What Are The Best iPhone Camera Settings?
To make your iPhone pictures better quality in 2023, here are the camera settings I recommend:
AF/AE Lock
Your iPhone camera’s autofocus feature does an excellent job of recognizing the subject of your photo and adjusting focus accordingly. This is true of the autoexposure function in terms of ensuring a properly exposed shot.
But with any auto-something feature, the camera makes decisions for you.
It’s not always the case that the subject is prominent and at the center of the screen. So to set focus/exposure yourself, you can tap the screen over the part of the shot you want in focus or optimally exposed, and the camera will adjust.
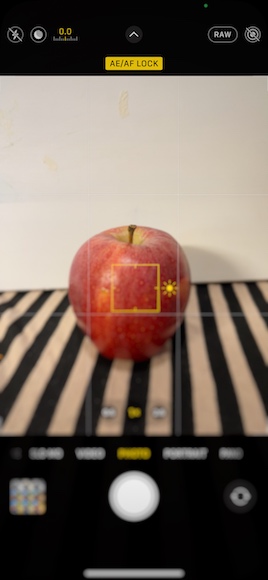
But when you tap and hold your finger on the intended focus point, you enable AE/AF Lock, which is indicated when [AE/AF lock] appears on the screen.
This prevents the camera from auto-adjusting the second the camera or the subject moves. I find it especially useful when shooting video, given the subject is likely moving and the focus adjustment is apparent during the shot.
Use the Grid

Enabling the grid feature is extremely valuable in helping you compose your shot. When you use the grid, your camera app displays grid lines over the camera image that will not appear on the captured photo.
The grid helps you align your shot, place the subject where you want it, and follow the rule of thirds for a beautiful composition.
To turn on the grid feature, go into the settings app > camera > under composition toggle on Grid.
Burst Mode
Burst mode might be one of the more valuable iPhone camera settings. It lets you take multiple high-speed shots for the duration of the action you’re trying to capture, ideal when taking photos of a moving subject.
A single tap of the shutter may result in a blurry image of a moment that’s gone before you realize you missed it.
To take burst photos, open the camera app, press the shutter button, and drag it to the left. The camera will continue to take rapid shots until you release the shutter.
In camera settings, you can select to use the volume up button for burst (by default, a single tap of the volume up button also works as a shutter release).
In the photos app, you will see your burst as a single thumbnail which you can select to view as individual photos and decide which one you like best.
Smart HDR
Smart HDR stands for high dynamic range. This setting is helpful when shooting in difficult or high-contrast lighting environments. Essentially the camera takes multiple photos in quick succession and combines the best elements of each to create an ideal exposure.
Based on the setting, your iPhone camera uses HDR mode by default. However, this may not always work to your advantage.
Shooting in HDR mode may result in a blurry subject. And sometimes, when you want a high-contrast shot, HDR will prevent it by heightening exposure where you want more pronounced shadows or darkening highlights.
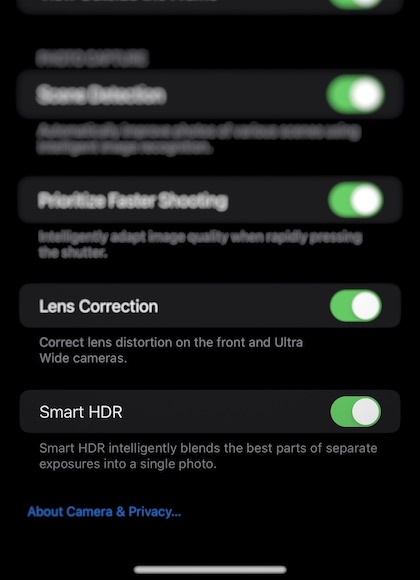
You can enable or disable HDR mode by going into settings > camera and toggling Smart HDR on or off at the bottom of the menu.
Lens correction
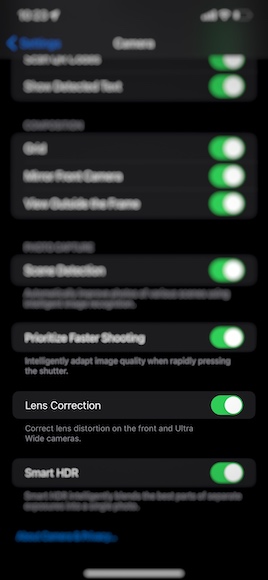
Your pictures may suffer from barrel distortion at certain focal lengths, especially wide-angle shots.
Barrel distortion is a warping of your image; think of a fish-eye lens effect. Lens correction fixes that.
Lens correction is a default setting when shooting with the Ultra Wide lens or using the front-facing camera.
While lens correction can give your shot a more natural look, there may be situations where you want the barrel distortion as a creative decision.
You can enable Lens Correction in the settings app under Camera.
Apple ProRAW
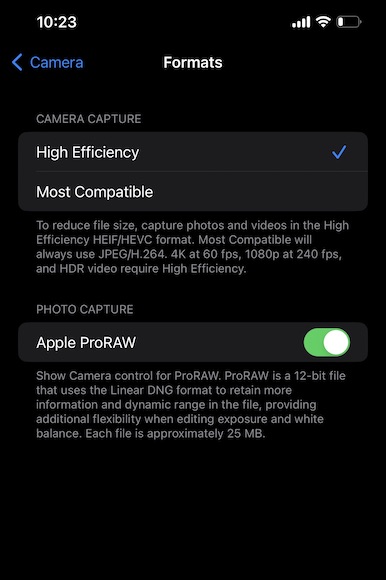
Apple ProRAW is apple’s version of the industry standard RAW file format.
RAW files, or digital negatives (DNG), capture considerably more information than JPEG or HEIF files. This gives you much more flexibility when editing your photos.
Keep in mind, however, that if you’re not editing your photos, you may find photos shot in Apple ProRAW will not look as good as you might want.
Shots often come out looking underexposed or flat. Again, the information is in the file, but, as with an analog film negative, the image will need processing to get that perfect exposure.
And with much larger files, RAW photos will take up more space in your drive. So when deciding when to shoot with Apple ProRAW, it’s important to consider your storage space and editing abilities. to switch raw on and off:
Portrait Mode
When in portrait mode, your iPhone lenses distinguish the subject of your shot to create a shallow depth of field effect. This means your subject is in sharp focus while the background is nicely blurred.
As the name suggests, portrait mode is ideal for portrait photography. However, you can certainly use this feature with non-human subjects.
Another exciting feature is portrait lighting. These are effects, not unlike a filter, that creates the appearance of different lighting environments, including:
- Studio light: makes facial features brighter
- Contour light: similar to studio light but with somewhat deeper shadows
- Stage light: creates the effect of a spotlight
- Stage light mono: similar to stage light but in black and white
- High-key light: Creates a black and white exposure with a completely white background.
Bonus tip: make sure you apply a cool camera filter to your shot too – the default iPhone camera filters are great in the latest iOS.
Night Mode

Night mode is a feature of iPhone 11 and later. This setting automatically activates when the camera app detects low-light scenes.
What night mode does is create a long exposure shot. It is the digital equivalent of opening the shutter for an extended period to allow as much exposure as is necessary for a clear image in a dark setting.
Depending on the available light, a night mode shot can take several seconds to capture.
With long exposure shots, any movement in the scene can appear blurry or out of focus. Therefore keeping the camera steady – ideally with a tripod – is the best way to get a clean shot.
As stated, night mode turns on automatically but can be disabled if needed.
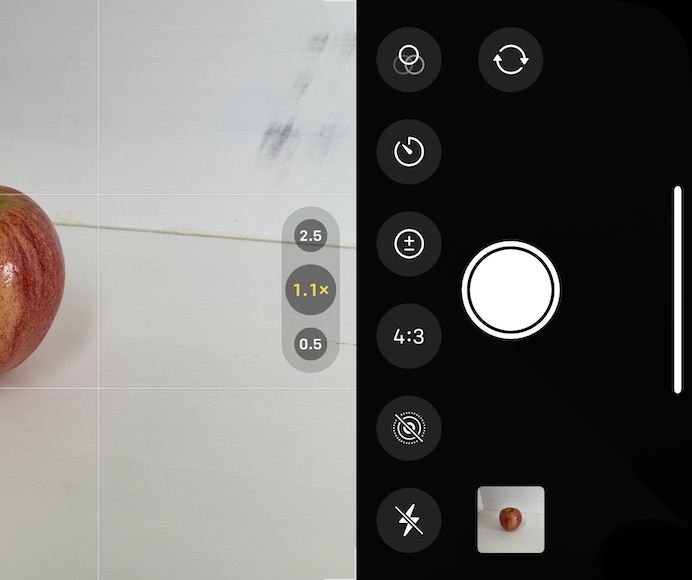
Macro Mode
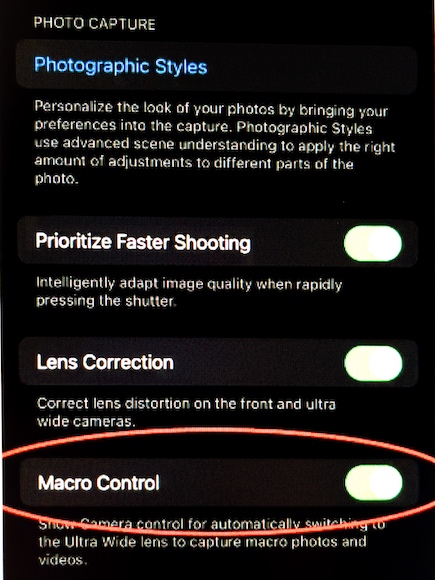
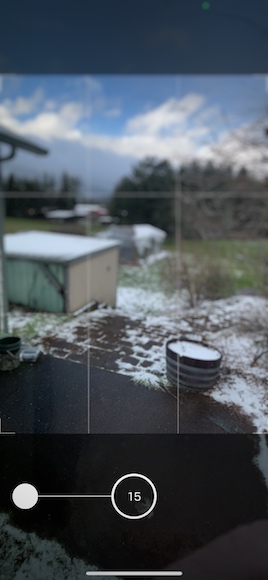
With the iPhone model 13 pro, 13 pro max, 14 pro, and 14 pro max, you can take extreme close-up shots with impressive detail. In Macro Mode, you can place your camera up to 2 centimeters from your subject and maintain perfect focus.
You can use Macro control while taking still photos, live photos, slow motion videos, and time-lapses.
Live Photos
Taking a Live Photo is exactly like taking a standard photo. But with this feature enabled, your camera captures the brief moments before and after you tap the shutter button.
The result is essentially a tiny video, with audio that you can play back by tapping and holding the thumbnail in the photos app. you can edit Live Photos the same way you’d edit a normal photo, but here you have the option to choose.
Preserve Settings
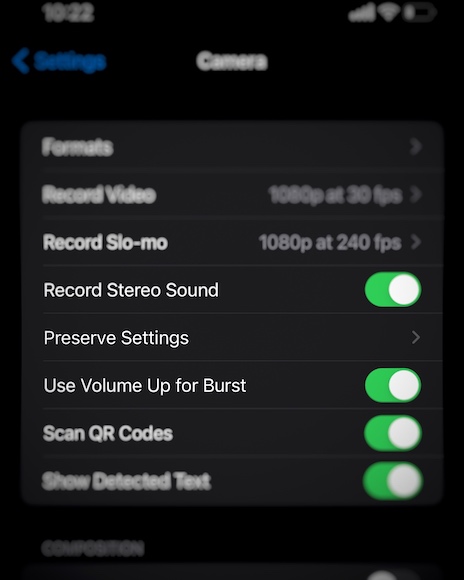
When you close your camera app, your iPhone will reset to its default settings. But you can preserve the last used settings by enabling this feature.
This will save you time and guesswork, so you don’t have to readjust to your preferred settings every time you open the camera app.
Timer
Moving the camera even slightly at the moment the picture is taken will cause your picture to come out blurry or out of focus. Sometimes just tapping the shutter button a little too hard is enough to ruin a shot.
Using the iPhone camera timer can eliminate this risk. When you set the timer, you can focus on keeping the camera steady while the iPhone camera takes the shot for you.
Video Recording
While I’ve been talking mainly about still photography, many of these iPhone camera settings are also for video recording.
One of the most important considerations when using your iPhone camera to shoot videos is resolution. The iPhone camera can record up to 4K resolution; In other words, cinema quality.
Frame rate is another important consideration when you record video. 24 frames per second (fps) has always been the standard for filmmaking, so when you are going for a cinematic look, 24 fps is what I would recommend. 30 fps is the video standard, 60 fps will give you a more fluid shot, and up to 240 fps for slow motion
How Do You Change Camera Settings on iPhone?
Where are the advanced camera settings on iPhone?
You can change the iPhone camera settings directly in the camera app or in the settings app.
When you open the camera app, tap the dropdown icon (^) at the top of the screen to reveal the in-app camera settings menu just above the shutter button. You can select any filters you want to apply, adjust exposure, set the timer, turn on/off raw capture, live photo, and night mode.
Otherwise, you can make these changes in settings under the camera menu.
Other FAQs about iPhone camera app settings
How do I reset my iPhone Camera settings to normal?
When you go into the camera menu in the settings app, tap on Preserve settings. If you deselect each option, your camera will reset to its default settings every time you close and reopen the camera app.
Which mode is best for taking photos?
This, of course, depends on your intentions. The best setting will likely vary considering the subject, the lighting environment, and whether/how you plan on editing your photo. Personally, I take advantage of burst mode when I can, but ultimately you’re going to want to experiment.
How do I change the front camera settings on my iPhone?
When possible, you can change the front-facing iPhone camera settings the same way you would for the rear-facing camera. One setting unique to the front-facing camera is Mirror Front Camera – found in Camera settings. With Mirror Front Camera enabled, the picture will appear as if you were looking at a mirror (words may look backward, your right is camera left), whereas disabling this feature will correct that.
What are the default iPhone camera settings?
The default iPhone camera settings aim to strike a balance between the best quality and efficiency. Some of the default settings include:
- Camera mode: photo (rather than video)
- Exposure/Focus: Auto
- Night Mode: Auto
- Apple ProRAW: Off
- Live photo: On
- HDR: On
- Lens Correction: On
- Grid Mode: Off
Check out these 8 essential tools to help you succeed as a professional photographer.
Includes limited-time discounts.
You'll Also Like These:
 Guide to Sunrise Photography (Camera Settings, Tips & Ideas)
 Guide To Low Light Photography (With Camera Settings & Tips)
 Easy to Understand Guide to Camera Settings for Beginners
 How to Shoot Night Landscape Photography (+ Best Settings)

WELCOME TO SHOTKIT
Enter your email to be sent
today's Welcome Gift:
19 Photography Tools
🔥 Popular NOW:


Shotkit may earn a commission on affiliate links. Learn more.