


How to use Filters in Photoshop Elements
Applying filters to images is a fast and easy way to change the way they look. Photoshop Elements offers plenty of built-in filters for you to experiment with.
By Jeff Collier
You can apply dozens of filters to your image when using Photoshop Elements to modify its appeal and overall condition.


Download the latest version of Adobe Photoshop Elements to follow along with this simple tutorial.
Start a free 30-day trial today
Using these filters provides a more straightforward and less time-consuming approach to cleaning up and retouching poorly structured photos.
In this piece, I’ll explain more about Photoshop Elements filters and how you can use them effectively.
Understanding Photoshop Elements Filters
The filters feature in Photoshop Elements makes it easy to edit and optimize your images without all the complexities involved in image manipulation.
Users also find them practical when applying special art effects or creating unique transformations through distortion effects.
You can also consider third-party filters from developers. Adobe allows these effects on the platform as plug-ins and will appear at the bottom of the Filter list once installed.
There are three ways to apply a filter on your image, and they include the following;
1. Filter menu, which contains all available filters and allows you to select and apply any individually.
2. Filter gallery where the platform displays thumbnail examples of the filter’s effect on your image. It allows you to apply filters or apply one effect more than once cumulatively.
The filter gallery approach also allows the user to rearrange filters and adjust their settings to ensure you achieve the ideal effect on your images.
Its flexibility when applying filters is among the main reasons most editors prefer this approach.
3. Filters panel to display a thumbnail example of each filter effect. You can use the panel to apply filters on your images when in Expert mode.
How to Use Filters in Photoshop Elements?
Photoshop Elements filters alter your image’s appeal, but you’ll have to correct the configuration process for quality results.
It would help to note that the available filters are either one-step or multi-step.
One-step filters don’t allow you to control the effect’s characteristics, while multi-step filters have a dialogue box to provide control over elements like filter intensity.
Here is a comprehensive guide on applying filters in Photoshop Elements
1. Choose the Area to Apply the Filter
The first step in our editing process is identifying and selecting the region we want to apply the filter in the image.
After opening the image to edit in the Photoshop Elements editor, select the layers you want to work on.
Applying filters on entire layers requires you to deselect any selected regions, then choose the entire from the Layers panel.
If applying on a layer’s portion, use the selection tools available to make a selection.
2. Choose How to Apply the Filter
Most beginners in Photoshop Elements do not understand the importance of finding the perfect filter for your picture.
Not all filters will guarantee you quality images; you need to take your time to know which effects will bring out the best look for your edits.
The approach used to apply the filters also determines how practical the effect is in your project.
Those using the Filter gallery approach should start by clicking Filter and selecting Filter Gallery. Select a category and choose the filter you want to apply in the edit.
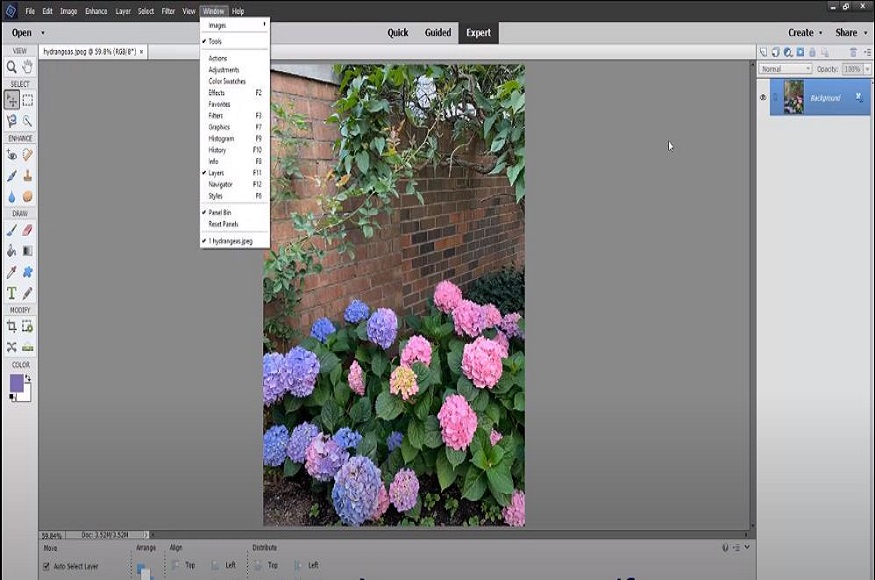
When using the Filters Panel to apply filters, choose Window and click on Filters. Choose a category from the list and double-click on the filter to apply.
If you use the Filter Menu, start by choosing Filter. Then select a submenu and click the filter to apply.
Filters whose names have an ellipsis (…) will display a dialog box for Filter Options when activated.
3. Configure the Filter
Multi-step filters allow users to further configure the effects characteristics by providing a dialog box to key in specific values.
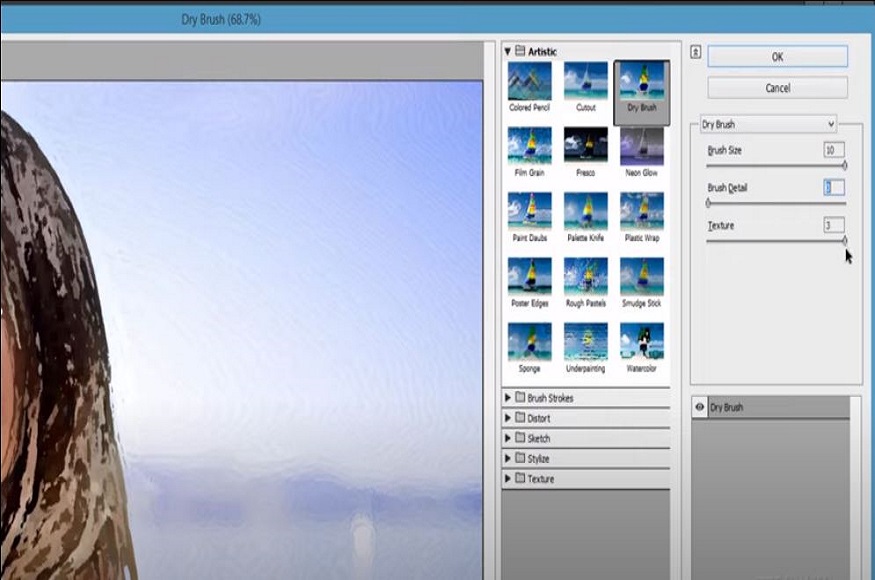
The dialog box automatically appears once you activate the effect and significantly determines how well the filter blends with your image.
When the dialog box appears, enter your values or select options for available presets.
4. Review the Changes
Photoshop Elements also provides users with a preview option to see the changes made by the effect while helping make adjustments.
You should select the Preview option in the document window to glimpse the outcome and identify where you might need to make changes.
In some instances, the preview option may not be available. Here are some practical approaches you can consider to preview the filter depending on the filter used and how you’ll be applying it;
- Zoom in and out by using the + or – button under the preview window
- Using the zoom bar, choose a zoom percentage for a closer look
- To center specific areas in the image window, click and drag in within the preview window
- To expand the preview area by hiding thumbnails, click the Show/ Hide button on the dialog box’ top
- You can also hide the effect in the preview image by clicking the eye icon next to the filter
If sliders are in the dialog box, you can hold down Alt or Option while dragging a slider for real-time rendering.
5. Using the Filter Gallery
The approach you decide to take when applying a filter to your images determines the features and tools you’ll use when editing.

Here is what to do for the best results when using the Filter gallery or of the filter opens in the Filter Gallery:
Click the New Effect Layer button at the bottom of the dialog box and select a filter to apply. You’ll need to add multiple effect layers on the image to use multiple filters.
You might need to rearrange the applied filters to change your image’s appearance. To rearrange a filter, drag its name to another position in your list of applied filters in the dialog box’ bottom.
To remove a filter, select it and click Delete Effect Layer.
6. Using the Filters Panel
If using the Filters panel to apply edits, you’ll start by selecting the filter you want to be applied.
After selecting a filter, do the following;
- Modify the filter’s intensity by adjusting the sliders
- For some one-click filters like Blur, you can add more effect by clicking the Apply More button
- Click the Advanced Options button to adjust the sliders and make modifications to the filters applied
Tips to Improve How You Apply Filters in Photoshop Elements
Using filters is among the few skills you’ll need to master to become an outstanding editor in Photoshop Elements.
In this section, I’ll give you some tips that helped me improve my filter skills in the platform. These tips include:
Preview the Result
One of the most time-consuming processes in photo editing is applying filters. Even with the integration of AI, using filters in your images is still hectic, especially when using Expert mode.
You can reduce editing time by previewing what a filter does in the Filter Gallery before applying it to your picture.
Most filters featured in Photoshop Elements allow users to preview their results in the document window and the Filter Options dialog box.
You’ll become better positioned to decide whether to apply the filter or cancel it after getting a preview, saving you time.
Not All Images Need Filters
Although filters aim to improve your picture’s appearance, it would be wise to note that they don’t work on all images.
Some filters will not provide quality results on images in a bitmap, indexed-color or grayscale mode, while others don’t work on 16-bit pictures.
It would also help to note that filters only affect the active and visible layer or a layer’s selection.
You Can Reapply Filters
Another tip for getting the most out of Photoshop Elements filters is to reapply previous filters on the same image.
Reapplying the effect means the filter will still use the previous configuration to enhance your image further.
How Will Using Filters in Photoshop Elements Improve Your Image?
Adding filters to your images in Photoshop Elements can improve their looks in several ways. It mainly depends on the type of filter used and the adjustments made before application.
Here are a few ways using Photoshop Elements filters will improve your image’s appeal;
Color Correction
It is common for pictures to come out with incorrect colors, either because of a camera defect or restraining conditions.
Some of the filters in Photoshop Elements prove effective in correcting color issues like the Levels or Auto Color Correction filter.
These filters allow the user to adjust your image’s contrast, brightness, and color balance for a more natural and pleasing feel.
Enhances Details
Using Photoshop Elements, you can also consider applying filters in your images to enhance specific elements.
Examples of these filters include the Sharpen or Unsharp Mask, which helps enhance image details for a sharper and more refined appearance.
They adjust the contrast between adjacent pixels to make an object’s edges more distinct.
Creates Special Effects
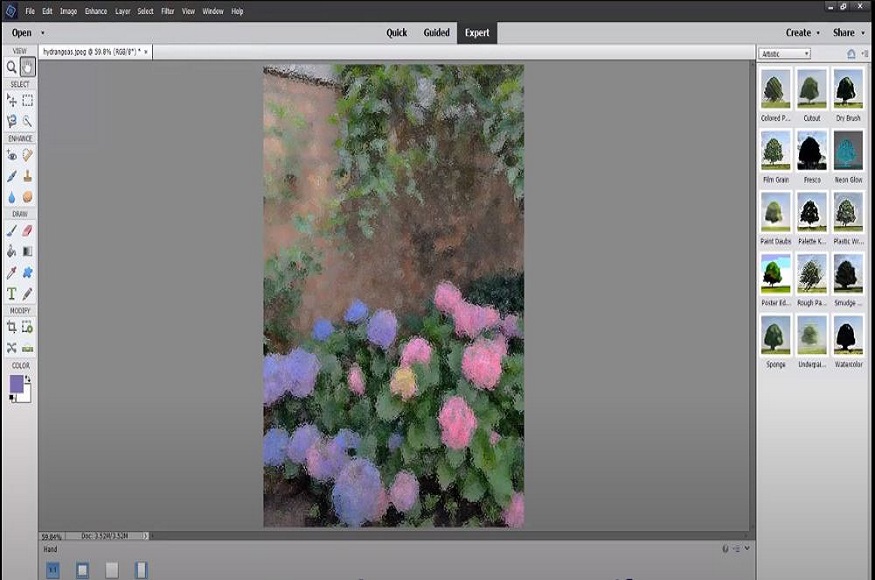
Another way applying filters in Photoshop Elements improves your image is by providing a more straightforward approach to creating special effects or adding artistic flairs.
For example, the Oil Paint filter makes your image look like it was painted with oils, while the Gaussian filter creates a soft and dreamy effect.
Removes Imperfections
Photoshop Elements filters also help correct the imperfections in your images.
Filters like Spot Healing Brush helps remove image imperfections like blemishes. They work by analyzing the surrounding pixels and blending them for a smoother image.
How Can You Load New Filters in Photoshop Elements?
You can access a library of filters when editing your images using Photoshop Elements.
Apart from the graphic effects provided by Adobe, artists and developers can also create and add new filters to the platform.
You’ll need to download and install these new filters before applying them to your photos.
Here is how to load new Photoshop Elements filters;
- Open the folder you saved the new filters on your computer and copy the filters.
- Open the file manager, click Computer, and open Local Disk (C).
- Find Program Files and double-click Adobe. Ensure you select your Photoshop Elements version, for example, Adobe Photoshop CS3.
- Double-click Plug-ins and Paste the new filters into the folder.
- Now Open Photoshop Elements and head over to the filter menu on the window’s top.
- Primarily, the software organizes filters by developers, meaning you need to know the developer’s name to find a filter. If you don’t remember the name, you can point to any folder and see a list of filters featured. To activate a filter, click on its title.
You'll Also Like These:

Jeff Collier is an experienced film photographer who enjoys experimenting with modern digital photography equipment, software and apps. He’s also an ex-world champion triathlete and avid cyclist, clocking hundreds of km each week in the beautiful Tweed Valley of northern NSW, Australia.

WELCOME TO SHOTKIT
Enter your email to be sent
today's Welcome Gift:
19 Photography Tools
🔥 Popular NOW:


Shotkit may earn a commission on affiliate links. Learn more.