


How to Use DaVinci Resolve in 2023: Beginner’s Guide
Learn how to unleash your creativity and bring your videos to life with this step-by-step guide on the free video editing software DaVinci Resolve.
By Andrew Dilks
With many video editing programs available, choosing the right one for your needs can be something of a minefield.
I’ve worked with a range of free-to-use editing suites but have often found their focus purely on editing leaves out important aspects of post-production.
Blackmagic Design’s video editing software DaVinci Resolve delivers a full post-production package capable not only of editing but also features a range of tools for colour grading and visual effects.
With many of these core features available in the free-to-use version, it’s not hard to see why it’s fast becoming the go-to video post-production suite for hobbyists and professionals alike.
While its comprehensive range of tools might be daunting for some, it’s an intuitive system that can be used to deliver great results and produce professional-looking video content.
I’ve put together this tutorial covering the basics of DaVinci Resolve, from setting up a project to adding text and special effects to make your videos pop out of the screen.
A Beginner’s Guide To DaVinci Resolve in 2023
DaVinci Resolve features a wealth of options for editing and post-production, and this guide will explore all the basics you need to deliver a polished video.
Whether you’re new to editing or looking to make the transition to DaVinci Resolve from another platform, this handy tutorial will prime you for creating and managing your upcoming projects.
Basic editing tools, audio mixing, and visual effects are also incredibly user-friendly to include. I’ll also touch briefly on the more advanced topic of colour correction and grading.
You can use any of your own video clips for this tutorial, or feel free to experiment with stock footage, which you can download from a variety of websites.
Step 1: Creating And Setting Up A New Project
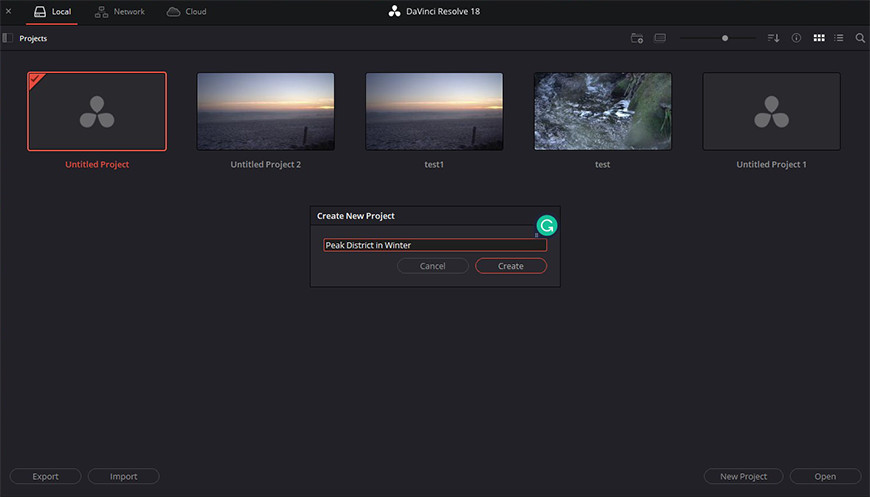
DaVinci Resolve Tutorial Step 1: Creating a new project
When you first open DaVinci Resolve, you’ll be given the option to load a pre-existing project or begin a new one, so to get started, select New Project and give your project a name.
Once you’ve done this, you’ll be presented with the main DaVinci display, but before you get started loading content, there are project settings you need to consider.
While these settings go into detail about how your project will function, for now, I’ll cover those beginners should be aware of when learning how to use the program.
Project Settings
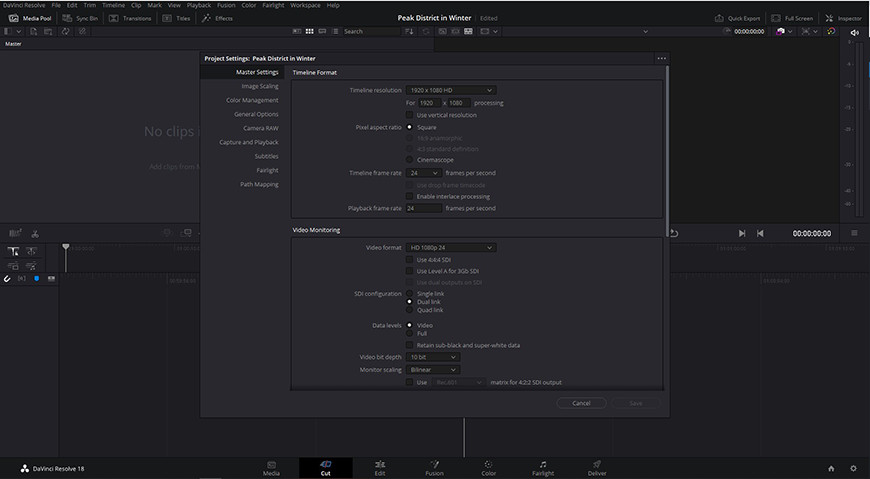
DaVinci Resolve Tutorial Step 2: Project settings
To open up the Project Settings for DaVinci Resolve, click on the cog icon found in the lower right corner of the interface to bring up these options.
The first thing you need to do is ensure your project’s Timeline Frame Rate is correct and matches the majority of the footage you’re editing.
DaVinci Resolve has this set to 24fps as default, so if this isn’t the rate you’ve shot your footage on, update this to the correct frame rate now.
If you’ve changed the timeline frame rate, you’ll also need to update the frame rate in the Video Format and Playback Frame Rate settings so that all of these match.
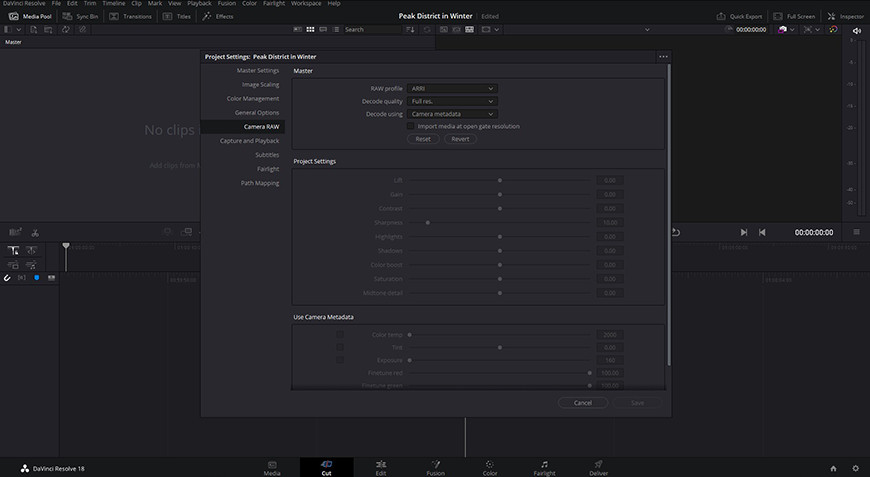
DaVinci Resolve Tutorial Step 3: Camera RAW settings
If you’ve shot your footage in RAW, you can also select the relevant camera manufacturer from the Camera RAW project setting.
The major camera manufacturers are all listed here, including Canon, Nikon, Sony, and, of course, Blackmagic.
This will ensure the camera’s metadata is imported into your project. and give you greater control over the footage for even better results.
Step 2: Importing Media
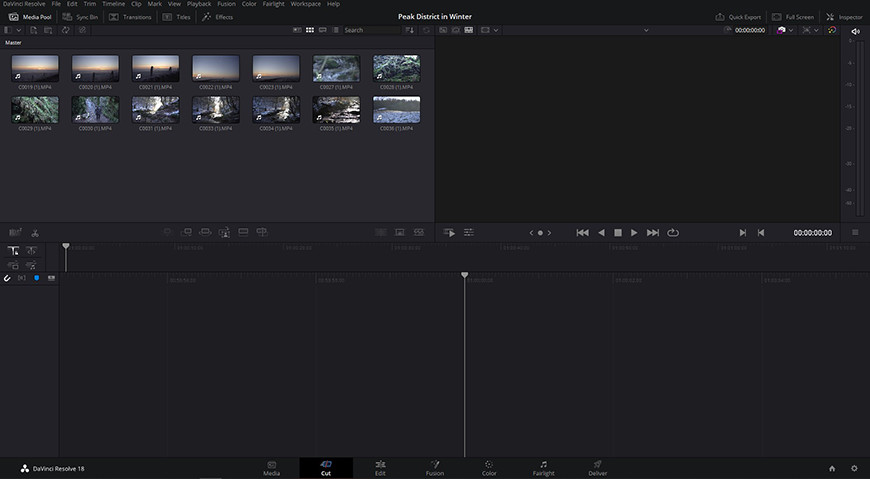
DaVinci Resolve Tutorial Step 4: Importing media
Once you’ve created your new project, it’s time to import the video clips and other media you want to use to cut together in your video.
DaVinci Resolve features a range of primary tabs used for different aspects of post-production, and you can import media easily in a variety of ways.
These include:
- Go to the menu bar and select File > Import > Import Media.
- Use the folder/file navigation menus from the Media Tab in the top left window.
- From the Cut tab and Edit tab, right-click in the Media Pool window and select Import Media.
- By opening the folder on your computer, selecting the media files you wish to use, then dragging these across to the Media Pool box.
While most of the media files you can import will likely be video clips, these can also include other file types that you might need to add to your project.
Images such as JPEGs and audio clips for music and sound effects can be imported into your media pool using the same steps outlined above.
Step 3: Trimming Clips
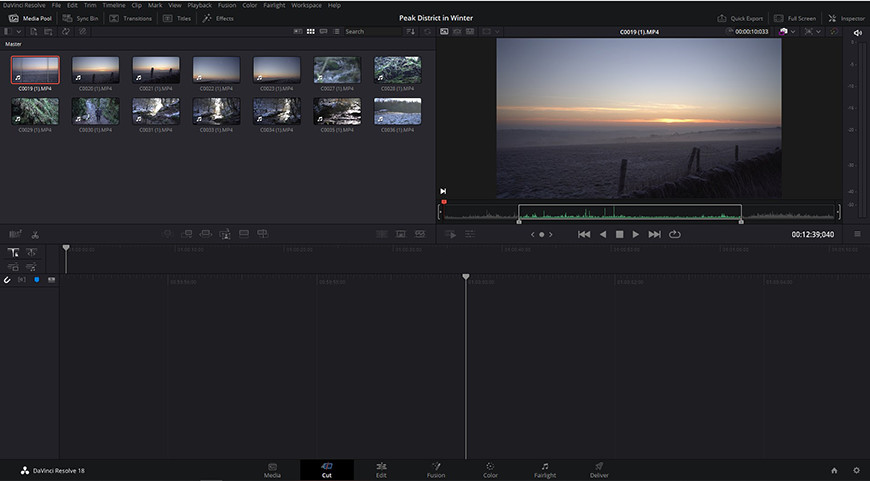
DaVinci Resolve Tutorial Step 5: Trimming video clips
Once you’ve loaded up all of the video clips and other media you wish to use, it’s time to trim the clips down and remove elements of the footage you don’t want to use.
To do this, head over to the Cut Tab, choose the clip you wish to trim, then double-click on the clip icon so it appears in the video preview window.
Once the clip is ready, follow these instructions to trim it down:
- Find the point in the footage where you wish the clip to begin and press I on the keyboard to mark the in-point.
- Find the point in the footage where you want your clip to end and press O on the keyboard to mark the out-point.
You can also mark these points by using the in- and out-point shortcuts by simply hovering the mouse over the clip thumbnail in the Media Pool.
If you need to change these markers at a later time, you can head back into the Cut Tab to update them, as well as use the relevant tools available in the Edit tab to further refine your clips.
Step 4: Adding Clips To The Timeline

With your clips edited to cut out any unwanted elements of the footage, you can now assemble these in DaVinci Resolve’s timeline, located in the Edit Tab.
To add a clip to the timeline, simply drag it from the Media Pool and onto the main timeline across the bottom of the screen.
As you introduce additional clips to the timeline, you can quickly rearrange them by dragging them to the position you’d like these to play in sequence.
You can review your edits as you go by dragging the red line play head to the start of the timeline and pressing the Spacebar to play your rough cut.
If you’re unhappy with any of the edits in your clips, you can further refine these and change the length of the shot by selecting the clip and altering the in-and out-points in the left-hand preview window.
Alternatively, you can select the Blade tool from the options at the top of the timeline and use it to make direct cuts to any clips loaded into the timeline.
Once you’ve made a new cut, use the Select tool to reposition these new clips elsewhere on the timeline or select them to delete from the edit.
Step 5: Including Transitions
DaVinci Resolve Tutorial Step 7: Adding transitions
Most video editing suites come with a range of transitions you can use to switch up the way one shot cuts across to another, adding more variety to the footage.
Basic transitions featured with DaVinci Resolve include cross-dissolve and fade-to-black, but it also comes with a range of transitions not available with more basic editing software.
Follow these simple steps to add a transition to your video project:
- On the Edit Tab, click on the Effects Library panel located at the top-left of the DaVinci interface.
- Select Video Transitions from the Toolbox, then click and drag the transition you wish to use onto the timeline, placing it between two video clips.
- Click on the Transition Icon in the timeline, then open the Inspector Panel located in the top right of the user interface.
- Change the settings in the Inspector Panel, for example, the duration of the transition and any other parameters you wish to alter.
DaVinci Resolve’s impressive selection of transitions offers plenty of scope for experimentation. I recommend playing around with these using different types of shots to see what results you can achieve.
Step 6: Adding Titles & Text
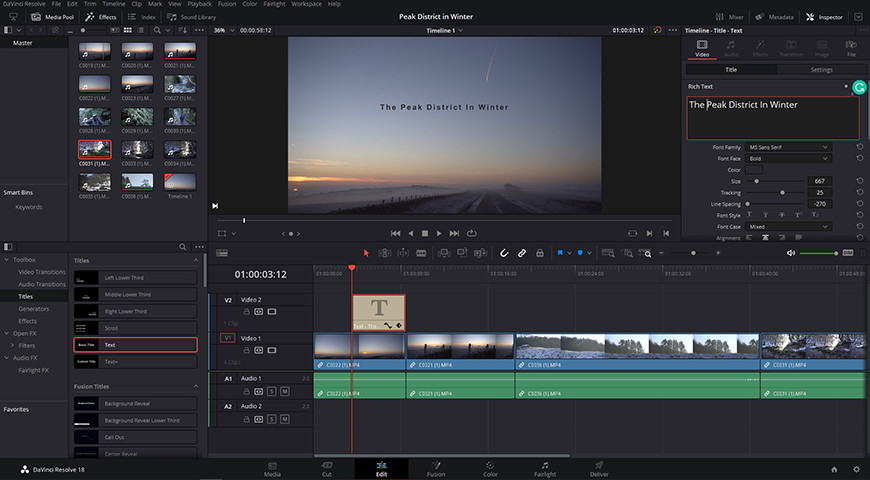
DaVinci Resolve Tutorial Step 8: Adding text and titles
There are two primary text tools you can use in DaVinci Resolve to introduce text and titles to your project: Text and Text+.
The former is optimal for quickly adding 2D titles to your video (or including subtitles), while the latter gives you more options for rendering more sophisticated titles using 3D shapes, particle effects, and other advanced effects.
It’s worth noting here that Text+ titles, which work in conjunction with Blackmagic’s professional compositing software, Fusion, can require significantly more processing power to render, so for the purposes of this tutorial, let’s stick to the basic titles.
Once again, you’ll need to click on the Effects Library panel to launch this feature, then select Titles from the Toolbox. Once you’ve done this:
- Click and drag the Text option into the timeline, placing it on a new layer above the video you wish the text to appear over.
- With the text clip selected in the timeline, open the Inspector Panel.
- In the Inspector panel, adjust the text, font attributes, and any other text formatting parameters listed here you wish to change.
Additional text options you can choose from the Titles include repositioning the text in different areas of the screen, introducing text scrolling, and an option dedicated to adding Subtitles.
The free version of DaVinci Resolve comes with an impressive selection of text-based tools, but for the full range of fonts, effects, and other bells and whistles, you’ll need to upgrade to the paid edition.
Step 7: Adding Effects
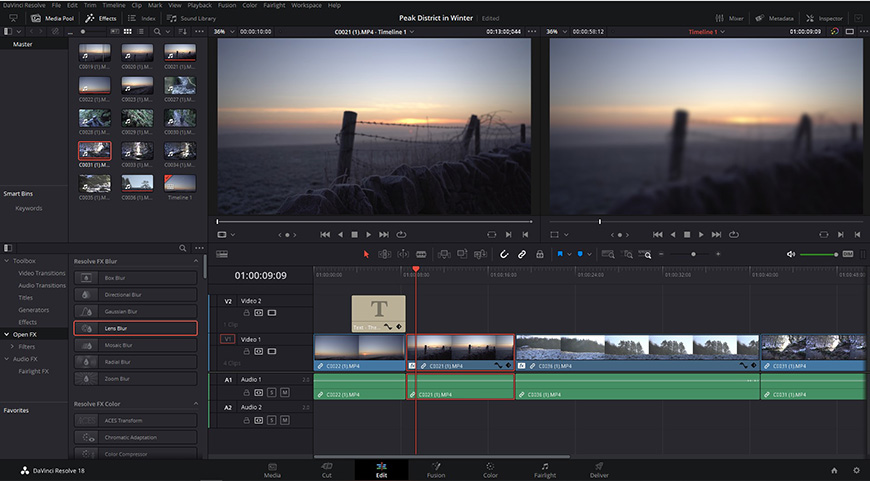
DaVinci Resolve Tutorial Step 9: Adding effects
Adding effects to your video project is easy and follows the same steps in the interface used to access the transition and text features I’ve covered above.
As with text and transitions, the free-to-use version of DaVinci Resolve offers a limited selection of effects plugins, but there are still plenty of options for beginners who are still getting used to the software.
To introduce effects to your project:
- On the Edit Tab, click on the Effects Library panel and select the OpenFX option on the menu.
- Select the effect you wish to use, then drag it from the list and onto the video clip you wish to apply it to.
- With the effect selected on the timeline, open the Inspector Panel and make any adjustments you wish to alter the effect.
- If you wish to remove an effect, delete it from the timeline, or use the trash bin icon from the effects menu.
If you wish to apply an effect throughout the entire timeline, you can do so by applying it to an Adjustment Clip, which can be found under Effects Library > Effects > Adjustment Clip.
Simply add Adjustment Clip to a new layer on the timeline, then go back to OpenFX and apply the effect you wish to use to this clip.
Step 8: Colour Correction
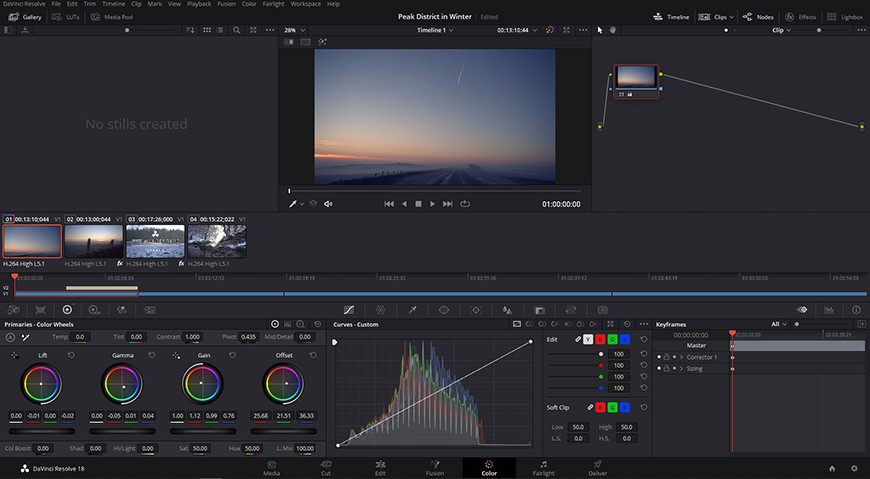
DaVinci Resolve Tutorial Step 10: Colour correction
One of the more advanced tools you’ll find with DaVinci Resolve that is often lacking in other free-to-use editing suites is the Colour Tab, which allows you to improve your footage with colour correction.
These tools allow you to adjust a wide range of parameters of your footage and create more accurate, rich, and detailed shots for your video project.
Once you’ve opened the Colour Tab, you’ll see a row of your clips across the middle of the screen, allowing you to select these individually to work on colour correction.
When you’ve selected a clip, it will appear in the large preview window, allowing you to clearly see all of the changes you’ve made.
While colour correction is a more advanced aspect of video post-production, it’s worth knowing some of the basic techniques you can use to improve your video quality.
The basic steps involved help to:
- Ensure your footage is normalised as much as possible;
- Fix any issues with saturation;
- Adjust brightness and contrast levels for a new balanced aesthetic;
- Set a more appropriate white balance level if necessary;
- Check to ensure skin tones are accurate.
The bottom left corner of the Colour Tab interface is where most of the colour correction tools are located. You can use these to:
- Set the black level of your shot by selecting an area with the Black-Balance Tool, which can be selected using the crosshair with a black box icon.
- Use the White-Balance Tool to ensure highlights are accurate.
- Click and drag the Lift slider to bring detail back into the footage if it appears too dark.
- Use the Gain tool to bring back detail into the shot if it is blown out.
The range of possibilities available when using DaVinci Resolve’s Colour Tab is extensive. Once you’ve explored some of the basic correction techniques, you can move on to more advanced grading options.
Step 9: Exporting A Project
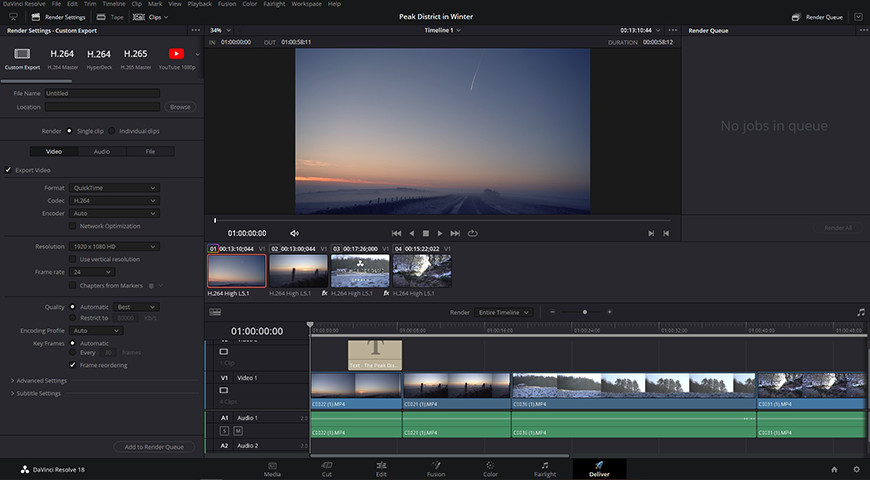
DaVinci Resolve Tutorial Step 11: Exporting
With your clips edited together with all the transitions, text, and effects included and the footage quality matched through colour correction, your project is ready to be exported.
Whether you’re uploading your video to YouTube or want the very best resolution, you can access an impressive selection of render settings via the Deliver Tab.
Template settings for YouTube and other commonly used settings can be selected with a single click, or you can alter the format, codec, resolution, frame rate, and other settings by selecting Custom Export.
Alternatively, head to the Cut Tab and choose the Quick Export link located in the top right corner of the interface to export and save your file in your preferred format.
Once DaVinci Resolve has completed processing the video, it’s ready to share on your platform of choice.
Final Thoughts
DaVinci Resolve successfully combines professional-level video post-production tools with an intuitive design and interface, making it a great program for beginners to explore video editing at their own pace.
While there are more basic editing tools available, if you’re serious about learning the full scope of post-production and are aiming to produce polished content, it’s arguably the best software on the market.
The inclusion of many of the premium-level tools in the free-to-use version makes DaVinci Resolve a no-brainer for amateur content creators who are prepared to put in the time to get the most out of the tools available.
If you’ve had experience with DaVinci Resolve or recommend another video editing suite, feel free to share your thoughts in the comments below.
- See also: DaVinci Resolve vs Premiere Pro
You'll Also Like These:
 DaVinci Resolve vs Premiere Pro (Key Differences to Know)
 How to Crop a Photo in Lightroom Classic (Beginners Guide)
 How to Get Started with Radiant Photo (A Beginners Guide)
 Pocket Guide to Photography for Beginners (With Essential Tips)

Andy Dilks is an experienced landscape photographer and former games industry veteran. When he isn’t taking photos or reviewing the latest tech gadgets, you can find him hiking and wild camping in the Peak District.

WELCOME TO SHOTKIT
Enter your email to be sent
today's Welcome Gift:
19 Photography Tools
🔥 Popular NOW:


Shotkit may earn a commission on affiliate links. Learn more.