


The EASIEST Way to Uninstall Adobe Creative Cloud
Want to learn how to uninstall adobe creative cloud? This simplified guide will help you remove all Adobe Creative Cloud applications from your Mac or PC.
By Greg Cromie
If you want to uninstall and remove all Adobe Creative Cloud applications altogether, this is the guide for you.
Perhaps you want to try another photo editing tool, or maybe Lightroom keeps crashing, or you’re just having issues with another one of the apps.
Whatever the case, you’re about to learn two ways to uninstall Adobe Creative Cloud and all its associated files.


Fastest & safest way to uninstall Adobe Creative Cloud while helping your Mac run smoother.
Using CleanMyMac X is our preferred way of uninstalling absolutely everything in one click. Especially since you’re in no doubt that any of the files have been left undeleted.
The second method is a way to uninstall Creative Cloud manually, which takes more time and a bit of fiddling around.
(We’ve also included a way to uninstall it from Windows too.)
Before proceeding with anything, make sure you’ve already synced all your files to your Creative Cloud account before starting the uninstall process.
How to Uninstall Adobe Creative Cloud (Quick Method)
Suppose you want to uninstall Creative Cloud and all the related Adobe apps and leftovers.
In that case, we recommend using a tool called CleanMyMac X – an all-around junk cleaner, malware remover and system optimizer.
You can read more about CleanMyMac X in this review, but for now, I’ll show you how it can be used to rid your Mac of every Adobe Creative Cloud file in a matter of seconds.
- Download a free trial of CleanMyMac X here
- Install and launch it
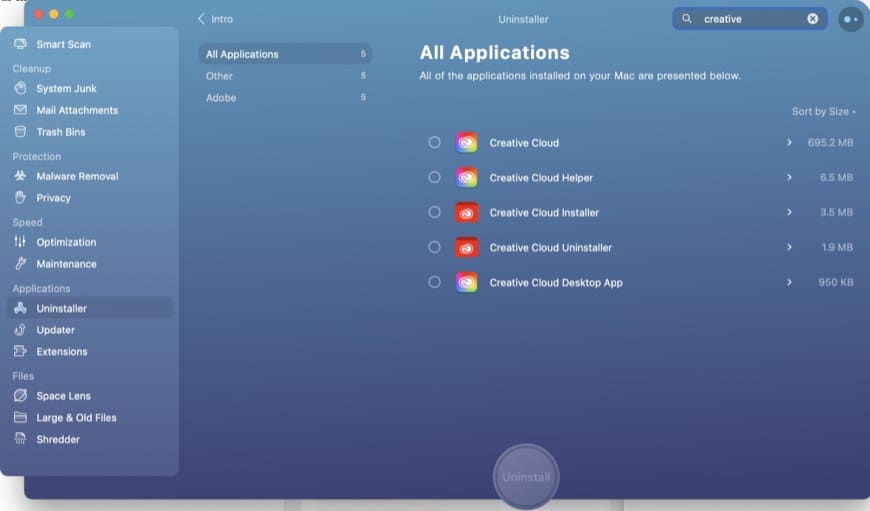
- Click on ‘Uninstaller’ in the sidebar
- Enter ‘Creative’ in the search bar to find all Creative Cloud desktop app files
- Click to select all the files
- Click the big Uninstall button
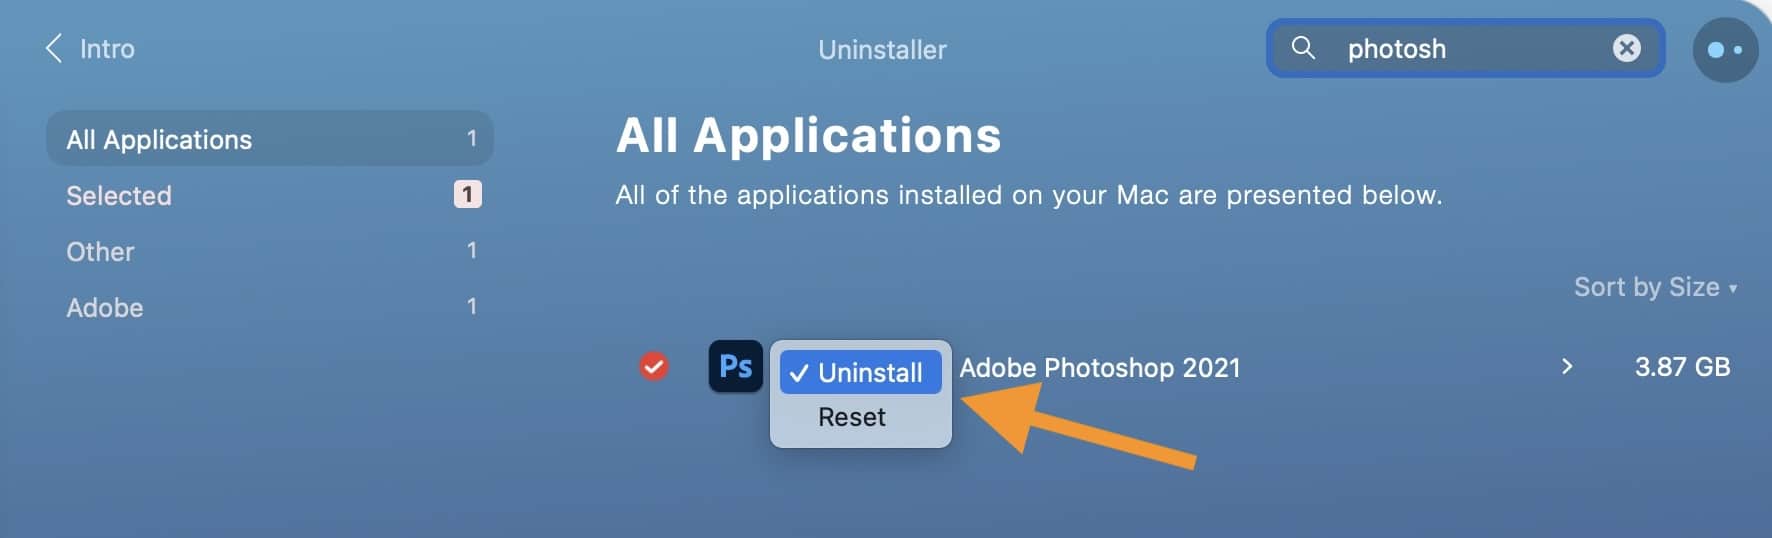
- Enter ‘Photoshop’, ‘Lightroom’, or whatever Adobe app you wish to delete
- Click Uninstall to remove each one individually
That’s how to remove Creative Cloud and all associated files and apps.
If, on the other hand, you’re having issues with one of the Adobe apps, you can use CleanMyMac X to reset it, meaning that everything returns to its default condition.
(This saves you from deleting the app and re-downloading it, which can take time due to the large file sizes.)
To perform an app reset, search for the app, then click the dropdown menu next to the problem and select ‘Reset’ instead of ‘Uninstall’. Then click the big ‘Reset’ button, and voila!
How to Uninstall Adobe Creative Cloud from Mac (Manual Method)
You may be wondering at this point, what is Adobe Creative Cloud and why is it such a pain to uninstall!?
Don’t worry – if you’ve decided to go with the manual work-around for an Adobe CC uninstall, we’ve got the process for Mac.
It’s worth pointing out that Adobe seems to have made it tricky to remove their Creative Cloud desktop software.
Adobe products are easy to subscribe to, brilliant to use and super powerful. But when it comes to removing Creative Cloud desktop software from a Mac, it’s quite a long process!
Before you do anything, make sure you quit the Creative Cloud desktop app – I tend to quit every open or running app on my Mac for this kind of task. That way, when you uninstall Adobe, there’ll be no conflicts or interruptions.
And for a point of reference, I’m running on macOS Big Sur (Version 11.2.3).
To remove Creative Cloud from a Mac desktop, follow these step by step instructions.
1. Quit any CPU Processes with Activity Monitor

The first stage to uninstall Adobe CC is to quit any CPU processes related to the Creative Cloud desktop app.
- While in Finder, select File and then New Finder Window – or hit Command N.
- It’ll make a Finder Window open on your desktop with a sidebar listing the most common folder locations such as Applications, Desktop and Downloads.
- Click on the Applications folder to see all the sub-folders and applications listed.
- Click on Utilities and then Activity Monitor (or you can search for Activity Monitor using the search function).
- Type Creative Cloud into the search field to see any Creative Cloud processes using the CPU.
- You need to close each of these processes down.
- To do so, double click on the Creative Cloud process to open a control window.
- At the bottom of the window, click on the Quit button.
- A warning box will appear asking if you want to Quit Creative Cloud.
- There are two options, including Quit and Force Quit – hit Force Quit.
2. Uninstall Creative Cloud via the Desktop App
The next stage involves the Adobe Creative Cloud uninstall steps to remove all applications.
It includes Photoshop and Lightroom if you have them on your computer. Stop here and be sure it’s the step you wish to take. Remember you can always cancel your Photoshop subscription or cancel your Lightroom subscription instead.
You must complete this step next to proceed to remove the Creative Cloud desktop app from your Mac. Failure to do so results in an error message within the Adobe Creative Cloud app.
- Open the Creative Cloud desktop app by double-clicking on it in the Finder or by clicking on the Creative Cloud icon pinned to the top of your window.
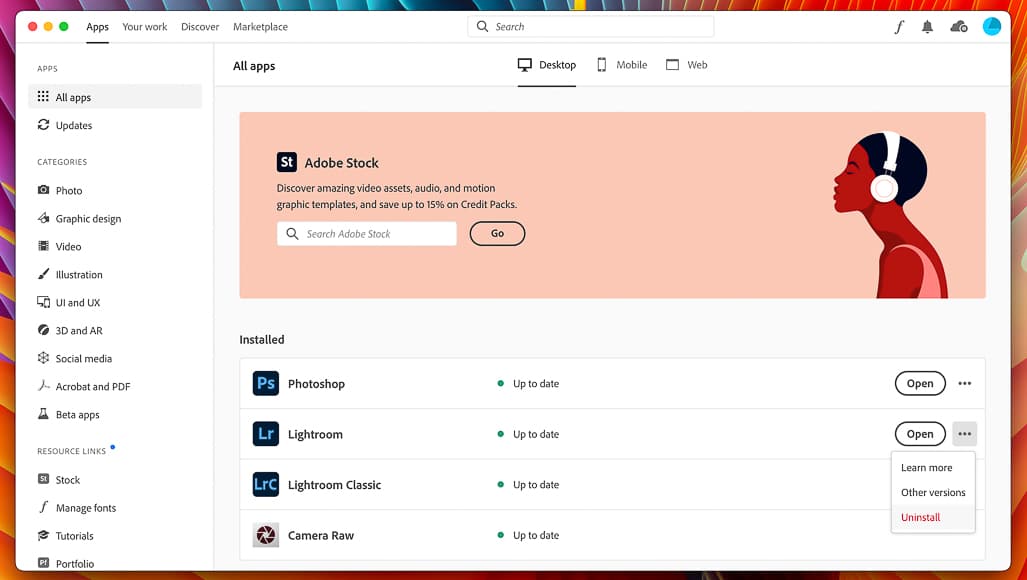
- Select the Apps tab and then All Apps (this is usually the default when opening Creative Cloud).
- You’ll see a list of apps that you’ve installed on your Mac.
- There’ll be an Open button and then an icon with three dots to the right of each creative cloud desktop app.
- Click on the three dots to reveal more options, including Learn More, More Versions and Uninstall.
- You want to select Uninstall.
- A dialogue box will appear with options for how you want to handle your Lightroom preferences – these are your personal settings that you may want again in the future.
- I recommend a cautious approach and suggest selecting Keep.
- The uninstall process will begin with the progress represented as a percentage.
Once you’ve removed each of the Creative Cloud applications, you’re ready to remove the Creative Cloud desktop app.
3. Remove Adobe Creative Cloud Desktop App
After you’ve cleared the Creative Cloud CPU processes and uninstalled each of the apps, it’s time to remove the Creative Cloud desktop app from your Mac.
Fortunately, the folks at Adobe anticipated that people would want the application removed from their Mac. As a result, they included a handy Creative Cloud Uninstaller function in the software.
Let’s take a look at the next stage for removing the Creative Cloud desktop app from your Mac.
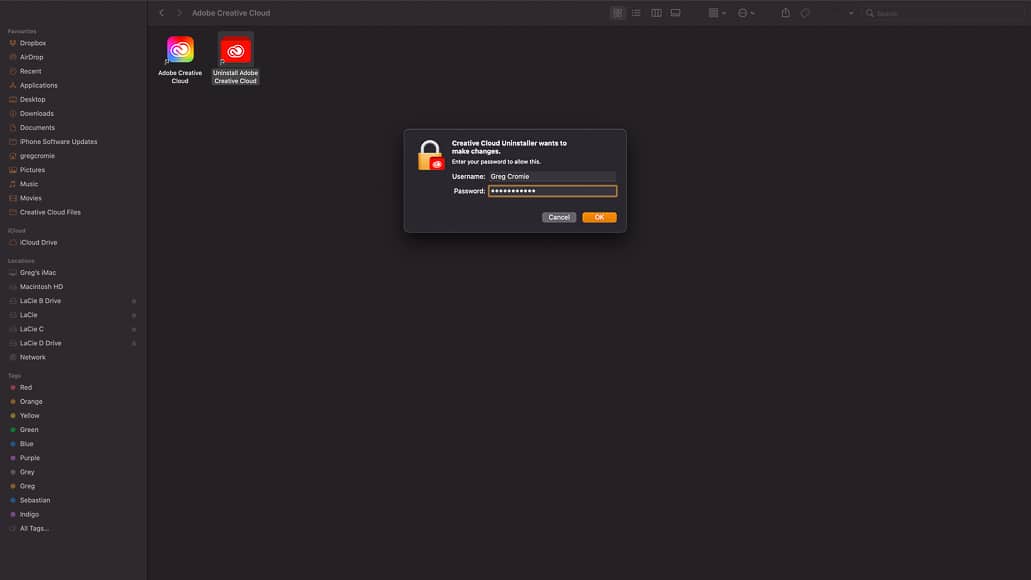
- Open the Uninstall Adobe Creative Cloud app by double-clicking on it in the Finder.
- A security window will open and state – Creative Cloud wants to make changes.
- Enter your master password for your Mac to unlock the uninstaller.
- You’ll receive a warning message – Are you sure you want to uninstall Adobe Creative Cloud app? You may repair the installation to resolve any issues.
At this point, it’s worth stopping for a moment to consider your options.
If you’re uninstalling Adobe CC and all of the apps to resolve a problem, you now have an alternative option. Rather than uninstalling everything and then going to the trouble to reinstall, you can opt to repair installation.
It may or may not resolve your issue, but it couldn’t hurt to give it a shot.
However, if you’re uninstalling Adobe CC for a different reason, proceed with the uninstall steps.
You’d take this path if you were planning on using a different computer to install the Creative Cloud apps. Or, you’d proceed if you didn’t want to use the software at all.
- Click on the Uninstall option to replace the warning with a progress window showing the deletion of the Creative Cloud desktop app.
- It may take some time but will eventually show a window to confirm the successful completion of the uninstall process.
- Now you no longer have the Creative Cloud desktop app or any of its applications on your Mac – almost.
4. Perform a Clean Sweep

To ensure that there are no leftover bits and pieces from Adobe Creative Cloud, I recommend a final clean up.
- Open a new Finder window and from the Go dropdown menu, select Go To Folder.
- In the Go To Folder field, type in ~/library and hit Go.
- It will open the Library folder.
- Search this folder for any files that reference Adobe CC or its applications.
- Should you find any files, move them to trash.
- Perform the same Go To Folder search in the following folders:
- ~/library/Application Support
- ~/library/Preferences
- ~/library/LaunchAgents
- ~/libraryLaunchDaemons
- ~/library/PriviledgedHelperTools
- The absolute final step in the process is to empty the bin on your Mac.
As a result of these steps, you’ve successfully uninstalled the Creative Cloud desktop app from your Mac. You’ll probably notice you now have a lot more disk storage as well as improved processing speeds.
How to Uninstall Adobe Creative Cloud from your PC (Windows)
Explaining how to uninstall Adobe Creative Cloud from a Mac was exhausting! Now I get to walk you through the process for PC (Windows).
The process for removing Creative Cloud from a PC follows much the same path. There are vital steps and stages in the uninstall process that’s easy to follow.
As a result, I won’t go into anywhere near as much detail.

It’s possible to remove individual Adobe apps like Lightroom and Photoshop using the Control Panel.
However, that can lead to complications with the Creative Cloud platform as it likes to have everything in order when it comes to uninstalling apps.
- If you’re not already signed in, open up and sign in to the Creative Cloud desktop app.
- Now that you have the Creative Cloud desktop app open go to the Apps tab and then view the Installed Apps.
- Next to the Open option is an icon with three dots.
- Click on this to select Uninstall.
As with the Mac uninstall, you can opt to keep or remove the app preferences at this stage. It’s your call, depending on your future plans with Adobe products.
- Repeat the above steps for all of the individual apps such as Adobe Lightroom and Photoshop.
- If you run into any problems at this stage and the apps do not uninstall, go to Control Panel and do it manually.
Now that you’ve uninstalled the individual apps, it’s time to uninstall the Creative Cloud desktop app.
- Use the Windows Control Panel to select Adobe Creative Cloud and remove it manually – use Add / Remove Programs.
- Should it prove stubborn and not leave willingly, you need to call in some help.
- Download and run the Adobe Creative Cloud Uninstaller software to remove all of the individual software applications.
- The Uninstaller will do its thing and remove the Creative Cloud desktop app from your PC.
- You’ve successfully uninstalled the Adobe CC desktop app from your PC.
But we’re still not done.
- The next step is much like we explained with a Mac – to clean out the final files left behind by Adobe.
- Download the Adobe CC Cleaner Tool and run this to remove the remaining Adobe files.
- Restart your PC and delete any Adobe folders you have sitting in local storage.
Now you’re done!
Final Words
As you can see, it can be a real headache to uninstall the Adobe Creative Cloud desktop app from a Mac or a PC. Regardless of how computer-savvy you are, there are countless steps to follow to remove the software.
It’s almost as though the folks at Adobe don’t want you to delete the Creative Cloud desktop app for fear you might find a better software option…!
That’s food for thought and not the sort of conspiracy I want to explore here today.
CleanMyMac X is by far the quickest and easiest application to uninstall CC from your Mac. It does precisely what it promises without sending you into a headspin – you can even download a free trial version here to check it does everything it promises.
What are your thoughts on uninstalling editing software from your Mac or PC? Have you attempted to uninstall Adobe Creative Cloud only to get lost in the process?
Share your thoughts, experiences and questions here and join the conversation. Good luck!
- Related: How to uninstall Luminar
Fastest & safest way to uninstall Adobe Creative Cloud while helping your Mac run smoother.

Check out these 8 essential tools to help you succeed as a professional photographer.
Includes limited-time discounts.


I am a Melbourne based street photographer and blogger. I love to travel and make a regular trip to Japan to photograph and document its dynamic culture.


WELCOME TO SHOTKIT
Enter your email to be sent
today's Welcome Gift:
19 Photography Tools
🔥 Popular NOW:


Shotkit may earn a commission on affiliate links. Learn more.