How to Use Symmetry in Photography
Looking for some creative inspiration of symmetry in photography? Learn the 4 types of symmetry and how you can use them to create more powerful photos in 2023.
By Greg Cromie
Photography is a liberating experience where you get to see the world through the creativity of a camera. But, there are compositional rules that serve to guide the process of capturing images. These rules also support photographers in establishing the best practices to achieve stunning photos.
We’ve covered many of these rules here on Shotkit to guide you on your creative journey. The rule of thirds is one example that comes to mind.
The rule of thirds requires you to imagine your composition split horizontally and vertically into thirds and then use this grid to guide your composition. The rule guides your placement of the horizon line and points of interest.
Another set of composition rules exists around symmetry in photography. And in some cases, the rule of thirds may be redundant to achieve photography balance. A photographer should learn but then break such rules.
So that begs the question, how do you take symmetry photography? And what are the different types of symmetry used in photos?
That’s what we’re about to find out. Let’s dive in.
What Is Symmetry in Photography?
You achieve symmetry when photos appear to have equal weight or value on each side instead of off-centre weight to one side.
It can be a horizontal or vertical split and is just as valid in portrait as landscape orientation. (For a more detailed look at orientation in photography, check out our article here.)
Symmetrical photos don’t have to be a mirror image, with one half being the exact same as the other. They can involve different elements in the frame on each side, but appears symmetrical when viewed as a whole image.
- What does Symmetry do in Photography?
Symmetry is a comprehensive tool that a photographer uses to create unique compositions in their photography. In photography, using symmetry creates balance and a sense of harmony when viewing the photograph.
- Why is Symmetry important?
Some folks need absolute symmetry in their lives – their view of the world is far more pleasing if everything is in place and symmetrical. How you prune a tree or hedge, how you decorate a room and how you arrange items in your home.
Regardless of your level of OCD, there’s a need to use symmetry in our acceptance of visual experiences.
Symmetry creates a sense of balance across the field of view. It has a psychological impact on the viewer as their brain has no trouble finding balance in what it’s seeing.
Symmetrical photos are far more appealing as they’re attractive to the human eye. Compositions that achieve visual perfection draw us in; the feedback we get from our minds is a sense of calm and correctness.
Plus, using symmetry in photography can be a great aid in your ongoing understanding of composition.
By being aware of how symmetry in photography works, you’ll be on the lookout for various compositions to test that understanding.
A great way that symmetry guides your compositions is through the use of leading lines or edges. By lining up your shot with leading edges to guide you, you’ll add depth and interest to your photo.
Before you know it, you’ll stop consciously searching for compositions with symmetry and subconsciously use them in your work.
It will have far-reaching impacts on your landscape, street, cityscape and even formal work.
Compare to asymmetrical balance in photography.
Types of Symmetry in Photography
There are four main types of symmetry in photography, and I encourage you to take a shot at all of them.
As mentioned above, one of the benefits of symmetry photography is the enhancement of your overall composition skills.
Let’s take a close look at each of the symmetry types and how to use symmetry in photography to understand them better.
Vertical Symmetry

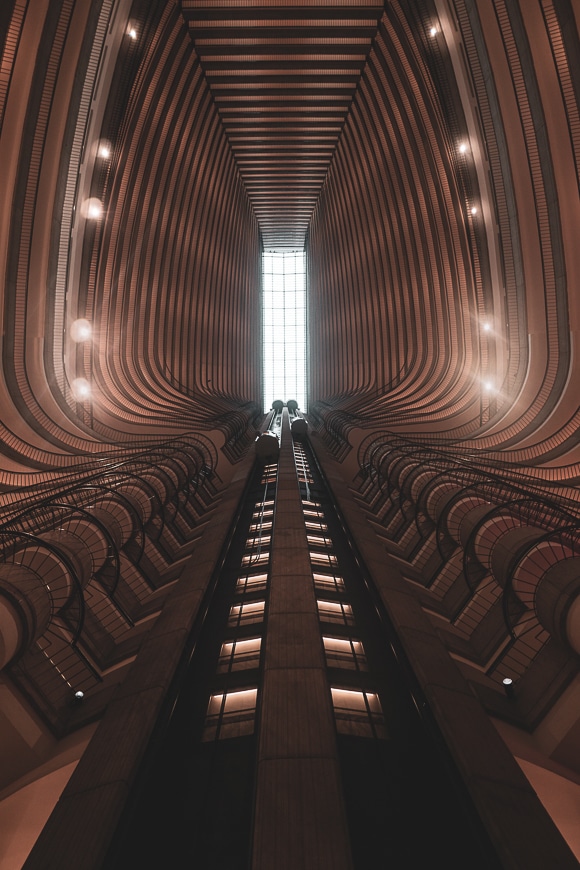
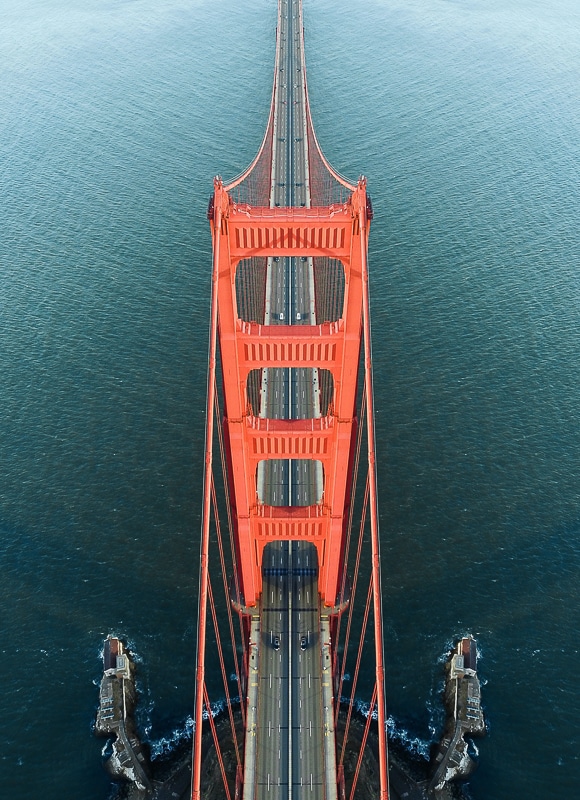
Vertical symmetry is probably the most common form of symmetry and often appears in still life photography. We naturally see and seek symmetry in our minds, even without a camera in hand.
This type of symmetry involves splitting your field of view in half by drawing an imaginary line vertically through the exact centre of your composition. In your composition, you’ll have equal weight or value of objects on each side of your line.
You’ll know if you’ve hit the mark as the images will be far more appealing than if you imagine that same line further to one side. In vertical symmetry, you have my permission to ignore the rule of thirds!
A great use for, and a brilliant way to practice, vertical symmetry is with cityscape and architectural photography.
Using vertical symmetry to capture a single building or a row of buildings on either side of the street, you’re visually representing their size, shape and placement within the composition.

For example, while standing before a building with a wide-angle lens, point the lens up at one of the building’s corners. If you’ve positioned yourself correctly, there should be equal amounts of the building to either side of the imaginary vertical line.
The wide-angle creates a dramatic distortion effect, with the building’s base filling the lower half of the frame. The top of the building will form a point. The vertical symmetry should be as close to exact on each side as possible.
The photo has balance thanks to how you have composed the shot with the line of symmetry down the middle.
Thanks to vertical symmetry, you’re drawn into the images and up to the point where the leading edges converge on one another.
Horizontal Symmetry

In horizontal symmetry, the same process applies as to vertical symmetry. However, your one imaginary line of symmetry runs horizontally through the frame’s centre rather than vertically.
The most common use of horizontal symmetry is in landscape photography. Imagine a gorgeous distant line of pine trees with tall snow-capped mountains standing in the background.
The top half of the frame isn’t balanced with the bottom half unless there’s a large body of water in the foreground.

The reflection of the trees and mountains forms the second half of the horizontal symmetry and creates balance across the frame.
Consider a large rock formation jutting from the ocean in the middle of a bay. The water reflects the same scene in the bottom half by framing the scene with the rock occupying the top half of the portrait orientation frame.
It’s a popular landscape shot for many photographers and a simple way to find symmetry in nature.
Of course, you can also create symmetry horizontally in other genres of photography. Your creativity is the limit.
See also: how to use line, shape and form in photography composition.
Radial Symmetry

Radial symmetry is entirely different from vertical and horizontal symmetry as it does not involve splitting your frame.
In radial symmetry, the main object within the composition is circular and occupies most of the frame. Or, it’s such a strong visual element that it sits in a prime place within the frame.
The point of this kind of symmetry in photography is to draw the viewer into the scene. The circular object attracts the eye, and your view travels around the frame in a circular motion.
Radial symmetry appears in photos where ripples radiate outwards in pools of water. Going back to our mountain landscape scenario from above, the body of water could be interrupted by a series of ripples radiating outwards from the centre.

You’re pulled into this section of the composition as it tries to ascertain if the water is rippling.
Photographing flowers top-down is another example of radial symmetry or radial balance. In these shots, the flower petals’ circular form fills the frame and draws the viewer into the centre of the image.
A similar approach applies to many subjects that are circular and would look great in images. Car wheels, truck tires, drone shots of a circular building and even an attractive dinner plate – as long as there’s a circular form with a repeating pattern, you’re on the right track.
Reflective Symmetry

Not to be mistaken with horizontal symmetry, reflective symmetry involves using reflections to build a symmetrical composition.
While bodies of water are an obvious one, they tend only to involve horizontal symmetry. But with reflective symmetry, you can use the reflections found in any reflective surface at any scale.
A glass of orange juice sitting on a glass table will case a reflection if the camera’s angle and the available light are just right.
Alternatively, you can achieve reflective symmetry by using a glass building to act as a mirror to reflect the scene immediately next to it – or one from a distance.

It’s possible to capture a scene with the right surface and portray it as perfectly symmetrical to the viewer – even though it’s a trick of the eye. It can apply to whole scenes or a single object.
Glass is a brilliant reflective surface, but some metals, plastics and even organic materials will reflect.
In some cases, a surface may only reflect the light and not the details of a scene – work with this to achieve a shot that’s suggestive of the reflection.
5 Examples of Symmetry in Photography
Examples of symmetry in photography are everywhere – especially once you know what you’re looking for.
The thing about symmetry is that it’s such a common part of our daily visual experience that we stop noticing strong examples.
Here are a few examples of symmetry in photography.
1. Symmetry in Wildlife Photography

Symmetry is not exclusive to human-made objects with symmetrical properties. In nature, there are examples of every type of symmetry everywhere.
Wildlife photographers can capture stunning shots of animals where symmetry is on full display. A pair of bucks facing off with their antlers interlocked, or a pair of elephants with their trunks linked in a lovers knot.
Another example of symmetry in wildlife photography is where the reflection of a water body creates reflective symmetry.
Imagine an eagle flying horizontally just a few feet across the top of a still lake. The eagle is reflected in the lake, adding drama and interest to the photo.
2. Symmetry in Macro Photography

Macro photography is another perfect genre to try out your vertical symmetry techniques. With a macro lens, you can get in nice and close to an insect or arachnid to frame it and achieve a perfect balance on either half of the vertical line.
Imagine a macro photo of a fly’s eyes or all eight eyes of a spider. Splitting the frame vertically creates perfect symmetry and draws the viewer into the photo.
While symmetry creates calm and balance in most cases, any photo with a spider involved tends to have the opposite effect – so it’s a great way to create contrast.
3. Mixed Symmetry Photography

If you’re super observant, you may come across opportunities to photography mixed symmetry. It’s a rare type of symmetry that has taught me to look up more often.
In the example above, you can see that the timber ceiling and frame are creating horizontal symmetry. But the addition of the antler-chandelier in the centre of the frame is an excellent example of radial symmetry.
What do you get when you combine the two? You get a brilliant example of mixed symmetry at play. The radial symmetry of the chandelier draws the eye. But the pitched ceiling creates depth and pulls you deeper into the image.
4. Leading Lines Photography

Looking for leading lines or edges around you is a simple way to train yourself to spot a scene. And, there’s a good chance that with a pair of leading lines as your primary composition technique, you can frame a vertical symmetry shot.
Leading edges are the strong sharp-lined elements within a scene. These can include the edges of buildings, roads and pavements, tram lines, train lines, power lines, and even a bridge’s supports.
Generally, leading edges in architecture converge on each other at a point in the distance. This gives your photos depth and forces you to focus on that point.
If you take a walk through your local neighbourhood or city streets, chances are you’ll see a lot of leading edges.
Vertical lines exist all around us and not just in architecture. Fallen trees or naturally leaning boulders can form leading edges in your photos.
A simple pathway or country laneway has leading edges that are a little softer than those found in the city.
5. Symmetry in Drone Photography

If you’re itching for a new drone project, consider using your new expensive toy to capture some symmetry photos.
Pro photographers use their drones to photograph architecture, agriculture and infrastructure. Where permissible, fly your drone over various subjects to spot and photograph different forms of symmetry.
Imagine a top-down view of a two-laned black road with a dotted white line in a vertical symmetry composition. The road itself creates a perfectly symmetrical element, but add to this dense pine forests to either side of the road, and the effect is amplified.
Another option is to use your drone to take photos of radial symmetry by shooting top-down over circular structures such as domes, fenced paddocks and even silos.
Thanks to the use of symmetry, your drone photography can take off, reach new heights and fly ahead of the competition. (Sorry, but the puns were begging to be used.)
Final Words
As it turns out, symmetry is all around us. It exists as a part of nature, and as a result, we’ve incorporated various forms of symmetry into how we’ve built our civilisation.
The reason is simple: symmetry provides a balance that our minds can accept and feel at peace within.
The same balance and peace of mind occur when symmetry forms a critical compositional element in photography.
As we’ve discovered, training yourself to look for symmetry in photography is a great way to build upon your skills.
Regardless of hunting for leading edges in the city streets or how a flower spreads its petals in a country field, you’ll develop an eye for using symmetry. Oh and make sure to look up now and then.
What are your thoughts on using symmetry? How do you apply photography symmetry to a composition? What tips do you have for using composition techniques to spot photo opportunities?
Join the conversation and leave a comment or questions below about how you use symmetry – I always respond to keep the conversation going.


Check out these 8 essential tools to help you succeed as a professional photographer.
Includes limited-time discounts.


