Guide to Image Masking for Photo Editing
Everything you need to know about image masking for photo editing including how to take advantage of the latest AI tools to speed up the process.
By Ana Mireles | Last Updated: February 6, 2023
Photo editing is an essential part of photography. Image masking can help you easily extract a subject or make selective adjustments to turn a simple snapshot into an interesting photo.
In this guide, I’ll show you various types of image masking and how to do it in Photoshop and Lightroom.
Of course, these aren’t the only image editing programs that offer image masking as a feature, but most of them work similarly.
Let’s dive right in!
What is Image Masking in Editing?
Image masking is a post-processing technique used to isolate different parts of an image.
This is useful when you want to apply your edits selectively or because you want to hide a specific portion of your photo.
What are Masks used for in image editing?
- Photo-compositing multiple images
- Hiding all or part of a layer
- Applying selective adjustments
- Making cut-outs (removing backgrounds)
- Working non destructively
- Adding transparencies
What is an Example of Image Masking?
One of the most common examples of image masking is when you want to apply different backgrounds to an image. That’s because it’s a non-destructive process.
I’ll use Adobe Photoshop because it’s the software I feel most comfortable using, but any layer-based image editing program works similarly.
So, the first thing you need to do when changing background is to open both images in the same document – one image per layer.
Make sure the new background is on the layer below. Then, select your subject. You can do this with whichever tool you find best.

Foreground image credit: David Jakab
Now, click on the Add Layer Mask button on the bottom of the Layer panel. As the background disappears, you can see that a new thumbnail is created next to the original – that’s the layer mask.
The original thumbnail looks intact – unlike the thumbnail you’d get when you delete the background. That is because the information of the layer is also unchanged.
The background is still there, and you can’t see it because the layer mask is hiding it – so you can see the bottom layer.
If you see the mask’s thumbnail, you’ll notice that the background is black and the foreground is white.

Background image credit: Martin Péchy
Notice there was a mistake in the selection, and a piece of the subject is missing. If you remove pixels by deleting the background, this information would be lost now.
In other words, you get the same result as you do with image masking, but the process is destructive.
Instead, thanks to layer masking, this is easy to fix with a few brush strokes. Since everything in black is hidden, and everything in white is visible – all you have to do if you want to modify it is to paint black or white on it using the Brush tool.

Not everything is black and white, though. If you use any tone of grey, you’ll create transparency. This way, the top layer with the mask will blend with the bottom layer.

Types of Image Masking in Photo Editing
Here, I’ll show you some image masking techniques using Adobe Photoshop and Lightroom, but most other good photo editing apps offer similar tools.
5 Photoshop Image Masking Techniques
Photoshop offers multiple types of image masking, from very basic gradients to Photoshop collage masking or Photoshop Transparency masking.
Here, I’ll talk about five of the most common ways of layer masking that you can use for image editing or photo collages.
1. Layer Masks

Credit: Shvets Production
This is the most popular masking technique in Photoshop. On a layer mask, everything in white is visible, whatever is black will be hidden, and the greyscale gives you different levels of transparency.
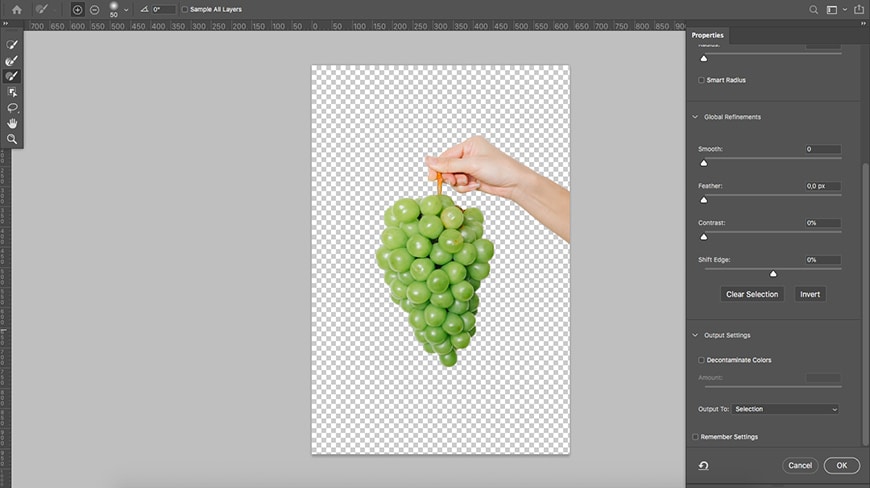
If you’re working on a single layer, the parts hidden by the mask will reveal the checkered pattern, which means there’s no information. You might be familiar with this if you’ve ever opened a cut-out – that’s a photo without a background.
Instead, if there is another layer underneath, the black part reveals it. The grey tones will introduce transparency to the layer causing both images to blend.
You can create a layer mask by clicking on the dedicated button on the bottom of the Layers panel. Then, you can use the brush tool to colour the mask. Alternatively, you can use any selection tool to select an element and fill it with black or grey.
2. Gradient Mask

Credits: ákos szabó
A gradient mask is nothing else than a regular mask with a gradient applied to it. This makes for a smoother transition between an opaque part and a transparency part of the mask.
There are many uses for this type of mask. For example, if you want to replace the sky in a photo, you can add a gradient mask to add some transparency towards the horizon and make a smoother blend.
3. Vector Mask

Credit: Pixabay
Vectors, as opposed to pixels, are non-dependant on resolution. They are very common in graphics software such as Adobe Illustrator.
In Photoshop, vector masks are helpful because you can use them in images with different dimensions. Also, because vector masks create rough edges – you can create a clipping path using the Pen tool or the Shape tool.
One of the great things is that you can come back to the path and change it at any time. Just click on the pen tool to modify any of the anchor points – the vector mask will adjust automatically.
4. Alpha Channel Masking

Alpha channels save selections as greyscale images. Alpha channel masking is an image masking technique where you create a channel to isolate your subject.
This type of image masking is useful when post-processing subjects that are difficult to select, for example, portraits with curly hair or furry animals.
When you open the channels panel, you’ll notice the RGB channel that forms your image and a separate one per colour – red, green, and blue.
When you click on one of the channels, you won’t see the image in that colour – you should see the image in greyscale. Click on each of them, and you’ll notice that each one has a different contrast – this will be different on every image.
Choose the one with the most contrast between the edge of your subject and the background, then duplicate it. You don’t want to work in the colour channel for alpha channel masking because that would alter the colours of your photo.
Increase the contrast using the tool of your choice until you can easily select the subject. Then, create a layer mask.
Notice that the mask creates its alpha channel. However, if you go to the Layers panel, you’ll find it there next to the thumbnail of your image – just like a regular mask.
5. Clipping Mask

Background image credit: Pixabay. Subject from the image of Karolina Grabowska
This image masking technique links a layer to the confines of the layer that’s directly underneath. When doing Photoshop collage masking, it’s common to use a clipping mask for each element.
A clipping mask is also used to confine images inside a shape. To do this, create a shape in one layer – then add an image on a top layer and add a clipping mask.
See here for more on creating collages in Photoshop.
6 Lightroom Masking Techniques

Image masking in Lightroom used to be a bit limiting and time-consuming compared to Photoshop, which offers much more tools, alpha channel masking, etc.
However, you’ll find it easier and faster with the latest update – here are the top tools:

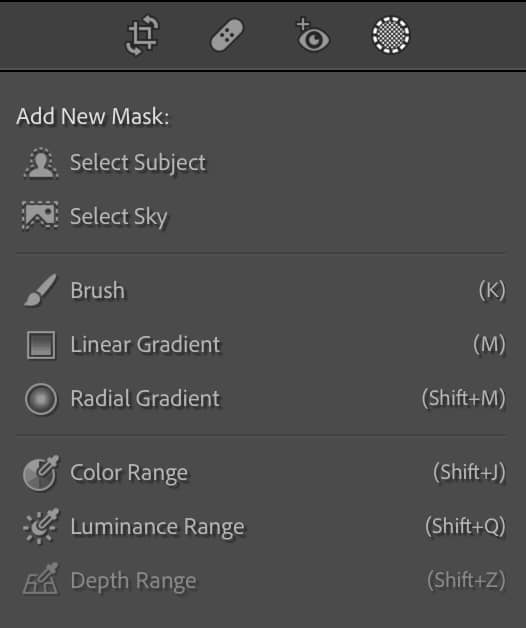
1. Select Subject
This is the other AI tool from the new masking panel. It will try to identify the subject and mask it for you. Again, you can retouch the mask to make it more precise.
2. Select Sky
This is one of the tools added with the new masking update. It will automatically detect the sky in your photo and mask it for you. You can always fine-tune the mask if it’s not precise, but it’s a real time saver.
Another software that allows you to easily replace the sky in your images is Luminar Neo.
3. Brush
You can find this tool even in older versions of Lightroom. To make a mask with the Brush, you have to paint over the desired area. You can adjust the brush size and feathering.
4. Linear Gradient
This image masking tool allows you to make adjustments that gradually fade. Just click and drag to select where the layer masking starts and ends.
5. Radial Gradient
With this tool, you can make a gradient mask with an oval shape – for example, for vignetting. Just click and drag to determine the area. Then, use the feather slider to decide how soft you want the edge.
6. Range Masking
Most people are already familiar with colour or luminance masking. With the new masking update, the colour range and luminance range have separate tools. There’s also a depth range to mask images based on the distance to the camera – but this is only available if your image has depth information.
The colour range masking works by selecting the pixels that share the sample colour. Then you can increase or decrease the range of colours included in the mask.
The luminance mask works similarly – except that instead of using colour, it uses the pixel intensity values. Choose a point in the image, and anything that shares its pixel values will be selected – you can modify the brightness range using the sliders.
There’s also a depth range that allows you to mask based on the depth of field of the photo.
How to Mask in Photoshop
Image masking in Photoshop is very easy. If you want to add a layer mask, simply click on the Add Layer Mask button.
By default, it will be all white – so you won’t notice any changes. You can now paint with the Brush tool in black to hide any part of the image.

Credit: Any Lane
If you want to make the layer invisible, you can fill the mask with black – or invert the mask using Cmd+I. Whatever you paint white will be revealed.

Instead, if you want to mask portions of an image to make selective adjustments, add a customized background or isolate an object, you need to make a selection.
Then, click on the Layer Mask button, and it will reveal the selection and hide the rest.

Once you have a mask, you can right-click on it to open the menu where you can disable it, delete it or apply it.

You can also double-click on it to open its Properties panel.

How to Mask in Lightroom
First, with the desired image open in the Develop module, click on the Masking tool.
From the Masking panel, choose the tool of your choice between the AI options, the selective adjustment options or the range options.
Apply the mask to the desired area of the image.
Make the adjustments using the Develop tools. As soon as you make the first one, the mask won’t be visible anymore – but don’t worry, it’s still working.
You can manage masks in the Mask panel that appears as you create the first one. There, you can add new masks, add or subtract areas from the mask (using multiple tools), duplicate a mask, invert it, etc.
That’s it. Remember that you can always come back to adjust a mask at any time because this is a non-destructive process.
Final Words
Incorporating masks into your image editing process allows you to turn a boring photograph into an eye-catching piece.
You can also use image masking in graphics where images interact with text in magazine covers or even fliers. It’s also helpful to isolate objects for commercial purposes or doing collages.
In conclusion, image masking will take your photography work to the next level. If you have any questions or suggestions – let us know in the comments.


Check out these 8 essential tools to help you succeed as a professional photographer.
Includes limited-time discounts.


