Animoto Video Maker Review
Read this impartial Animoto video maker review for photographers who want to benefit from video marketing. Includes Animoto promo code!
By Mark Condon
This is a review of the Animoto Video Maker for photographers who want to use video marketing in 2018 to book more clients.
I was introduced to Animoto while attending WPPI in Las Vegas earlier this year, and was struck immediately by how simple it was to create a powerful video clip.
I believe that Animoto Video Maker can be a useful tool for professional photographers who wish to cut through all the noise on social media, and grab the attention of their target audience.
Let’s dive right in to my Animoto review to see what this innovative software is all about.
What is the Animoto Video Maker?
The Animoto Video Maker is an online subscription-based application which anyone can use to make a short video.
By ‘video’, I mean a series of short images, text or video clips that are arranged together to form a short, snappy video that’s meant to grab the attention of a potential client.
Animoto can also be used to create non-marketing related videos (Animoto ‘Memories’), which seems to be more suited towards personal slide shows, or even slide shows for existing clients.
However, in this review I will be focusing on the Animoto ‘Marketing’ side of the application, and investigating how simple it is to create a video from your existing library of material as a professional photographer.
Animoto Promo Code
Animoto offers a free trial available here to get a taste of its software. When you’re ready to lift the limitaitions, here’s an Animoto Promo Code to give you a 10% discount.
All you need to do is apply discount code: shotkit
Who is Animoto for?
One of the biggest hurdles when discovering new applications such as Animoto, is working out how exactly you’d benefit from using it.
As photographers, we’re constantly bombarded with marketing for various applications and services that promise to help us run or promote our businesses. As solo entrepreneurs, photographers have to wear many hats, and any software or service that can genuinely help is welcome.
In a nut-shell, Animoto is for any photographer who wishes to book more clients using video, an attention-grabbing medium that’s still relatively new and surprisingly under-utilised in our industry.
I won’t bore you with stats on video marketing, but all you need to know is that to stand out on Facebook, Instagram or whatever other social media platform you rely upon, video could well be the key to your success.
Animoto Video Maker Review | Making a Video
I’ve owned a digital camera for years, but can count the number of times I’ve used its video function on the fingers of one hand! I’m guessing you’re the same? Maybe you’ve never used it…
Animoto can be used effectively to piece together video clips to create one marketable video, but to me, this is diving too deep too soon.
As (stills) photographers, filming video can be daunting, so in this review I wanted to focus more on how easy it is to use Animoto to create a video from something we already have a lot of – our own images.
Opening ‘Animoto Marketing’, you’re greeted with a selection of recommended video templates that are ‘great for photography’ and ‘popular’.
There’s also a ‘Start from Scratch’ button, but since it’s kind of hidden away up top, it’s clear that Animoto want your first experience to be a fast and simple one.
I appreciate this hand-holding, and it’s clear right from the start that the Animoto team understand their audience here:
we’re photographers with no video experience, and just want a fast way to post a video of our services that sells.
For the purposes of this review, I wanted to create an ad to promote a discount on engagement shoots in a quiet month for me here in Sydney.
Clicking on ‘View All’ allows me to view all the existing templates to choose from. Unfortunately there’s no search bar to filter the ‘promotion’ templates, but a quick Command/Ctrl-F later and I’ve found a template named ‘Seasonal Promotion’ which seems to fit the bill.
I like the ability to preview the video without leaving the browser window by hovering over it. So far so good.
Clicking ‘Choose Storyboard’ opens the main Animoto Video Maker project screen, where the current template’s photos and text are displayed in blocks. In another column there’s a selection of tools to edit the video, and a place to upload your own photos and videos.
It’s a good idea at this point to upload more photos than are required in the template, so that you have a selection to play around with on your Story Board.
I found upload speeds rather slow – whether this was to do with Sydney’s crappy Internet, or the fact that Animoto has to do some heavy behind-the-scenes processing of each file, I’m not sure.
It’s wise to resist the temptation to fiddle around too much with the existing template by adding more blocks or changing the order of video/text/images. Animoto have enormous experience in video marketing, so you can assume that their templates are all tried-and-tested for maximum conversions – let’s leave them alone for now!
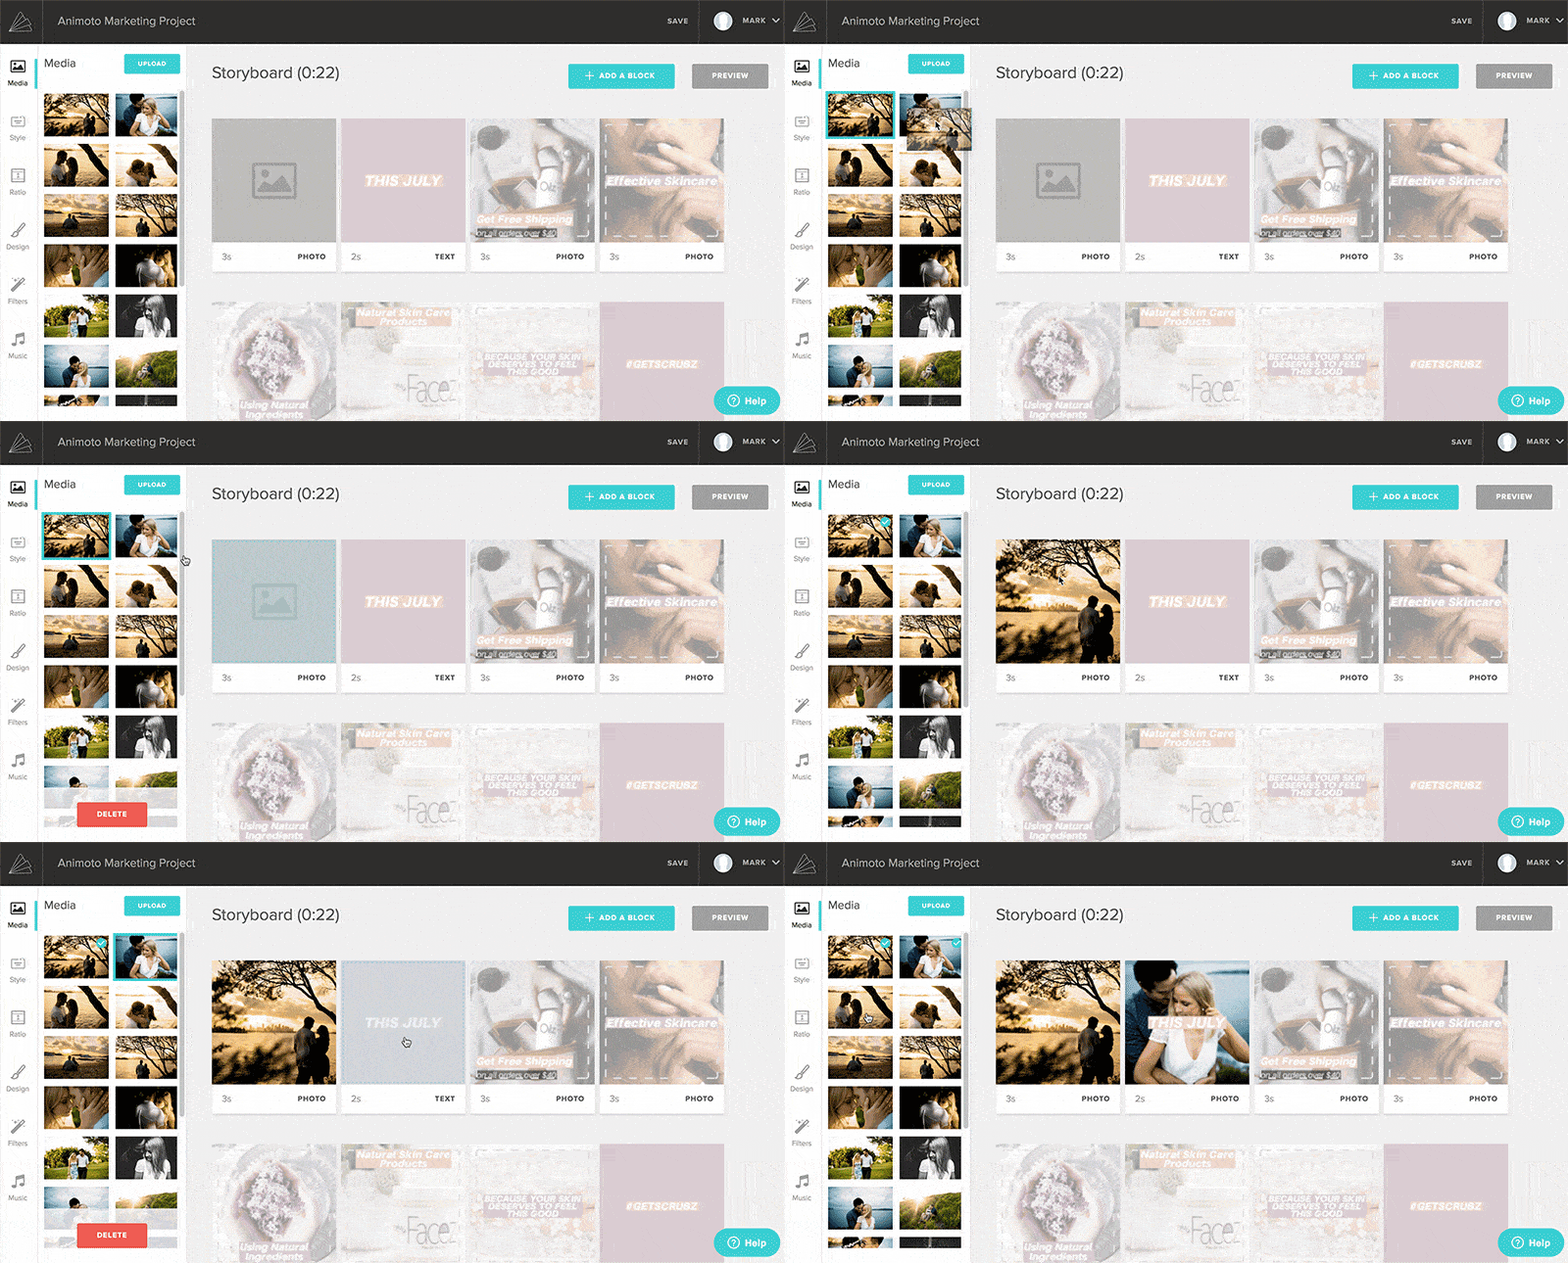
The user interface is all pretty self-explanatory, intuitive and familiar – anyone who’s used to dragging and dropping images in album building software will immediately feel at home with the Animoto storyboard.
One small niggle I had was that there’s no ‘Undo’ button, and Command/Ctrl-Z doesn’t undo your previous actions either. It took me a moment to work out how to swap my image from a block when I changed my mind – it’s simple when you know how (by clicking the icon of an image, then selecting the trash can), but I’d definitely prefer the ability to ‘undo’ actions with one click.
On that note, there’s a lot of helpful Animoto resources to guide you through the video creating process… but let’s face it, no one watches those! If you’re anything like me, you’ll want to jump straight in and start fiddling around yourself – thankfully, the interface is largely intuitive and simple to navigate.
It’s also, dare I say it, a lot of fun! Dragging images onto the story board, then watching as text and graphic overlays animate on top of them is pretty cool, and as long as you don’t overthink the process, you can go from nothing to an attention-grabbing video in minutes.
After replacing all image/text elements on the Story Board with your own content, you can preview a low-res version of your video, then click ‘Produce’ to finalise the project.
Animoto Video Maker Review | Using the video
After producing your video, the next screen you’ll see shows progress bars to indicate the processing of the different video sizes. It’s great to have the option of the 4 popular video sizes to be able to embed your creation right away on your website, export it to YouTube or to all the various social media sites.
You can also grab a direct link to your video, and hide the Animoto branding (both on the page and in the URL) as long as you are on a paid plan. I can see this being useful for videos you want to share with existing clients perhaps.
If you decide to embed the video somewhere, one nice touch is the ability to add a call-to-action button which appears as an overlay at the end of your video.
Take a look at my example video below, which took all of 5 minutes to make!
The option that we should be most interested with here though is the ‘Export to Facebook’ button.
After linking your Facebook account with Animoto, you can choose to share the video via your photography business’s Facebook Page.
Whether you intend to turn your video into a (paid) Facebook Ad or not, the first step is to share it (organically) to your Page.
Once the video is live, you can either leave it there on your timeline or hide it from view (if for example the video is to target only a specific audience), then use the ‘Boost’ option or Facebook Ad Manager to turn the post into an Ad.
[Check out this Facebook Ads Course for a powerful way to book clients for your photography business.]
Animoto Video Maker Review | Functionality
It’s tempting when using new software to start fiddling with every fancy tool available, or start from scratch in an attempt to control every variable of the process.
While this can be fun later down the track with Animoto, I’d strongly recommend sticking to the existing templates, and not delving too deeply into the additional Storyboard editing tools.
As mentioned before, the templates have no doubt been highly-optimised for marketing success. As long as you include powerful imagery and text that convey your branding and promotion in a clear, attractive way, you have a massive head-start on grabbing your audience’s attention.
Having said this, for the purposes of an in-depth review of Animoto, let’s have a quick look at the other functions available to really tweak your video creations.
From top to bottom in the editing column, there’s Style, Ratio, Design, Filters and Music.
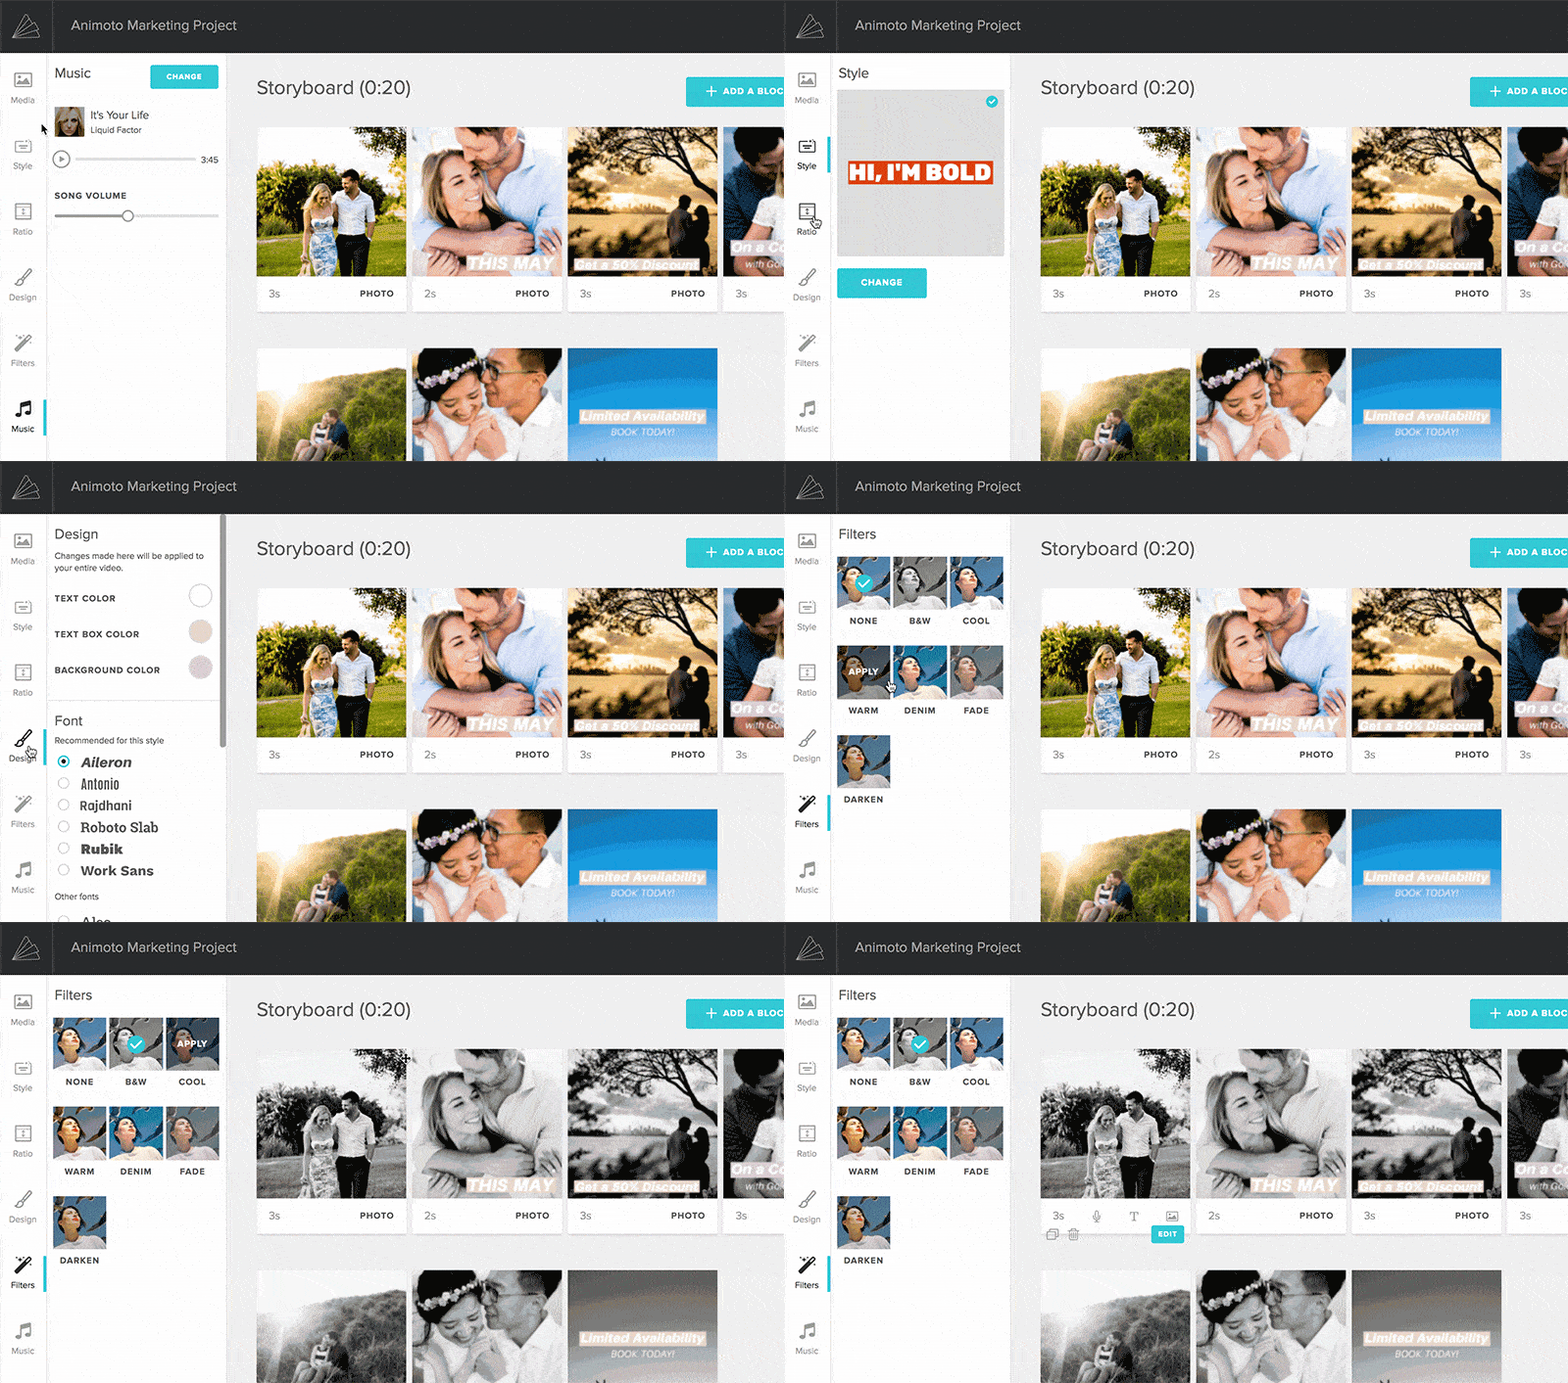
Style: the overall look and feel of the video. Thankfully Animoto doesn’t overwhelm us with options here.
Ratio: Landscape or Square. I’d stick with square unless you’re using the video solely on your website or on Youtube.
Design: Font options, where you’ll find the most commonly used Google Fonts.
Filters: B&W, Cool, Warm, Denim, Fade, Darken… A quick way to achieve a consistent look with your editing.
Music: As long as you’re on the Pro or Business plan, you’ll have 2,775 songs to choose from, including 25 from the Triple Scoop Music™ catalogue.
When using the templates, the ‘Music’ option was the only one I changed, and recommend you do the same.
Adding your own photos and customising the text is essential to create an alluring video that represents your brand, but choosing appropriate music is also quite important.
I say ‘quite’ since most viewers won’t even turn on their sound when viewing your ad, but for those that do, the music can be the cherry on top of the cake when it comes to grabbing attention.
You also have the option of uploading your own (copyright free) music, but with such a huge selection to choose from, there’s probably no need. That said, you’ll need to spend some time finding something that suits your video well.
Thankfully the search/filtering options are excellent, with options for music based on types of photography (wedding, pets, travel etc.) and mood (romantic, edgy, cinematic etc.)
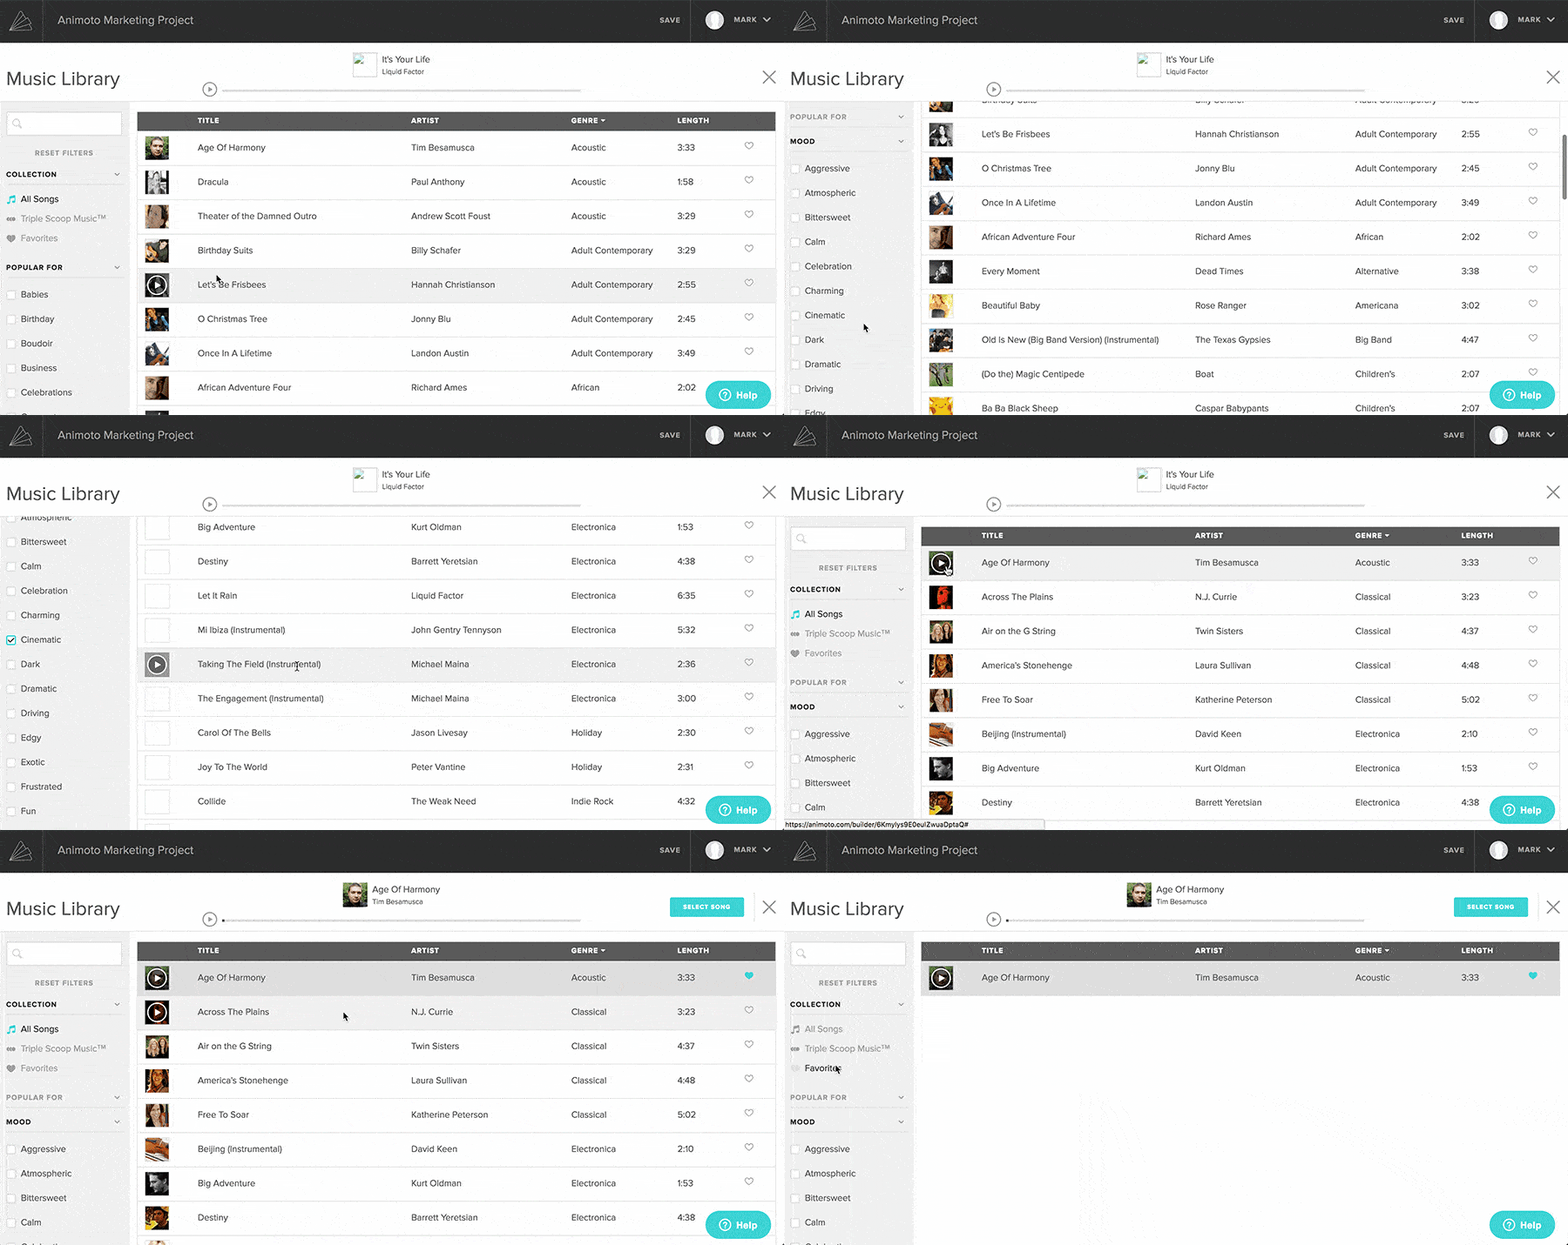
One thing to note is that there’s currently no option to trim the audio clip to select the portion you want to actually use in your video. Instead, you’re stuck using the initial portion of the song that matches the length of your video clip.
I’d like to see more options available here in the future with regards to flexibility in the audio editing, perhaps with a beat-matching option too.
However, this is really only for Animoto ‘power users’ who are perhaps experimenting outside the convenient, optimised state of the templates and the ‘top songs for this style’ audio recommendations that appear when selecting another song.
If you’re lucky, the original template music will match your message, making the entire Animoto video creation process fast and effortless.
Animoto Pricing
Animoto is a subscription service with 3 tiers depending on what features you need from it.
Most professional photographers like myself will probably need the ‘Professional Plan’, which includes the ability to remove the Animoto branding, square marketing videos (for Instagram), a license to resell the videos to consumers and other video/music customisation features.
You can save up to 50% on an annual subscription vs a monthly one, with prices starting at just $8/month. Check out all the Animoto pricing info here.
Whichever plan you choose, remember to use the Animoto code: shotkit
Animoto Review | Conclusion
I’ve really only skimmed the possibilities of using Animoto to create videos for your photography business.
Dragging and dropping images and replacing text and audio with Animoto is a fast-track way to getting your message in front of your audience with video, arguably the most powerful marketing medium available to us today.
If you have the time and know-how to create engaging video segments to add to your Animoto Storyboard, you can no doubt increase the efficacy of your marketing message, and create something that stops the scrollers in their tracks.
Incidentally, the Animoto blog is chock-a-block full of useful Facebook marketing tips on really getting the most out of your video creations. Despite Animoto being a ‘video maker’, it’s clear their focus also lies on helping you make money by using video to book more clients, or sell more products.
As with most software, the limiting factor is our own imagination. In the case of Animoto, all the tools and templates are there for us to create awesome videos in minutes – it’s up to us to tailor our message to our audience, and use the variety of marketing platforms at our disposal to achieve our goals.
The Animoto video maker is fast and simple to use. Its templates are a powerful tool to allow someone with zero video-production skills (i.e. the average ‘tog like you and me!), to produce something professional-looking and attention-grabbing.
If you’re tired of posting your images and messages to your Facebook business page and seeing terrible Reach and Engagement (Newsflash: Zuckerberg’s restricting organic reach even more in 2018!), Animoto could be your answer.
You could be one of the few using video to market your photography business on Facebook, and Animoto is the easiest and fastest way to produce great video content for social media that I’ve found.


