Understanding Post Processing Review
A review of the best tutorial on How to use Lightroom available today. Understanding Post Processing is a recommended Lightroom editing video course.
By Mark Condon
Before writing this review on Understanding Post Processing, I thought I knew how to use Lightroom to a high standard. Aside from writing a popular book on Lightroom tutorials, I like to think that much like most other pro photographers, I know a fair bit about Lightroom photo editing.
After all, to be a successful photographer in 2017, it’s just as important to be great at Lightroom editing as it is to be great with a camera.
Most of us start off with a set of free Lightroom presets which are all well and good, but to use Lightroom to its full potential, you’ll need to delve a bit deeper.
How to use Lightroom to its full potential
Much like all the other self-taught photographers I know, I learnt Lightroom by watching Lightroom tutorials on YouTube. There are so many Lightroom tutorials available for free that it seemed unnecessary to pay for a Lightroom editing course.
However, when you teach yourself something (especially with free material), there’s always the nagging feeling that you’ve missed something… or that there’s more to be learned that requires a deeper examination of the topic.
That’s why I decided to review Understanding Post Processing, a collection of Lightroom video tutorials that costs $100 $59 (there’s a discount on since I wrote this).
Let’s take a closer look to see if you agree with me that Understanding Post Processing is the best Lightroom editing course available in 2016.
A Review of Understanding Post Processing
Understanding Post Processing is a course structured around 10 Lightroom video tutorials recorded in HD by Mitchell Kanashkevich. It’s based on Adobe Lightroom 6, but all the principles are still relevant today with Lightroom CC and Classic.
I featured Mitchell on Shotkit eariler this year, which is how I came across his amazing work and punchy post processing style.
(If you want a shortcut to making your photos looking better, check out these free Lightroom presets.)
Mitchell charges hundreds of dollars for 1 on 1 Lightroom workshops, so I was interested to see how many of his secrets he chose to reveal in his Understanding Post Processing post processing course, which seems very good value in comparison.
The Lightroom Tutorials
The video tutorials which show you how to use Lightroom to its fullest potential consist of 10 high definition screencasts of Mitchell talking while he edits a selection of his travel photos.
You’re taken from a RAW, unedited image all the way through to the finished photo, which Mitchell usually sells to advertising companies or publishes in books.
Needless to say, it’s a very revealing look at the difference from before to after in the image creation process of a world-class travel photographer.
Each of the 10 Lightroom tutorials lasts 10-15mins and focuses on several unique lessons. An example of the contents of a couple of the 12 Lightroom tutorials can be seen below:
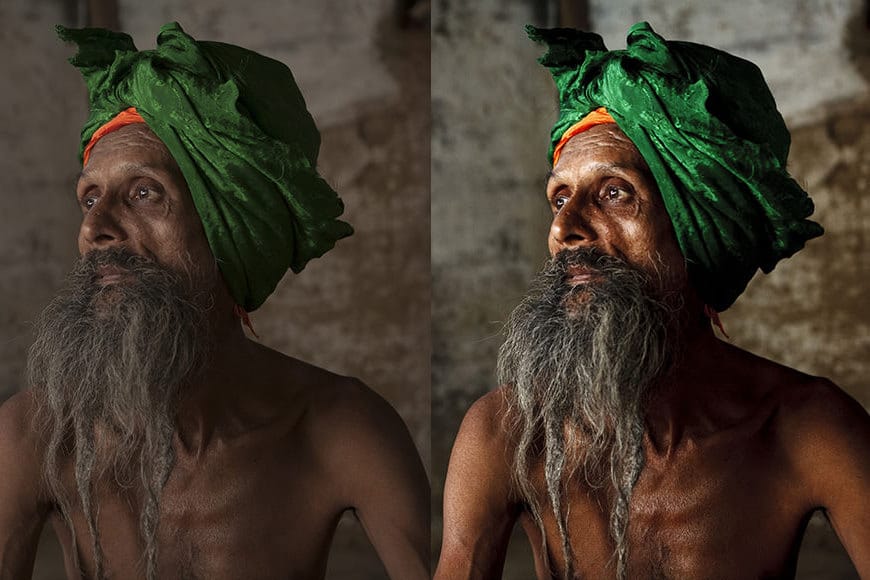
Lesson 3 – Lonely Wiseman
Areas covered:
- Creating a sense of volume in the face.
- Understanding how to use the Temperature slider to correct skin tones.
- How to make a portrait pop.
- Intensifying facial features and wrinkles.
- Bringing out detail in darker areas of the face in higher contrast situations.
- Bringing out detail in the clouds in a bright sky on an overcast day.
- Making a flat image with dull colors more visually engaging.
- Advanced expansion of the tonal range and preserving detail in high contrast scenarios.
- The difference between the easy way to expand the tonal range and the right way.
- Darkening the sky without darkening elements that are placed above the horizon.
The Lightroom Editing Experience
As I’ve been using Lightroom since Lightroom 1, I didn’t think there’d be many Lightroom tips and tricks I didn’t already know.
If you’re an advanced Lightroom user, you’re probably thinking the same thing – after all, Lightroom isn’t that complicated.
However, I can honestly say that during each video I was writing plenty of notes on ways to edit in Lightroom that I hadn’t seen before.
I think we all get stuck in a rut of editing our images in a similar way each time. Whether it’s via Lightroom presets or just sticking to what we know, it’s a good thing to learn how to use Lightroom in a totally different way.
It’s especially good if you’re a wedding photographer like me, to watch a travel photographer (or any other genre different to your own) edits photos in Lightroom. It gives some useful perspective on your editing process and let’s you see how to use Lightroom using new techniques.
The amount of information on how to use Lightroom for maximum impact in Understanding Post Processing is impressive, especially for a newcomer to Lightroom… and the inclusion of the RAW files realy takes the course to the next level.
This feature sets Understanding Post Processing way above all other Lightroom tutorials I’ve seen, and is what in my opinion completely justifies its price.
The Included RAW files
Bundled with the 10 in-depth Lightroom tutorials, Understanding Post Processing also includes the 10 RAW files that Mitchell edits in the videos.
The RAW files used to be a paid add-on to the course, but they’re currently included as a bonus, so now seems like a good time to buy the course for the reduced price of $59.
Most pro photographers are protective of their RAW files, not wanting to show the world their work before it has been edited.
In this day and age, a RAW file is almost like a half-finished photo after all.
I’m glad that Mitchell chose to include his 10 RAW files in the Understanding Post Processing course for 2 reasons:
#1 Before/Afters
With the RAW file, you have an honest and accurate ‘before’ image with which to compare the ‘after’.
This gives us an exclusive look at the original photo a top travel photographer takes, rather than the digitally enhanced version.
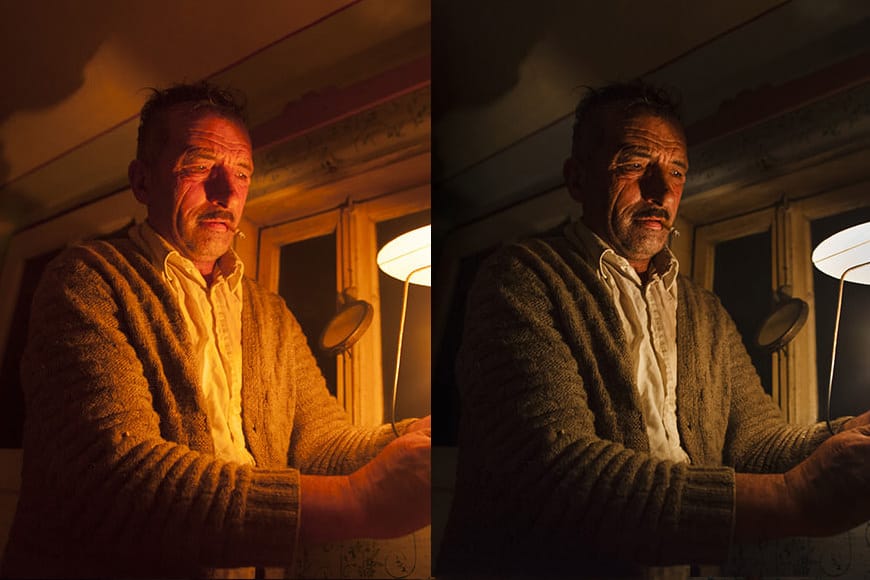
Image showing Before/After of Lesson 5 – Evening by the Kerosene Lamp
Seeing the difference of the before/after pictures really helps illustrate just what is capable with Lightroom photo editing… if you know what you’re doing!
#2 Practice makes Perfect
Benjamin Franklin famously said “Tell me and I forget, teach me and I may remember, involve me and I learn.” For anyone who’s ever watched a free Lightroom tutorial on YouTube, only to forget the next day, you’ll no doubt be able to associate with this quote.
Having the RAW files to practice on while you are learning new Lightroom editing techniques is the best way to improve your post processing skills and remember everything you learn to use on your own photos.
Click here to head over check out a sample video on the Understanding Post Processing sales page.
Usage Advice
Understanding Post Processing contains a lot of great advice on how to use Lightroom to its fullest potential.
Even if you consider yourself good with Lightroom, you’ll learn a way to edit something better or faster than before.
I recommend that you set up 2 monitors (or just one large monitor), with Lightroom on one screen and the Understanding Post Processing Lightroom tutorial on the other.

My desk set up when watching Understanding Post Processing
The videos are in high definition, so I recommend viewing in full screen so you can see all the detail in the photos.
Then take 1 of the included RAW files, and pausing the Lightroom tutorial, make the same edit as Mitchell makes, then watch a bit more, pause, edit and repeat. It’s basically like having a 1 to 1 workshop, with the advantage that you can rewatch it over and over again.
When you’ve finished the video, take one of your own RAW files and practice making similar edits. This is the key to making your newly acquired Lightroom editing skills stick.
What I didn’t Like
This being an honest review of Understanding Post Processing, I wanted to include a couple of minor niggles with this Lightroom editing course.
The first thing you may notice when watching the first video is that it was made using Lightroom 5. I’m guessing that the majority of photographers are using Lightroom 6 now, so the course seems a little dated.
Having said this, all the tools used in these Lightroom tutorial videos are available in Lightroom 6, so I guess it’s not really a big deal.
Another thing I would have liked is for Mitchell to tell us the various shortcut keys he presses while editing. Adobe provides a list of them here, but it would have been nice if the keystrokes appeared on screen during the video.
I also would have liked to hear more of the story behind the photos in the video, such as the technique used to capture them, etc.
I must admit it is interesting to see all the camera/lens settings in the RAW files in Lightroom though.
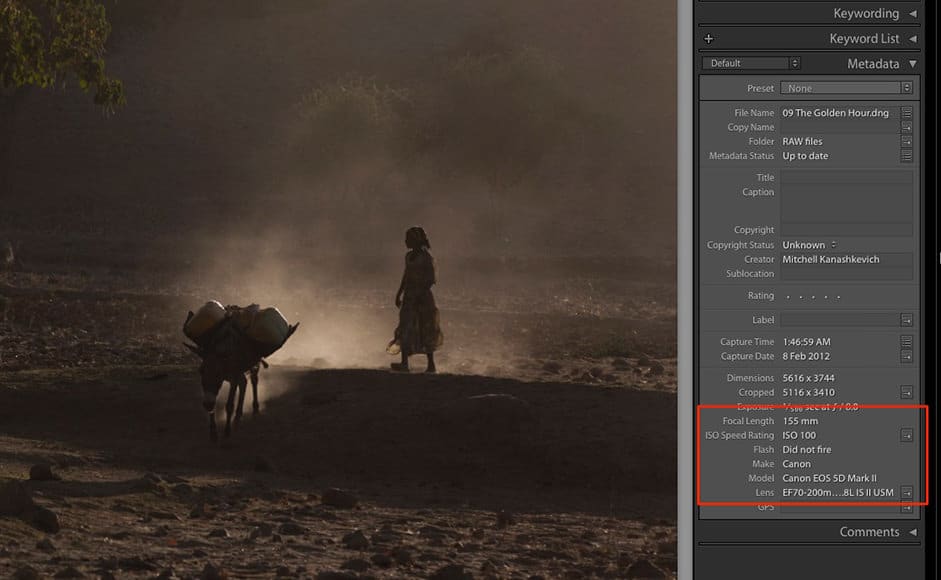
All the RAW files include the embedded EXIF data which show settings/camera equipment used.
Conclusion
Understanding Post Processing is an excellent video course on how to use Lightroom to create vivid, powerful photos.
However, its the inclusion of the RAW files really takes the product to the next level, and it’s something I’d like to see more Lightroom tutorials doing in the future.
The Understanding Post Processing videos are well-paced, informative and easy to understand. There’s lots of helpful info for both beginner and advanced Lightroom users, and I highly recommend you get a hold of a copy while it’s still on discount.
CLICK HERE TO GET A 41% DISCOUNT ON UNDERSTANDING POST PROCESSING


