How to Use Lightroom Noise Reduction
Removing noise in Lightroom is easy with this step-by-step guide for desktop or mobile. Plus find out pro tips for avoiding noise in-camera!
By Ana Mireles
Have you ever opened a photo on your computer and discover it looks all grainy?
Sometimes, even when a photograph looks good on the camera, once you see it on the monitor you discover it has some mysterious dots and grain that lower the quality of the image. This is called noise.
It’s happened to all of us, especially when we were out photographing in low light conditions. But don’t despair, you can easily fix this noise in post-processing using Lightroom – one of the best noise reduction software available.
Before we dive in to this guide to reduce noise in Lightroom, let’s look first at a definition.

Download the latest version of Adobe Lightroom to follow along with this simple tutorial.
Start a free 7-day trial today
What is Noise in Photography?

Credit: Sander Dewerte
If you’ve ever worked with film photography, you know that using a high ISO film results in grainy images. Well, noise is the equivalent of that in digital photography.
Sometimes this is desirable for a specific artistic effect. For example, there are many filters that add noise to your image to give it that vintage grainy photography look that emulates film photographs.
Most of the time though, it’s something that you’d want to get rid of – you may want to reduce noise because it’s distracting or just because it lessens the overall quality of your picture.
In any case, it’s important to understand what it is and what causes it so you can control it more effectively.
Noise usually appears when you shoot in low light situations. This is because some of the factors that can trigger it are underexposure, a high ISO, slow shutter speed for long exposures, and others that I’ll explain later when I talk about avoiding noise in-camera.
As a result, you might end up with a photograph that has these ‘spots’ with a different color or luminance than the surrounding pixels.
So, instead of having a smooth solid color and evenly lighted area, you have this grainy looking image.
Each camera performs differently in low light situations. Depending on the sensor, some cameras give you more or less noise within the same conditions.
In any case, if you have a noisy image, you should start by knowing what you’re dealing with.
There are two types of digital noise – color and luminance. Let’s take a closer look at them both.
Color Noise

This is the least desirable type of digital noise. You can recognize it because it creates different colored dots where there’s supposed to be a solid color.
For example, you might photograph a night sky but instead of solid deep blue to black, you see some random red or green spots.
If you’ve ever wanted to reduce noise in your image, it’s likely you’ve come across color noise before.
Luminance Noise

Luminance noise has nothing to do with color but instead is more about the brightness of each pixel.
I’m not referring to a smooth transition from light to dark, but single pixels that look like sand. This is the most common type of noise.
It’s also the one that you might want to use to create a film photography effect If you’re not looking for this vintage effect, however, you might want to reduce noise, or remove it altogether.
How to Remove Noise in Lightroom
There are many programs where you can perform noise removal – for example, you can do noise reduction in Photoshop. But one of the great things about using Adobe Lightroom is that it’s easy to reduce noise, and you have control over the type of noise you’re adjusting.
(There are also noise reduction plugins, noise reduction Photoshop Actions, or even standalone software whose sole purpose is reducing noise.)
Let’s take a look at Lightroom noise reduction.
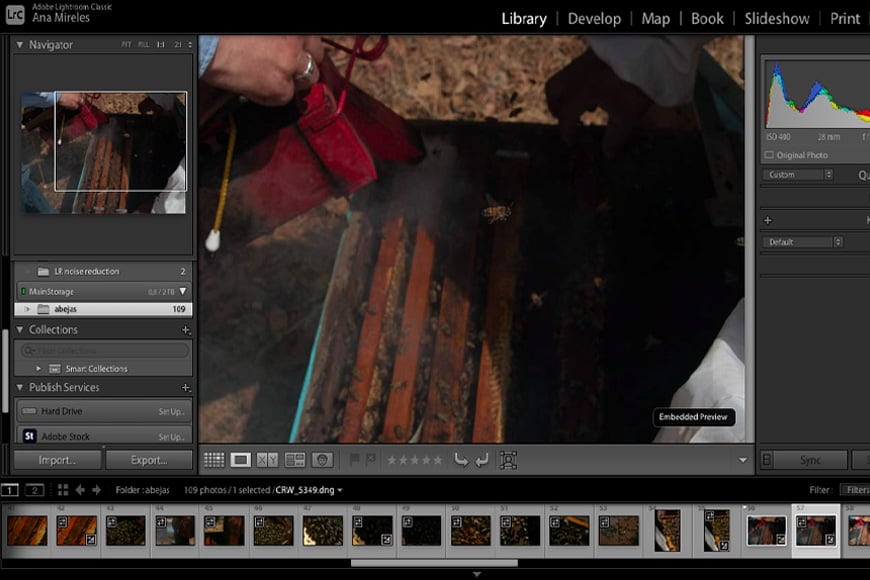
Step 1: Open your image
Credit: Ana Mireles
If you’re working with RAW files, which I strongly recommend you do, Lightroom will automatically apply some noise reduction to it.
Don’t worry, you can still adjust the effect further if needed. You can also cancel it and move the presets back to zero if you want to keep the noise for artistic effect.
Both things can be done in the same place, so whichever result you’re looking for, you can continue with the next steps to remove or reduce noise in Lightroom.
Step 2: Edit your photograph
When you import your photos to Lightroom, they open in the Library window. To do any edits you have move to the Develop module.
To reach it, simply click on the Develop option from the menu you’ll find on the top right. The editing panels will open on the right-hand side of the screen.
I always like to start with the overall edits of my image before adjusting the noise. I do this because other adjustments sometimes make the noise more or less evident than it is to begin with.
For example, if my image is too dark and I adjust the exposure in post-processing, I will be making the noise more visible.
This is just my workflow, but it’s totally fine if you prefer to do it the other way around and start with the noise removal. Do it whichever way gives you the best results to reduce noise.
Step 3: Go to the Detail panel
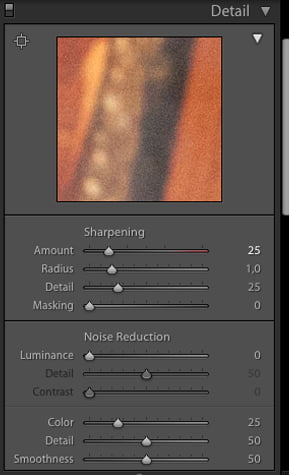
To remove or reduce the noise of your image, you need to open the Detail panel.
You’ll find it on the right-hand side, just like all the other developing tools. To expand it, click on the triangle/arrow icon.
In this panel, you’ll see a thumbnail with a zoomed-in area of your image. This is helpful because most of the time the noise is less visible when you’re zoomed out.
Then you have the section for Sharpening. This comes in handy because reducing the noise comes at a price; it will cause some blurriness.
Finally, you’ll have the Noise reduction section. This is divided into two because, as I said earlier, there are two types of noise and Lightroom lets you deal with each one separately.
The first part has three sliders: Luminance, Detail, and Contrast. This is of course dedicated to fixing luminance noise. The second half is for the color noise and it has sliders for Color, Detail, and Smoothness.
Step 4: Identify the type of noise

Each type of noise in Lightroom has different characteristics that make them easy to identify. The luminance noise is created by pixels that change in brightness, while color noise has pixels with random colors.
Keep in mind that your image can have both. If you’re not sure which type of noise you’re dealing with, drag the slider of one of them to the maximum, and see what changes. Then repeat this action with the other one.
Step 5: Adjust luminance noise
If your image has luminance noise, you’ll need to work with the first three sliders. As I mentioned before, Lightroom automatically applies some adjustments when importing a RAW file.
The sliders should now be Luminance at 0, Detail at 50, and Contrast at 0. The only one active at this point is the luminance and the other two sliders will be greyed out and you won’t be able to adjust them.
Don’t worry, you just need to move the luminance slider to activate the others. It doesn’t have to be a big adjustment, even changing it by +1 or -1 point is enough.
Ok, now you can start moving the other sliders until you find the result you want.
Remember that removing the noise also removes details. With the Detail slider, you can recover some of the sharpness, but it will also bring back the noise.
The same goes for the Contrast slider, so you’ll have to find a compromise.
Step 6: Adjust color noise
This time you’ll need the last three sliders to help remove the color noise in Lightroom. At the moment they should be Color at 0, Detail at 50 and Smoothness at 50.
This process works in the same way as the luminance sliders. You have to move the first one before you can move around the other two.
Again, try to find the right balance between the adjustments you make. In this case, you also have to keep an eye on the colors of the entire image because adjusting the color noise con also change other colors in the picture.
Step 7: Zoom out and check your image

While working zoomed in is advisable when you’re correcting the noise, it’s always good practice to zoom out every once in a while, and especially at the end, to see the overall results.
Noise Reduction in Lightroom Mobile

Noise reduction is also possible to do on your smartphone via Lightroom Mobile. This is a useful tool in general, but especially so because Lightroom Mobile has an integrated camera that allows you to shoot RAW images.
Regardless of whether you’re shooting on a digital camera or smartphone, RAW images have the greatest amount of information for you to edit, thus maintaining the best quality.
If you want your Lightroom Mobile camera to shoot in RAW, you have to set up the format DNG. This stands for Digital Negative and that’s exactly what it is. The raw information before processing is like a negative from film photography.
In any case, you can also do noise reduction on a JPEG image or an imported photo that wasn’t taken with the in-app camera.
So here’s how to do it: Once you open your image for editing, scroll through the menu at the bottom until you find the Detail option. Tap on that to open the slider controls.
It’s worth mentioning that this option is available in the free version of Lightroom Mobile as well, so you can do your noise reduction editing in Lightroom Mobile without having a Creative Cloud membership plan.
Back to the editing – the tools that you find here are the same as you find in the desktop section. You can do color noise reduction and luminance noise reduction.
Just use the sliders to adjust the noise as you would in Lightroom Classic following steps 4 to 6 above. Use two fingers to zoom in and out on your image for better results.
5 Tips for Reducing Noise In-Camera

Lowering your ISO is essential for reduce color noise. Credit: James Bold
Since reducing noise in your images during post-processing can cause a loss of sharpness, it’s much better to avoid the need for those adjustments in the first place.
Here are some tips to reduce noise in your photos as much as possible in-camera.
1. Lower the ISO
Calculating the exposure of your photograph depends on three factors: aperture, shutter speed, and sensor light sensitivity (otherwise known as ISO).
Most people tend to ignore the ISO setting and give priority to aperture if they need to control the depth of field or shutter speed if they need to control motion.
If you have a moving subject, or you’re not using a tripod and there isn’t enough light, you shouldn’t compromise the sharpness of your image. You can set the ISO higher but you do have to find the best balance possible for the situation.
What I mean is, don’t just leave it in auto mode, or pump the ISO up to the maximum just because the camera allows it. To reduce noise in your images you have to pay attention to your ISO values.
2. Don’t underexpose
Sometimes it’s easy to take the previous example to the letter and you end up underexposing the shot because you didn’t want to raise the ISO any higher.
It’s important to keep the ISO to the minimum value that you can, but also to always expose your image correctly.
If you underexpose to avoid the noise caused by a higher sensitivity and then try to correct it in post-processing, you could end up with much more noise to deal with.
3. Try in-camera noise reduction
Some cameras have a noise reduction feature built into them. This can be useful in some situations but maybe not always.
Like any other automatic setting, it has pros and cons. Yes, it’s useful, but on the other hand, you won’t have any control over it – some camera models have more aggressive noise reduction settings than others.
My best recommendation is that you try it in many situations and see when it’s useful and when it isn’t. Don’t just leave it on by default.
4. Get to know your camera
Every camera has its limits and performs differently under low light conditions. I can’t tell you that using an ISO over 800 is bad, or that you shouldn’t shoot with something over 1600.
Truth is, my camera may still deliver good images with settings that yours doesn’t or the other way around. It depends on the sensor.
How much noise is or isn’t acceptable is a little subjective depending on your taste and depending on the image itself. Some images look better than others with a little noise.
My advice is to just go out and shoot as many photographs as you can with different settings in multiple lighting conditions and get acquainted with your camera.
5. Research before buying
If you’re looking to buy a new camera and you know that you have to face low light situations on a regular basis, then go for a model that’s designed for it.
If you do a lot of night photography or you’re planning to shoot events like weddings or concerts, then you should get a camera that performs well in low light situations.
Before heading up to the shops, do your research. Look online for reviews and comparisons. There are many articles that show visual comparisons of the same scenes photographed with different camera brands and models. Make use of those.
And when you’re buying, don’t forget that a fast lens will allow more light into the sensor and will help keep the ISO values lower.
Lightroom Noise Reduction FAQs
What is noise reduction in Lightroom?
Noise reduction is a process for smoothing out pixels in order to reduce unwanted noise in your images. In Lightroom, the Noise Reduction sliders are located within the Detail panel.
How do you remove noise from a photo in Lightroom?
Open the Detail panel. Here, you can find sliders for Luminance and Color noise – you can play with these sliders to identify which type of noise is prominent in your photo. Now adjust the sliders as necessary. You can also adjust the Detail and Contrast sliders – these will recover some sharpness but also introduce more noise, so you’ll need to find a good balance.
What is the best noise reduction software for photography?
Lightroom is very capable at noise reduction, however, there are some dedicated software tools that truly excel at it. Topaz Labs Denoise AI is currently considered to be the best noise reduction software on the market. We have a full list of the best options here.
Noise Reduction in Lightroom | Final Words
Digital noise is something that we all have to deal with… unfortunately. On the bright side, it’s such a common problem that developers keep improving the software to fix it. Noise reduction in Lightroom is the perfect example of that.
Maybe it won’t be possible to completely remove noise from your picture, but Lightroom can reduce digital noise to a minimum. And throughout the years there have been upgrades in Lightroom versions to enhance this tool, so don’t forget to keep it up to date.
I hope I showed you in this article why Lightroom is one of the best choices on the market for making noise reduction easy and delivering the best results.
If you’re still not convinced, you can always buy some Lightroom plugins specifically for noise reduction as these will take the functionality yet another step further.
What’s your typical noise removal process? Do you use Lightroom noise reduction, or prefer an alternative method? Let us know in the comments.


