Vortex Storm Jacket Review
A review of Vortex Media's Storm Jacket Pro for professional photographers who need a camera cover that lets them photograph in the rain, snow, or dust.
This is a guest review of the Vortex Storm Jacket by travel and wilderness photographer Teryani Riggs.
I do a lot of photography along the Oregon coast, a place where it can rain a full nine months out of the year. That being said, my favorite month to shoot is often December when the winter storms and low sun angles can create amazing light.
…but shooting during the storm season also means frequently getting rained on.
When I had cheaper cameras, I’d often tried things like umbrellas (which pretty much only work when someone else is holding them and there’s no wind) and plastic bags (way unwieldy and difficult to use). Usually I just ended up ducking the camera back under my raincoat until the showers let up.
Once I upgraded to a more expensive camera, though, my desire to not have to worry about my camera in the rain rose considerably and I finally decided to try out Vortex Media’s Storm Jacket Pro.
It had the best reviews of all the rain jackets I looked at and was fairly affordable.
Vortex Media Storm Jacket Pro | What is it?
Vortex Media’s Storm Jacket is simply a waterproof nylon sleeve that fits over your camera to keep out rain, snow, dirt and dust. It’s narrower on the lens end than the body end, and has a drawstring at each end that you can cinch tightly.
The Pro version also has a velcro-sealed opening where your camera connects to a tripod. The Standard (and more inexpensive) version is just the sleeve without a tripod opening. (I’d recommend the Pro whether you use a tripod or not, as the same opening is perfect for reaching the controls with your hand.)
Beyond choosing between standard and pro versions, there are also five different sizes to choose from depending on the overall length of your setup: S, M, L, XL, and XXL depending on the length of the cover from front to back. (See below for the sizing chart.)
The width on all of these is the same – only the length changes. You can also choose from variety of colors.
Another plus is if you use side-mounted gimbals (i.e. the RRS PG-02 or the Wimberley Sidekick), they work just fine with the Pro model.
There’s not really much more to it.
Media Storm Jacket Pro | Design & Usage

If it’s just drizzling, I roll the Storm Jacket’s fabric back to see I’m doing and get my hands in there.
The design of the Vortex Media Storm Jacket Pro is quite simple. Deceptively so, actually. It’s basically just a nylon tube that fits over the camera and lens.
The ripstop fabric is lightweight, compressible and completely waterproof. (They even say it won’t melt, but I haven’t tried that.)
The drawstrings work well–when I had them correctly cinched, they didn’t slip even once. The velcro that seals the sides of the tripod slit together is almost annoyingly strong.
The back half, as mentioned before, is slightly flanged outwards to give a bit more room to the camera body (and your hands).
For storage, the Storm Jacket comes with a zippered pouch that you can use as a stuff sack. It has a clip on it and some photographers mention clipping it to your bag on the outside, but as I’m someone who’s often on a multi-day trip, the less wet individual pieces of gear get, the better.

Taking photos on a stormy day without worrying about my camera getting wet | HDR edited with Aurora HDR | f/6 ISO 100 | Sony a7III + Sony FE 16-35mm f/4 ZA
Sizing
One of the potentially more challenging decisions you’ll need to make when buying your Storm Jacket is which size to choose.
The instructions say to measure the length of your camera and lens setup, and then add on a couple of inches for good measure.
If you only have one setup, these are the general guidelines:
- Small — 11″
- Medium — 17″
- Large — 23″
- X-Large — 27″
- XX-Large — 31″
Being someone who switches between a short, wide angle lens to a 400mm wildlife lens in the same trip, I figured a “medium” was my best choice if I was buying only one.
It turned out to be rather huge for my wide angle setup, but strangely enough, the extra material really didn’t get in the way much and allowed me not to cinch the rear of the camera tight at all. (Leaving the back open gives more options for reaching the various control buttons.)
First Impressions
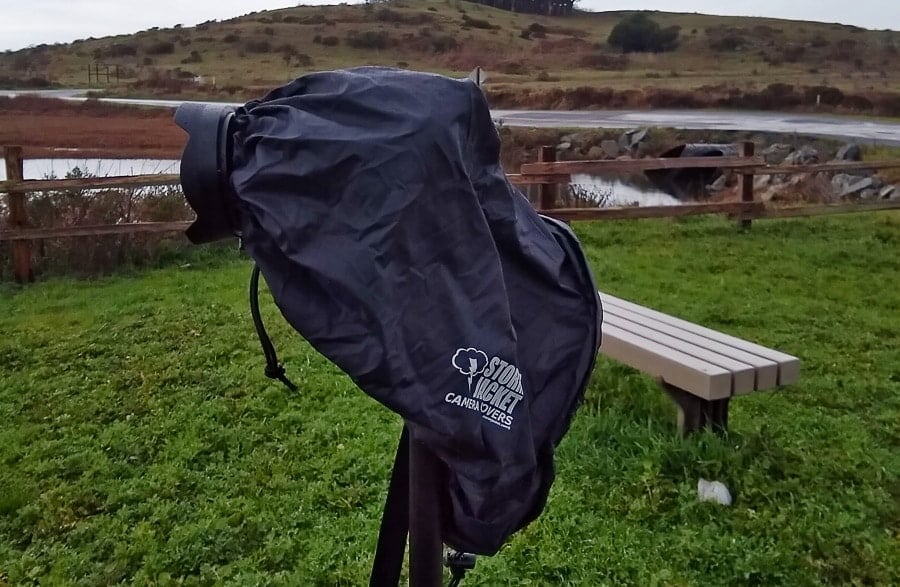
The Storm Jacket has one job to do and it does it well – keep your camera dry!
When my Storm Jacket arrived, I confess I was a bit disappointed. After all, it really is just a nylon sleeve with cinches at each end. I was really hoping it would revolutionize my time in the rain and this just looked so… minimal. And huge for my little mirrorless camera!
My main concern was whether I could easily shoot with it. Was I going to be able to reach my controls easily? View the LCD screen? Would the medium size even be workable on a small Sony A7 III and a short lens? I had my doubts.
On the plus side, it came in a small, handy, compressible package that took up next to no room in my pack. This was definitely appreciated. My camera bag is often packed to the max on these trips and I really needed something small and easily accessible.
So I dutifully packed it into my bag and headed off to Dunes National Park in the midst of a storm.
The weather was off and on, with 10-15 minute bouts of rain every 10 minutes or so. Sure enough, in the middle of shooting, a slight drizzle turned into a complete downpour and it was time for the Storm Jacket.
The first thing I noticed was that it definitely took me more than the advertised 10-15 seconds to get the it on. It easily took me 1-2 full minutes, especially since I was shooting with a tripod. (I’d recommend practicing at home first.)

I was only able to get this shot because I had a Storm Jacket on | HDR edited with Aurora HDR | f/8 ISO 100 | Sony a7III + Sony FE 16-35mm f/4 ZA
Once I got the Storm Jacket on, I fell in love with it. The front cinch strap was quite effective – it never moved from the place I cinched it to, regardless of how I carried the camera or moved around. You have to be careful to put it on in a way that won’t affect your focus ring, but other than that you’re good to go.
Access to the controls is a bit tricky. If you’re not using a tripod, you can reach a hand through the tripod opening. Otherwise the access is through the back.
What I especially liked was being able to walk from place to place and not worry about my camera getting wet. I left it on the tripod and hiked it all around the dunes.
In the past, I’d either duck the camera under my rain jacket or put it back in its bag. But the former only works for quick rain showers when you don’t have anything else to do, and the latter allows moisture to eventually get into the inside of my main camera bag.
So in the end, while I didn’t really need to be shooting during the rain like some sports photographers need to, being able to carry my camera on my tripod without ever having to think twice about it was simply amazing.
Special Considerations
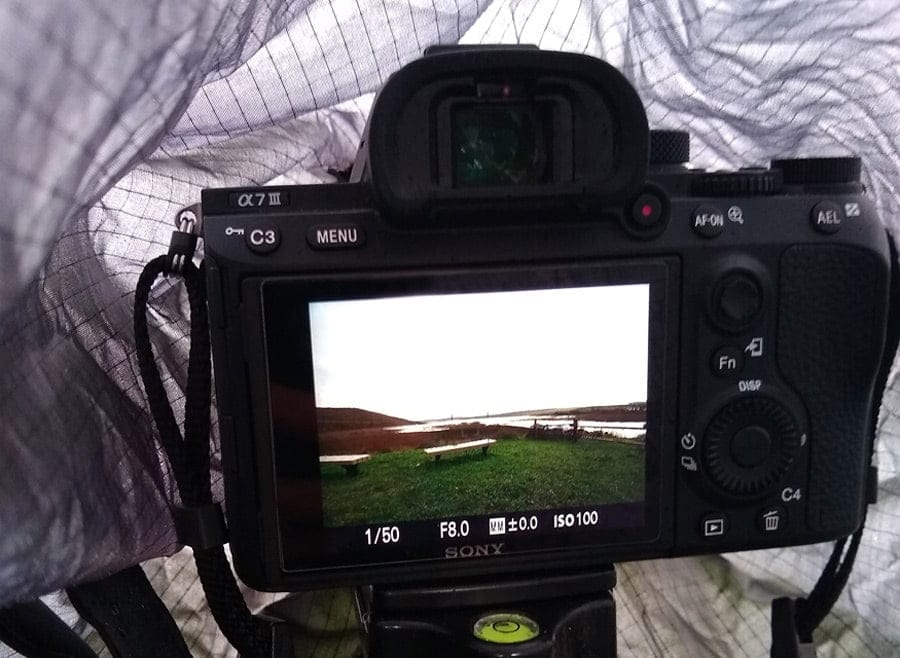
The view from underneath the Storm Jacket.
There are a few things to keep in mind when using the Storm Jacket.
Understandably, it’s going to be more difficult to operate a camera with a Storm Jacket on than without one, but it’s significantly easier than the alternatives (plastic bag, umbrella, missing the shot, etc.). While the back is certainly wide enough to get your hands in, it’s difficult to see what you’re doing without actually get your face in there.
With a setup that matches the recommended sizing, this isn’t a problem. The tie simply goes to the end of your camera and cinches down (or not). But if you’re using a short setup with a Storm Jacket that has a lot of leftover fabric, this can a bit of a hassle.
Luckily it was easy to roll the extra material up in between squalls. Or, if the rain wouldn’t let up, I would actually get my eye in there a bit. (See the photo above.) Still, it was a bit challenging to reach the buttons and adjust the focal length/focus manually.
Another problem with my Sony a7III was that when the wind blew, the fabric of the jacket would often blow across the EVF, triggering the camera to shift from the LCD to the EVF. This was hugely annoying.
Thankfully you can set most mirrorless cameras with eye-detection EVF’s to stay on the LCD in the menu system (which I promptly figured out how to do once I got out of the field).
On the user side of things, if you’re shooting and your lens is exposed make sure avoid pointing your lens into the wind/rain when you’re changing positions. I know this seems self-explanatory, but it’s extremely easy to forget when you’re moving around a lot. (Be sure to carry a cloth for wiping raindrops off your lens.)
This goes for waterfalls as well. I know it’s billed as a rain jacket that can protect your camera from waterfall spray, but there’s really no way to keep the spray off your lens if you’re pointing it at the water.
Also, if you’re not using a tripod you’ll probably notice that there are no holes for the shoulder strap of your camera to come through. Not wanting to go through the hassle of taking it off, I definitely found my strap getting in the way. Especially when it was really windy.
(It’s actually better to take the strap off when it’s windy, but mine doesn’t easily come off and I often alternate between using my camera hand-held and on a tripod.)
And if you use a hotshoe flash, you’re a bit out of luck. It won’t fit with just one jacket.
Vortex Media Storm Jacket Pro | Conclusion

Since I was shooting on a relatively short lens (Sony FE 16-35mm f/4 ZA), I rolled up the sleeve in between squalls.
Whatever the challenges, they seemed quite minor when compared to the safety and security of knowing that my camera was protected. Especially for someone like me who’d always used less than standard means to protect their camera, this truly provided a new sense of freedom.
As far as other camera rain jackets are concerned, the Storm Jacket compares quite well in both price and design, as well as ease of use.
At the higher end, the bomb-proof Think Tank Hydrophobia V3 ($114 – $149) is both much bulkier and more time-consuming to get on.
At the lower end, while the Ruggard P18 ($7-$11) is certainly better than not having anything at all, the quality of the materials is nowhere near that of the Storm Jacket.
There are, of course, many more models out there. But if you’re looking for one in this price range, you won’t be disappointed.
Teryani Riggs (they/them) is an adventure, who loves all things wild and free. Teryani can often be found in the midst of a social/eco-justice campaign, hiking through wild backcountry, or hitchhiking around the world listening to other people’s stories. While their focus has historically centered on landscape, travel, and wilderness photography, they’ve also been hired to shoot genres as varied as historical fiction reenactments in the studio to product and food photography.


