YouTube Thumbnail Size (Dimensions) Guide + 7 Tips for Creating Them
Discover what size to make your YouTube Thumbnails with this helpful guide which includes XX tips for making them look great, as well as the best free tools.
By Ana Mireles
Did you know that over 500 hours of video are uploaded to YouTube every minute?
Having high-quality content isn’t enough to stand out amongst all this competition.
You need to increase the number of views on your videos, get upvoted, gain more subscribers to your channel, etc.
Changing your YouTube thumbnail to a custom one can help you do this by increasing your click-through rate.
If you don’t think thumbnails are important, think about how you choose the YouTube videos that you watch: How much impact did the thumbnail images have on your decision?
In this article, you’ll find out how to enable customized YouTube thumbnails on your account, how to create them, the ideal YouTube thumbnail size and 7 hot tips to make them attract the most clicks.
So, if you’re ready to increase the number of viewers on your YouTube videos, let’s get started!
What is the YouTube Thumbnail Size in 2023?

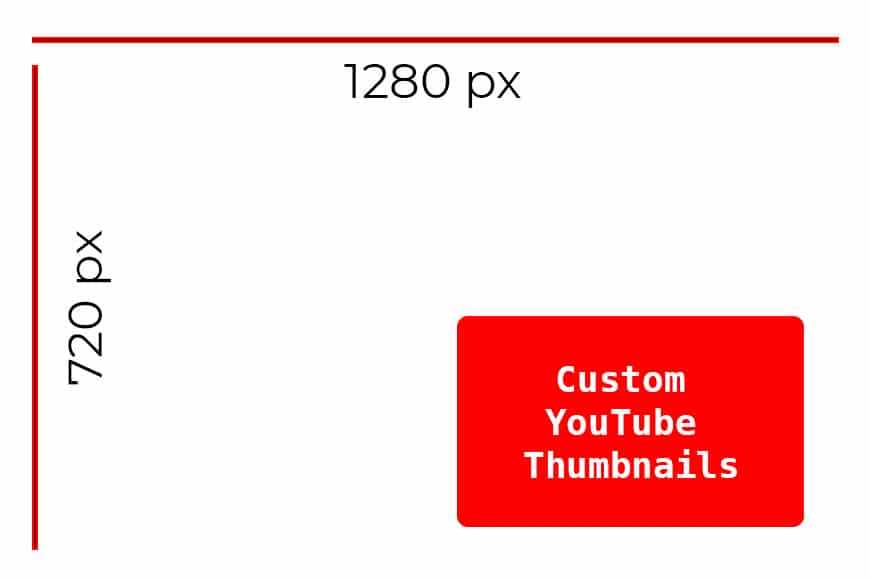
The best YouTube thumbnail size is 1280 x 720 pixels.
(While you can upload something bigger, you should ensure it preserves the 16:9 aspect ratio and doesn’t exceed the 2MB limit.)
Keep in mind that it won’t look any bigger, nor will it increase the quality – so, it’s better to optimize it on a third party program to fit the recommended size.
While you can upload a smaller custom thumbnail, YouTube will stretch it out and reduce quality. So, if you can’t use the best YouTube thumbnail dimensions for whatever reason, use a minimum width of 640 px.
Size is not all that matters, though – check out some of the best practices to make a YouTube thumbnail in the tips section in this article below. You may also find our guide to social media image sizes useful too.
What is the biggest size a YouTube thumbnail can be?
The maximum file size for a custom video thumbnail is 2MB. If you try to upload something bigger, it will give you an error message.
How do I get high-quality YouTube thumbnails?
For high-quality thumbnails for your YouTube video, you’ll need a well-exposed photo that it’s high-quality from the start.
Then, optimize it using a photo editing program following YouTube’s size recommendations – never use a photo smaller than 640 pixels or it will look pixelated.
How can I change the thumbnail size on YouTube?
You can’t change the thumbnail size on YouTube. If the image is too big (more than 2MB), it will give you an error message.
However, if it’s too small, it will automatically stretch it out to fit the required size – this will make the photo look pixelated and low quality.
Use a photo editor to change the thumbnail size before uploading to YouTube.
7 Tips for Creating Effective YouTube Thumbnails
1. Use a good photo
This might sound obvious, but it’s a key aspect to attract viewers. If your thumbnail image is too dark, or people can’t really understand at first glance what it is – they will keep scrolling.
Always start with the right foot by using a high-resolution photo that’s well exposed and composed – see our guides to photography exposure and composition.
Current cameras and phones deliver great quality pictures even in auto mode – of course, it’s better if you can learn some photography basics too so you can take full manual control on how the photo looks.
Otherwise, you can source photos from stock image websites – some of them are for free while others require you to buy the license.
Make sure you have enough contrast in the picture because that will make the subject stand out. You can do this by using contrasting colors or playing with highlights and shadows.
Also, choose photos that engage the viewer through emotion. For example, use a portrait whenever possible because a human element intuitively makes us relate to the situation.
Use action shots if they’re relevant to your content – they convey excitement and generate interest.
2. Follow the technical recommendations
Fortunately, YouTube is very clear on the requirements for custom thumbnail images – just follow these, and you’ll be good to go.
Here are the Youtube thumbnail dimensions and format requirements:
- Size – 1280x720px
- Aspect ratio – 16:9
- File format – PNG, JPG, GIF, BMP.
- File size – maximum 2MB
3. Less is more
Consider that YouTube thumbnail images are displayed small – especially if people are browsing on their phones.
A cluttered image will be confusing, and most people won’t waste their time figuring it out. You can use composition guidelines to improve your photos.
While you’re composing your photo for your YouTube thumbnail, add some negative space because you’ll need it for text and graphics – more about that in the next tips.
4. Consider adding text
Most YouTube thumbnails include text because it helps the viewer immediately identify what your video will be about.
Try to be concise and honest – nobody like click bait! That’s not to say that you can’t get creative. Think of something that intrigues people so that they want to know more about it.
The type, size and color of the font is also important. Make it big enough so that it’s easy to read and use a color that pops against the background – learn more about complementary colors.
Then, choose a font that fits with the content. For example, don’t use a very formal font if you’re doing a fun video for kids. Instead, use one that looks playful.
5. Add graphics to highlight information
While keeping in mind the ‘less is more’ rule, you can use graphic elements to organize or highlight the information on your YouTube thumbnail.
For example, you can use arrows to symbolize a transition if you’re showing the viewer that you will do a before and after transformation. Or, use price tags if you’re going to do a review or talk about an offer.
Your logo is another graphic element that could appear on your thumbnail. In general, the idea is that you keep a good balance between image, text and graphics.
6. Be consistent
All the choices you made before about the font, the composition, the graphics and the colors create a visual identity called branding.
When you start to use branding consistently, you’re helping your viewer identify you when scrolling through YouTube. This will help you to gain more followers and keep them coming back to your new videos.
It’s a good idea to create a series of templates that include your brand’s color palette, fonts and logos so that you can only update the info and use them for all your videos without wasting much time.
7. Be original
Using templates doesn’t mean that you can’t be original. Actually, there’s a lot of competition on Youtube in particular the ways people are using the thumbnail image to stand out.
So, make sure you stay relevant and stand out from all the other creators out there.
See what kind of YouTube thumbnail image your favourite influencers are using, and see if you can make a custom thumbnail that one-ups them ;-)
How to Create a YouTube Thumbnail: 3 FREE Tools

While YouTube offers auto-generated thumbnails, it’s best to take control and use a custom image.
Don’t worry – you don’t necessarily need to know how to use professional photo editors or graphic design software – you can still use a thumbnail template from any of the apps below.
The beauty of using an app to make thumbnail images is that the ideal YouTube thumbnail size will already be set for you.
1. Create a Custom YouTube Thumbnail Image with Canva
Go to www.canva.com or download the app and create an account or sign in if you already have one. You can do this for free and use any of the multiple templates and media available.
Otherwise, you can upgrade to a premium paid account and unlock all the content.
Use the search bar to save some time and type ‘YouTube Thumbnail’ – this will automatically show you all the template options.
You can also do a more specific search by adding extra keywords such as Food YouTube Thumbnail or Travel YouTube Thumbnail.
Choose the custom thumbnail image you like best, or use a blank canvas and add any available assets. Everything labeled as FREE can be used regardless of the type of account – if you see the crown icon, it’s only for Canva Pro users (the paid accounts).
Then, click on any element that you want to edit. You can change or add images, text, graphics and effects. It’s all very intuitive – you can create a YouTube thumbnail image in record time.
Once you’re done, you can save or share your design by clicking on the download or share icons on the top right.
Pro tip: if you think you’ll be making further edits outside of Canva, choose to save as a PNG so no further image degradation will occur.
2. Create a Custom YouTube Thumbnail Image with Adobe Express
Go to the Express website or download the Adobe Express app. You’ll need to have an Adobe Creative Cloud account to use it, but not necessarily a paid membership.
Click on the Plus icon and choose Custom Size Graphic from the drop-down menu.
Remember that the YouTube thumbnail size is 1280×720, so type 1280 for the Width and 720 on Height and make sure the measurement value is set to pixels (px).
Once the blank canvas is created, you can choose a template or make your design from scratch. Either way, you can use available assets from the program, upload files from your device or connect to Lightroom and your Creative Cloud libraries if you have them.
If you choose a template, just double-click on an element to open the edits panel and work on it. Instead, click on the Add button to incorporate different elements if you’re doing your own design.
Then, you can continue to edit them by double-clicking on them just like you would if it was a template. All the tools are easy to find and control, mostly with sliders, making them intuitive.
The great thing is that all your work gets saved and you can always come back to your designs and work on them again or use them as templates.
To do this, go to the Projects section where you can find all of them – you can organize them in folders to keep things tidy and easy to find in the future.
If you want to modify your YouTube thumbnail design, click on it, and you’ll open the edit page. If, instead, you want to use it as a template for a new design – hover over it and click on the three-dots menu that will appear.
Then, choose Duplicate. This will make a copy of the project that you can rename and use as a template without the risk of losing your original design.
In that same menu, you’ll find a Share option to invite people to collaborate on the design – this is only available on the desktop version and not on the app.
Once the project is done, you can export your project by clicking on the Download button. You can choose between PNG, JPG and PDF (beta).
They recommend PNG for the best graphics and highest quality. Keep in mind that this can increase the file size, and there’s a 2MB limit on YouTube – use JPG if you need it smaller. Then click on Start download.
Otherwise, you can choose the Publish option and post directly to Twitter or Facebook, or send your design via email or text message.
3. Create a Custom YouTube Thumbnail Image with Snappa
Go to the Snappa website and create an account. You can choose the starter plan for free, which will give access to a limited amount of assets – just like Canva and Adobe Spark.
However, unlike the others, it also limits your downloads to 5 per month – you can unlock unlimited downloads and assets with a PRO account or a TEAM account if you want collaborations.
Anyway, once you sign in, go to My Dashboard. You can simply click on the YouTube Thumbnail icon under the Social Media Posts menu to make things easier. Otherwise, you can input the graphic size manually.
This will take you to a page with all the available templates for YouTube thumbnails – and of course, the option to create a custom design.
Once you choose the one you like, click on it, and this will open it on the editor page. Most graphic editors have a similar template, so even if this is your first time using Snappa, but you’re familiar with another program, you’ll find it quite intuitive.
If this is your overall first time, it’s still very easy to use, and it has animated clues to guide you. For example, a blinking arrow hints you to start by adding a background by clicking on the top left icon of the editor and so on.
You can choose any of the photos and graphics offered by the program or upload your own. Then use the Effects tab to add an overlay, adjust the lightness and saturation, etc.
To edit any elements on the canvas, just double-click on them to select them and use the toolbar to modify them. You can name your design on the top bar and then save it using the Save button on the right.
This will save your YouTube thumbnail design in the cloud – if you want to save it on your device, use the Download button. There’s the option to save it optimized for web as JPG or save it in High-res as PNG.
How to Add a Custom YouTube Thumbnail to your Video
When you upload a video to YouTube, it will ask you to select a thumbnail. By default, it offers three auto-generated choices or the choice to upload your own custom thumbnail image.
Click on Upload thumbnail to add a custom one – this option is only active if you have a verified account. If your account is not yet verified, and you want to enable the option to upload custom thumbnails – follow these steps.
Access your YouTube channel. Then, click on the Customize Channel button on the top right. On the channel customization page, look for the gear icon on the left toolbar – that’s the settings option. Click on it.
Here, go to the section Channel and find Feature eligibility and click the Verify by Phone. Unfortunately, giving your phone number is the only way of verification at this time.
On the next page, select your country and choose a method of verification. You can receive a verification code via text message or a phone call with an automated message telling you the verification code.
Input your phone number and wait for the verification code. Then enter the code and click submit. This will enable custom thumbnails and other features that were previously unavailable to you.
Now, if you want to add your own YouTube thumbnail to a previously uploaded video, go back to your YouTube studio. Then select the Videos option to display the videos you’ve uploaded.
Select the video you want to upload the custom thumbnail image and click on the pencil icon to edit it. Scroll down to the thumbnail section. Then click on upload thumbnail.
If you want to change a YouTube thumbnail image you already had, click on the three-dots menu and click on the Change button. Finally, save the changes by clicking on the Save button on the top right.
Final Words
Hopefully, this article helped you clear some doubts about YouTube video thumbnails. Using custom thumbnail images can dramatically increase the click-through rate, so make sure you start using them!
Remember that it might take some time to find the right style that fits your brand and attracts more followers. Try out some different choices, analyse the data of views and impressions and make changes if it’s not performing well.
After some trial and error, you’ll start to understand your audience, and you’ll notice the difference in performance.
You should also take note of any YouTube thumbnail images that leap out at your when you’re next browsing the platform – this way you’ll get a better idea of what design to use in your next video.
Above all, adhere to the perfect YouTube thumbnail size guidelines in this article. I wish you lots of success in your YouTube channel!
Share your own tips and tricks about custom YouTube thumbnails in the comments section below.


Check out these 8 essential tools to help you succeed as a professional photographer.
Includes limited-time discounts.


