How to Use Grids & Guides in Photoshop
Ever wanted to create a collage of your photos in Photoshop? Or maybe you're designing a flyer or invite. Discover how to use grids and guides in this tutorial.
Ever want to create a printed layout of your photos? Maybe a collage or a flyer, or even a small zine?
Perhaps you’re getting into graphic design for the web?
If so, learning how to use Photoshop’s grids will be a game-changer, both in terms of aligning objects effortlessly and in terms of creating a well-balanced, beautiful layout.
In this guide, we’ll take a closer look at what a grid is for, how to create one in Photoshop, and a few tips to help your design projects really shine.
Before we dive in, do you need to buy Photoshop? Check out how much it costs.


Download the latest version of Adobe Photoshop to follow along with this simple tutorial.
Start a free 7-day trial today
What is a Grid in Photoshop?

A grid can make it easy to set and align your images exactly the way you want them.
A Photoshop grid is a non-printing set of grid lines that serve as a guide for arranging elements on a page.
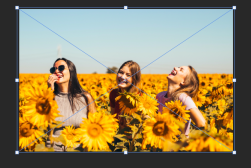
For example, the blue lines in the image above create a simple 3×3 grid making it easy for me to place my images correctly. Think of it in terms of graph paper, except far more flexible.
One thing that’s great about Photoshop grids and digital grids in general is that they’re highly customizable. You can set them up in a variety of patterns and layouts. The 3×3 grid is a popular choice, but there are millions of different options.
Depending on what you’re designing, you can either create a new Photoshop grid each time or save your grid as a preset for future reuse.
What is a Photoshop Grid used for?
First and foremost, overlaying a grid on Photoshop documents will help you line up the different elements exactly, without any guesswork.
All you need to do is set up the size of the different elements to match the grid areas you want them to fit into.
Grids also help keep your content organized and make it easier to collaborate with other designers.
They can also help you balance your design. Just like in photography, the elements of a web page or other graphic design projects need to be placed harmoniously within the frame you’re working in.
Using a grid will help you see exactly where things are in relation to each other.
In the past, landscape and architecture photographers used a grid in Photoshop to straighten buildings and horizons, but these days that’s easier to do in other photo editing software.
How to Make a Grid in Photoshop
As with most things in Photoshop, there are a few different ways to make a grid – you can even create them using Photoshop Actions.
We’ll start with the most obvious method – turning on Photoshop’s grid overlay.
Step 1 – Add a Grid to Your Document

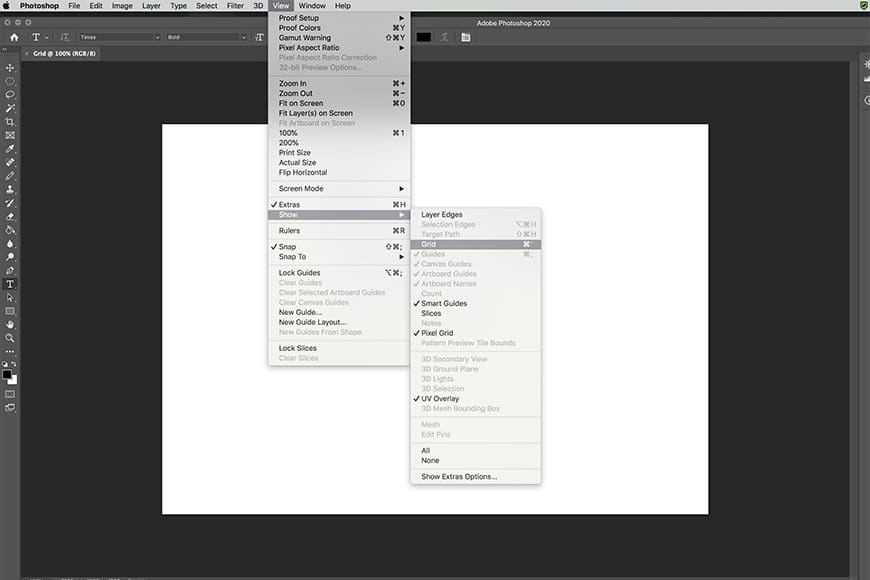
To add a grid to your document, go to View > Show > Grid
Open a file or create a new one. In the View menu, navigate down to Show and then click on Grid.
A set of squares divided into smaller squares made of dotted lines will appear.
Step 2 – Customize Your Grid

A standard Photoshop grid looks just like graph paper in days of old. Unlike paper grids, however, we can effortlessly change how our grid looks by going to the preferences tab and dialing in your settings.
On a Mac, in the Photoshop pull-down menu go to Preferences > Guides, Grid & Slices.
In Windows, go to the Edit menu, then to Preferences > Guides, Grid & Slices.
A new window will appear with options for changing the colors of the grid lines, whether they’re solid, broken, or dots, the distance between them, and how many subdivisions are present.
For example, if you want to make a rule-of-thirds grid, set the Gridline Every to 100 percent with 3 subdivisions. Simple!
Step 3 – To Snap or not to Snap

Photoshop has a feature that, if you like, can help you place objects inside a grid by “snapping” them into place.
To turn on snapping, go to the View drop down menu and hover over Snap To and click on Grid.
Now objects will “snap” into place on the grid.
Not everyone finds this feature helpful, so play around with it both on and off and see which one works best for you.
Step 4 – Check Your Design
Once you’re finished placing elements within your grid, turn it off (under View > Show > Grid) and see how your design looks without it.
Remember, grids in Photoshop won’t show up when printed. They’re just there to guide you. If you accidentally leave one on, it won’t make a difference in your final image.
How to Use Photoshop Guide Layout to Make a Grid
If you want more control over how your grid looks, try using Photoshop’s guides. The Guide Layout feature, in particular, is especially helpful. Here’s how to use it.
Step 1 – Add a New Guide Layout

Open a file or create a new one. In the View menu, click on New Guide Layout.
Step 2 – Customize Your Guide Layout

This is the set up for a simple rule-of-thirds layout. You can, of course, make the grid much more complex by specifying size and adding gutters and margins. It all depends on what your project needs.
Once you choose New Guide Layout, a new dialogue box will appear. In it you can set a variety of parameters for your layout.
If you’re not working from a preset, start by setting the number of columns and rows.
Next, you can either specify the width/height or, if you leave them blank, Photoshop will space them out equally for you.
If you’d like spacing between the cells, add a gutter. You can also add a margin along the outer edges of the document.
If you don’t want any pre-existing guides to show up, check the Clear Existing Guides box. If you want the columns to be centered in the document, check the Center Columns box.
Here, if you’d like to make a rule-of-thirds layout simply add 3 columns and 3 rows, leaving the width, height, and gutter blank. Then check Center Columns and hit OK.
You can even use the Guide Layout in tandem with a grid, if you’d like things to be even more precise.
Step 3 – Set the Other Features
If this is a layout you plan to use repeatedly, saving it as a preset is the way to go. Simply go up to the drop-down menu under Preset and click Save Preset.
Also, if you like the snapping feature we mentioned in the Photoshop grid instructions above, go to View, hover over Snap To and click on Guides.
Tips on Using Grids in Design

When using multiple portraits, pay attention to where the models are looking.
1. Stay out of the Gutter
Gutters are meant to provide empty space between your elements. It’s fine to cross over them if your element spans multiple columns, but make sure you begin and end at the edge of a column or row – not in the gutter itself.
2. Keep your Design Responsive
If you’re creating something for web and/or UI, you’ll want to make sure your final image will be scalable across a range of devices and screen resolutions (i.e. responsive).
Designs that use a 4px or 8px grid will turn up crisp and clear on everything from a low resolution screen to a high resolution retina screen.
3. Pay Attention to Composition
While standard grids are easy and quick, they don’t work for every project. Take the time to consider how each of your elements will interact with each other and choose your grid accordingly.
Even when doing something that requires a standard grid (i.e. Instagram), which element you place where will have a big impact on the final outcome.
For example, if you’re working with images of people (like the one above), it’s best to have them looking into the image, not into the frame.
Final Words
While grid systems have been used pretty much since humans started writing and drawing, today’s responsive web has us using grids more than ever before.
In the end, grids have so many uses for graphic designers, that learning to create a grid in Photoshop projects is one of the first skills budding graphic designers should learn.
(As you can see, the number Photoshop grid is actually really useful for photographers wanting to showcase multiple images too.)
From creating a guide for aligning and balancing your designs, to helping you create interesting effects (i.e. diagonal text), a grid is much more than mere lines on a page.
What about you? Do you use grids in your Photoshop projects? Have any more tips to share?


Download the latest version of Adobe Photoshop to follow along with this simple tutorial.
Start a free 7-day trial today


