How to Crop an Image in Photoshop (In 4 Simple Steps)
Learn how to crop an image in Photoshop using the crop tool, plus useful cropping tips including how to crop to exact measurements
By Judyth Satyn
Are you ready to print off some of your favorite snaps, but their measurements don’t match the print requirements?
Or do you have an image that would look ten million times better without the distracting backdrop?
Cropping an image can bring focus to a subject that is otherwise lost in a vast expanse of unnecessary background.
In this Photoshop tutorial, you will learn how to crop an image using the crop tool.
Plus you will learn additional cropping tips, how to crop to exact ratios and how to freestyle crop to create your own crop border.


Download the latest version of Adobe Photoshop to follow along with this simple tutorial.
Start a free 7-day trial today
How to Crop an Image in Photoshop (In 4 Simple Steps)
Cropping images in Photoshop is easy and quick when you use the crop tool.
Step 1 – Open your image
To crop images, you will need first to Open an image, select an image and open it in Photoshop.
To use the crop tool, your layer or image does not need to be unlocked, the action of cropping will unlock your image.
When you crop a layer in Photoshop you will crop the entire canvas, you cannot crop a single layer using the crop tool.
If you need to alter the size of a single layer in Photoshop, check out this tutorial – How to resize an image in Photoshop.
Step 2 – Select the Crop Tool
When you have opened your image, navigate to the toolbar on the left-hand side of the image window and select the Crop Tool.

Or use the keyboard shortcut by pressing C.
When the Crop Tool is selected a Cropping Border will surround your image and the Crop Tool Options Bar will open above the image.
Photoshop will automatically reload the previous crop tool settings in the Options Bar.
If you used the Perspective Crop Tool or a Crop Ratio, the last time you cropped an image, these will reappear.
The previously selected Crop Border Grid used to guide you while editing, will also reappear.
Step 3 – Reset Crop Tool Settings
To reset the Crop Tool settings navigate to the top right corner of the Options Bar and click on the Reset button, a reversed arrow icon.
![]()
The crop tool will now be cleared of settings so you can enter your setting preferences for cropping images.
To change the Grid preference inside the Crop Border, navigate to the Options Bar and open the drop-down menu under the grid thumbnail.
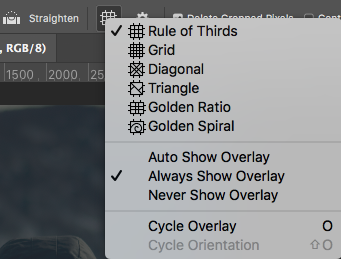
You can now change the crop border’s grid to your preferred setting, a golden spiral, diagonal, triangle, or no grid.
Step 4 – Crop
A – Using the Crop Tool
To crop your image manually hover your cursor over the crop border until the arrow icon appears, the arrow will indicate which way you can move the crop border.
Press down and Drag the Crop Border to create the new image size.

If you want to keep the aspect ratio of your original image, Hold the mouse button or cursor and press the Shift Key while dragging the crop border.
When you achieve the desired canvas size press, Enter and your image will instantly be resized.
To permanently delete the pixels outside the border of your newly cropped image, Tick the box beside Delete Cropped Pixels in the Options Bar.
![]()
Now you have all the information you need to crop an image in Photoshop, time to get those photos printed!
How to Crop in Photoshop to a Specific Shape
When creating a presentation or using images for display on a website, you will need them to fit just right, no extra millimetres allowed.
If you have lots of images to crop it might be worth creating a Photoshop action for the task.
You can use the Aspect Ratio Menu to crop an image to an exact size, this is useful when your final image needs to fit precise measurement requirements.
Enter the ratio numbers in the Aspect Ratio Menu above the canvas window in the crop tool Options Bar
The aspect ratio menu gives you a choice to enter the aspect ratio in Pixels/in or in Pixels/cm, make your choice and enter the new measurement.
When an aspect ratio is entered a crop border will appear over your image, you can reposition this crop border by dragging the framed area with your cursor.
When you have chosen the cropping area for your image, press Enter and Photoshop will automatically crop and resize your original image.
I hope you found this tutorial on the crop tool in Photoshop easy to follow.
If you’ve had a play around with the free Photoshop trial and are ready to subscribe, here’s the best way to buy Photoshop.
And here are some more related articles about cropping images:


