How to Rasterize in Photoshop (and When to do it)
Learn how to rasterize images in Photoshop, a useful technique for editing and manipulating images, especially when working with text and shapes.
By Judyth Satyn
Before you learn how to rasterize in Photoshop it is worth knowing why you would create a raster in Photoshop.
In Photoshop, graphics are made of either rasters or vectors.
Vector images are made from shapes, lines, and curves, and will retain their image quality and crisp edges no matter how much you zoom out or in.
Raster images are made from square pixels and are lower quality than vector images.
When vector images are rasterized, they are converted from vectors to pixels.
Shapes and text layers are created as vectors in Photoshop, but some Photoshop tools only work on raster images, such as the paint bucket tool, clone tool, smudge tool, and eraser tool.
It is impossible to use these tools when editing a vector image or vector layer. Thus, you will need to change the layer to a rasterized layer.
With this tutorial, you will learn how to rasterize in Photoshop to give you the freedom to use any Adobe Photoshop tool.


Download the latest version of Adobe Photoshop to follow along with this simple tutorial.
Start a free 7-day trial today
How to Rasterize an Image in Photoshop
Ever tried to use the eraser tool only to be met with the heavy clonking sound of an irritated computer?
A pop-up window will appear, warning you that your vector layer will be converted to a raster image if you proceed.
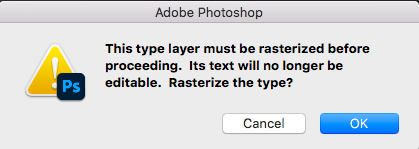
Most photographers and graphic designers are grateful for the pop-up warning, as they will do anything possible not to convert their vector layer into a raster image.
But truthfully, raster images will suffice for most projects unless you want to blow up your raster image to billboard size.
Let’s start.
Select the Vector Layer you wish to rasterize in the Layers Panel.
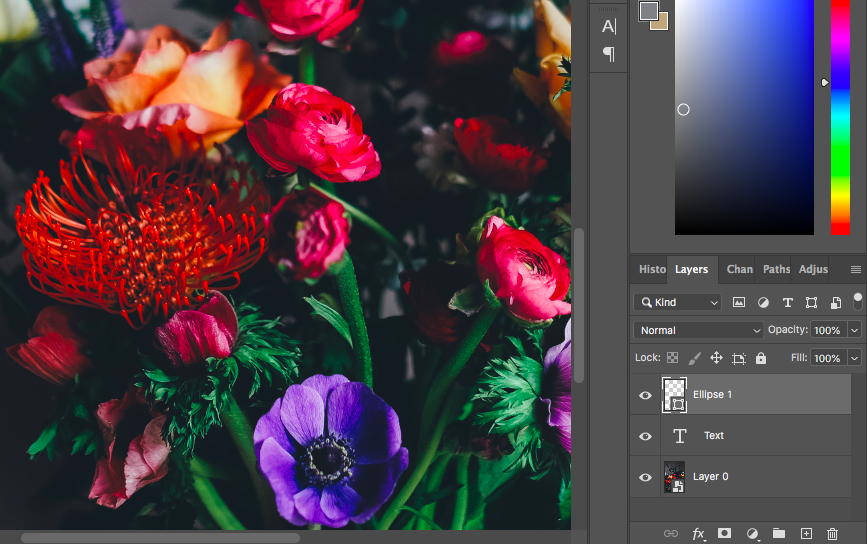
Duplicate the layer or image.
Although it is not necessary to duplicate your layer, it is a good idea to have a backup copy of the original vector layer as it is not possible to reverse rasterization after saving
To duplicate the vector layer, navigate to the top menu bar, select Layer > Duplicate, or click on the Add Layer Icon at the bottom of the Layers Panel.
To rasterize a layer, select Layer from the menu bar, choose Resaturize > Layer
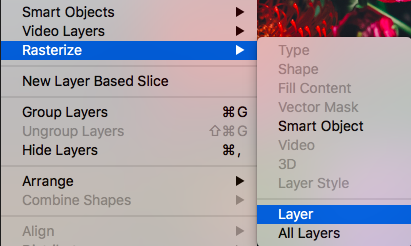
If the Vector Layer you wish to rasterize is a Type Layer, Smart Object, or a Shape Layer, Photoshop will offer you this as an option besides Rasterize.
Photoshop will offer you the option to rasterize Fill Content, use this if you wish to rasterize only the fill (solid color, gradient, or pattern) of a shape.
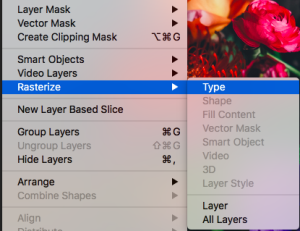
When a layer’s Vector Mask is rasterized it will be transformed into a Layer Mask in the Layers Panel.
You can choose to rasterize all layers at once by clicking the All Layers option.
Selecting All Layers will rasterize all layers containing vector components in the Layers Panel.
Once you have changed your image to a raster image, you will be able to use Photoshop tools restricted to raster images.
Use Photoshop’s Zoom Tool if you want to see the Pixels in your image.
There are a couple of quick sneaky tricks for changing these vector layers to raster layers.
How to Rasterize Text in Photoshop
In Photoshop, you can rasterize text by right-clicking on the text layer in the Layers panel and selecting “Rasterize Layer” from the context menu.
This will convert the text into pixels, making it editable as a regular image.
You can also use Layer > Rasterize > Type to achieve the same result.
Remember that rasterizing text means that the text can no longer be edited as text, so it’s important to make any necessary adjustments before rasterizing.
How can you undo rasterize in Photoshop?
To undo rasterizing in Photoshop, navigate to Layer > Rasterize > Smart Object to convert the rasterized layer back into a Smart Object.
This will allow you to edit the original vector data again.
You can also try Edit > Undo to undo the previous rasterization step.
If you have already saved the file and closed it, click File > History to restore the previous version.
How do you undo and redo in Photoshop?
Why can’t I rasterize a layer in Photoshop?
If you can’t rasterize a layer in Photoshop, here are 4 reasons to help you troubleshoot:
- The layer is already rasterized
- The layer is a background layer: Photoshop background layers cannot be rasterized. You will need to convert the background layer to a regular layer first by double-clicking on the background layer and then clicking ok in the new Layer dialog.
- The layer contains a Smart Object: Smart Objects cannot be rasterized directly. Right-click on the Smart Object layer, then go to Layer > Rasterize > Smart Object.
- Photoshop is not working properly: Try restarting Photoshop, check for software updates and make sure your graphics card driver is up to date.
Is Rasterizing the Same as Flattening?
When you flatten an image, you will merge all the layers in the layer panel down to compress them into one single layer.
Although the result of this will be a raster image, it is not, in essence, the same as a raster image.
When you change a vector layer to a raster layer, you will be editing a single layer or image.
The other vector layers or raster layers in the layers panel will remain as layers, you will not merge them into a single layer.
If you enjoyed this PhotoshoptTutorial, check out another excellent tutorial on how to create the vignette effect.


